The Timeless Appeal of Handmade Correspondence
In today’s digital age, receiving a physical letter feels incredibly special. Emails and text messages are instant, but they lack tangible weight. A handwritten note carries emotion. Furthermore, the vessel holding that note matters greatly. Learning how to make an envelope elevates your correspondence from simple communication to a cherished gift. It shows the recipient that you care deeply. You invested time and effort.
Moreover, making your own stationery allows for limitless creativity. You are not restricted to standard white sizes found in stores. Instead, you can choose patterns, textures, and colors that reflect your personality. Consequently, this creative process is rewarding for the maker as well. It connects us to a long history of letter writing. Before mass production, people often made their own folded paper containers. Therefore, this craft is both a practical skill and an artistic expression. It slows down our fast-paced lives. We can focus on the details. Thus, creating a custom wrapper becomes a mindful activity. It prepares the heart for the message inside.
The Science of Paper: Choosing the Right Material
To create a durable and beautiful envelope, you must understand paper. Paper is not just a flat surface. It has grain, weight, and fiber direction. Furthermore, these elements affect how the paper folds and holds its shape. For instance, paper grain refers to the direction the fibers align. Folding with the grain is easier and produces a cleaner crease. Folding against the grain often results in a cracked or jagged line.
Therefore, you should test your paper before cutting. Additionally, you must consider the paper weight, measured in GSM (grams per square meter). Standard printer paper is usually 80 GSM. It is thin and tears easily. Consequently, it might not protect your letter well. Cardstock, ranging from 150 to 200 GSM, offers sturdiness. However, it can be too thick for intricate folding. A weight between 100 and 120 GSM is often ideal. It balances durability with flexibility. Moreover, you can repurpose materials. Old calendars, maps, or magazines work beautifully. This approach is eco-friendly. It gives paper a second life. Thus, selecting the right material is the first crucial step in the process.
Essential Tools for Precision and Quality
A craftsman is only as good as their tools. Making an envelope requires precision. Therefore, having the right equipment ensures a professional finish. First, you need a cutting tool. Scissors are common, but a craft knife and a metal ruler yield straighter edges. Consequently, you avoid the “hairy” edges that scissors sometimes leave. A self-healing cutting mat is also essential. It protects your table surface from scratches. Furthermore, you need a scoring tool. This could be a specialized bone folder or an empty ballpoint pen. Scoring creates an indentation for the fold. It ensures the paper bends exactly where you want it to.
This prevents messy, crooked folds. Additionally, adhesive is critical. You can use a glue stick, double-sided tape, or liquid glue. Each has pros and cons. Glue sticks are neat but can dry out. Double-sided tape is instant and permanent. Liquid glue offers a strong bond but can wrinkle thin paper. Therefore, choose your adhesive based on your paper type. Finally, a pencil and eraser are necessary for marking measurements. Ultimately, these tools transform raw materials into a polished product.
Understanding the Geometry of Envelopes
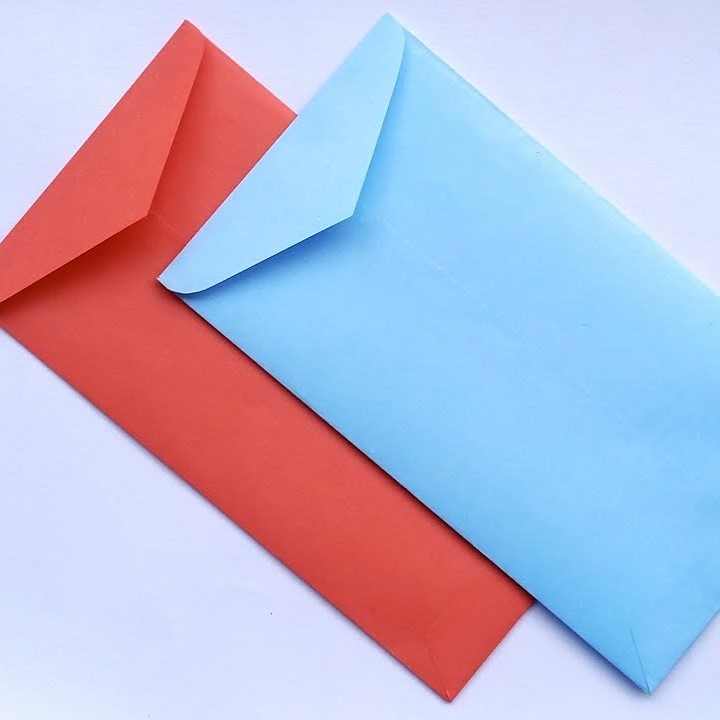
Envelopes are geometric marvels. They transform a flat 2D sheet into a 3D vessel. Moreover, they do this without wasting much space. The standard envelope shape consists of a rectangle for the body, four side flaps, and a top flap. Understanding this layout is vital. When you learn how to make an envelope, you are essentially solving a geometry puzzle. The side flaps usually overlap slightly to hold the structure together. The bottom flap folds up first. Then, the side flaps fold in. Finally, the top flap seals the deal. This overlapping design is not arbitrary.
It protects the contents from falling out. Furthermore, it provides structural integrity. There are many styles, however. The “Baronial” style has a pointed flap and a diagonal seam. The “A-style” has a square flap and side seams. Each style serves a different aesthetic purpose. Additionally, the aspect ratio matters for postal shipping. A square envelope might look trendy. However, it often costs more to mail than a rectangular one. Thus, geometry dictates both form and function. You must plan your template carefully.
Step-by-Step Guide to Crafting Your First Envelope
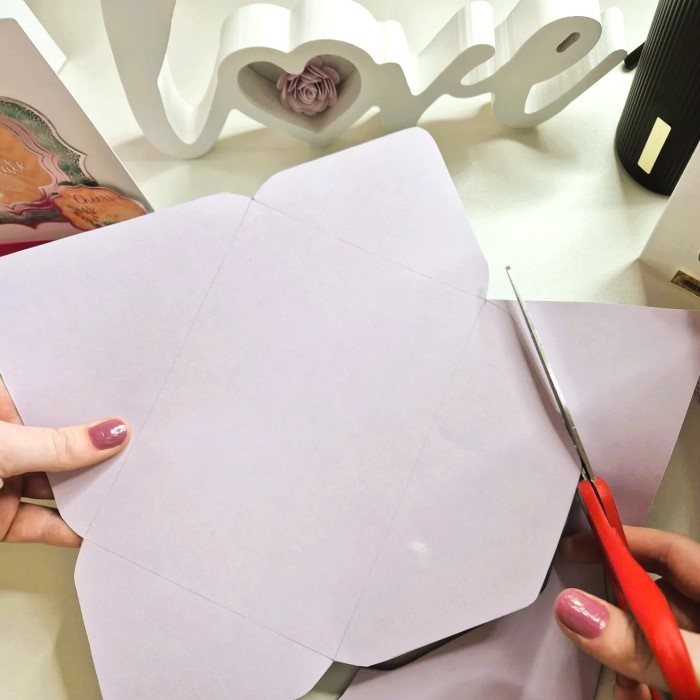
Now, let us put theory into practice. You can start with a simple template. First, find a piece of paper larger than your intended card. Lay it flat on your work surface. Then, place the card in the center of the paper. Next, fold the paper edges over the card. You are creating flaps on all four sides. Crease these folds sharply. Afterward, unfold the paper. You will see a rectangle in the center with four surrounding flaps. You need to shape these flaps. Cut the top and bottom flaps into trapezoids. Then, cut triangles off the corners of the side flaps.
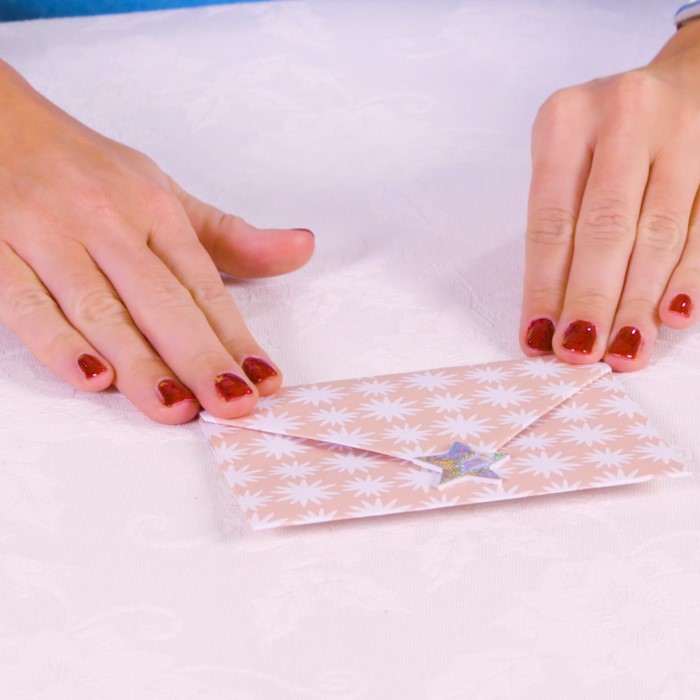
This allows them to fold neatly without bunching. Consequently, you have a cross-shaped template. Now, fold the bottom flap up. Apply adhesive to the edges of the side flaps. Press them down onto the bottom flap. This creates the pocket. Your card should slide in easily. Finally, the top flap remains open until you are ready to seal it. You can use a sticker or tape to close it. This method is the foundation of understanding how to make an envelope. It is simple, effective, and customizable.
Creative Customization and Design Techniques
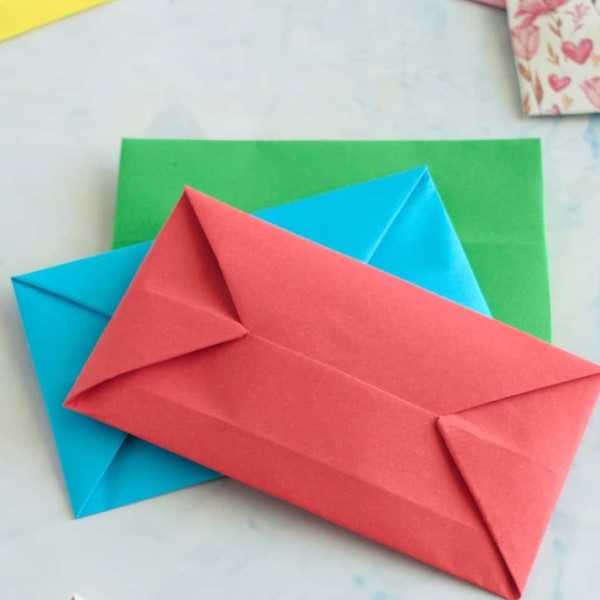
Once you master the basic shape, the real fun begins. A plain envelope is a blank canvas. You can customize it to match the occasion. For example, you can use patterned scrapbooking paper. This creates instant visual interest. Furthermore, you can add a decorative liner. A liner is a sheet of contrasting paper cut to fit inside the envelope. It peeks out when the recipient opens the flap. Consequently, it adds a touch of luxury. Another technique involves sealing wax. Wax seals are historical and romantic. They add texture and weight to the envelope.
However, be careful with postal regulations. Bulky seals may require extra postage. Additionally, consider rubber stamps. You can stamp a design on the front or back. This repeats a motif from the card inside. You can also use washi tape. This decorative tape comes in countless patterns. You can use it to seal the envelope or decorate the edges. Moreover, calligraphy adds elegance. Hand-addressing the front makes it a work of art. Therefore, customization turns a functional item into a masterpiece.
Making an envelope is fun, but sending it requires knowledge of postal rules. The postal service has strict guidelines. These ensure that your letter can be processed by machines. Therefore, you must consider size and thickness. Minimum sizes exist. If an envelope is too small, it gets lost in the machinery. It must be at least 3.5 inches high and 5 inches long. Conversely, maximum sizes apply. If it is too large, it becomes a “flat” and costs more to send. Furthermore, thickness matters. A standard letter must not be thicker than 0.25 inches.
If your envelope is lumpy because of decorations, it might be non-machinable. Consequently, you will pay a surcharge. The flexibility of the paper is also a factor. It must bend easily. Additionally, the aspect ratio affects the price. Very long, skinny envelopes cost more. Thus, it is wise to check your local postal service website before designing. This prevents your beautiful creation from being returned. It ensures your thoughtfulness reaches its destination efficiently.
Eco-Friendly Practices in Stationery Crafting
Sustainability is a growing concern. Paper crafts can generate waste. However, they can also be incredibly eco-friendly. Making your own envelopes is a form of upcycling. Instead of buying new, you can use materials you already have. For instance, old newspapers make stylish, vintage-looking envelopes. Magazines offer glossy, colorful options. Furthermore, you can use leftover wrapping paper. This reduces household waste. Additionally, consider the glue. Many commercial glues contain plastics or harsh chemicals.
You can make your own paste using flour and water. This is non-toxic and biodegradable. Moreover, avoid plastic windows in your envelopes. Traditional envelopes often have a plastic film to show the address. This makes them difficult to recycle. When you make your own, you skip the plastic. Therefore, your stationery is fully recyclable. You can also reuse packaging. A cardboard box can be cut and scored to make a sturdy mailing packet. Consequently, you save money and resources. Embracing these practices makes your hobby kind to the planet.
Frequently Asked Questions About Envelope Making
Many beginners have questions about this craft. Here are answers to some common queries to help you get started.
How to make an envelope step by step?
The process involves a few clear steps. First, choose your paper and place your card in the center. Fold the paper around the card to create creases. Open the paper and cut the flaps into shapes. Usually, you want trapezoids for top and bottom, and triangles for the sides. Then, apply glue to the side flaps. Fold the bottom flap up to secure them. Let the glue dry completely. Finally, insert your card. You can seal the top flap with glue or a sticker.
Are you allowed to make your own envelopes?
Yes, you are absolutely allowed to make your own envelopes. The postal service accepts handmade stationery. However, you must follow specific rules. The envelope must be a standard shape and size. It must also have a clearly marked space for the address and stamp. Furthermore, the paper must be opaque. The contents should not be visible. As long as you pay the correct postage, your custom creation will travel safely.
How to make a really tiny envelope?
Tiny envelopes are great for gift tags or tiny notes. You need a template on a small scale. You can download a mini envelope template from the internet. Alternatively, you can use the same folding method as a large envelope. Just start with a smaller piece of paper, like a sticky note or a piece of scrap paper. Be precise with your folding. Tweezers can help with glue application on such a small surface.

Conclusion: The Art of Connection
In summary, the journey to how to make an envelope is filled with discovery. It combines technical skill with artistic flair. We have explored the importance of paper science. We have discussed geometry and tools. Furthermore, we have looked at postal rules and eco-friendly habits. This craft is more than just folding paper.
It is about creating a vessel for your thoughts. It adds value to your message. In a world of fleeting digital interactions, a handmade envelope stands out. It tells a story before it is even opened. Therefore, gather your supplies today. Start experimenting with different shapes and papers. You will find that making the envelope is as enjoyable as writing the letter. It brings joy to the sender and the receiver alike. This simple act of creation strengthens our connections with others.