Introduction to the Speed Square
Every carpenter and DIY enthusiast needs a reliable tool in their arsenal. Consequently, learning how to use a speed square is a fundamental skill for anyone working with wood. This triangular tool, often made of aluminum or plastic, is incredibly versatile. It serves as a ruler, a protractor, and a saw guide all in one. Therefore, understanding its functions can significantly improve the quality of your projects. Many people see it as a simple measuring device. However, it is much more than that. It is the key to precision and efficiency.
The speed square, also known as a rafter square, was invented in 1925 by Albert J. Swanson. He created it to simplify the complex layout work required for roof framing. Since then, it has become a staple in the construction industry. Its triangular shape includes a 90-degree right angle and a 45-degree angle. Furthermore, it features a “fence” or “lip” along one edge. This lip allows the user to hold it securely against the board’s edge. This design ensures that every line is perfectly straight. Consequently, errors are minimized, and projects proceed smoothly.
Moreover, the speed square is portable and durable. It fits easily into a tool belt or pocket. This accessibility means you will always have it ready for quick measurements. In this guide, we will explore the various uses of this tool. We will cover everything from basic layout to advanced techniques. Whether you are building a deck or framing a wall, this tool is indispensable. Therefore, let us dive into the world of the speed square. We will unlock its full potential for your next DIY adventure.
Understanding the Anatomy of the Tool
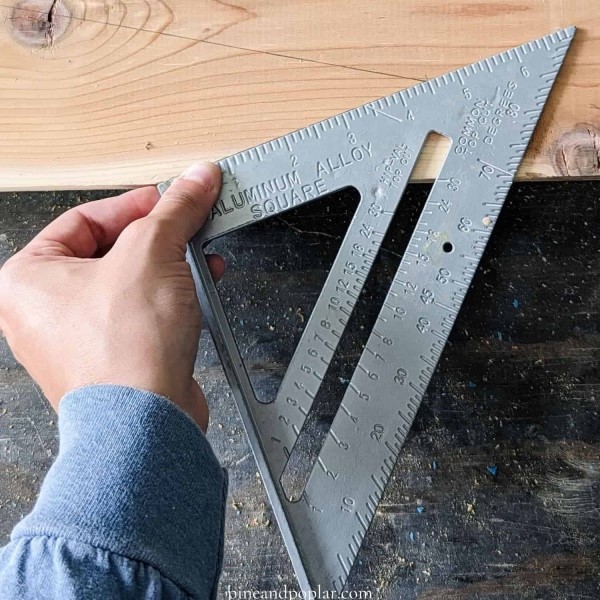
To use the tool effectively, you must first understand its parts. The speed square consists of several distinct features. Each part serves a specific purpose in the layout process. First, there is the “pivot point.” This is a corner of the triangle. It acts as the axis for rotating the square to various angles. You will use this point frequently when marking angles other than 90 degrees. Consequently, mastering the pivot point is crucial for accuracy.
Next, there is the “fence” or “lip.” This is a thicker edge that runs along one leg of the triangle. The fence allows you to hook the square onto the edge of a board. This ensures the tool stays flush with the material. Therefore, it guarantees that your lines are perpendicular to the edge. Without the fence, maintaining a straight line would be much more difficult. It provides stability and control during the marking process.
Furthermore, the face of the square contains various markings. These include a ruler along the edges. There are also degree markings. These show angles from 0 to 90 degrees. Additionally, there is a “common” and “hip/valley” scale. These are specific to roof framing. They help in calculating rafters quickly. Understanding these scales allows you to unlock the full potential of the tool. Therefore, take a moment to familiarize yourself with these markings. It is the first step toward becoming proficient with this device.
Marking Basic Cuts with Precision
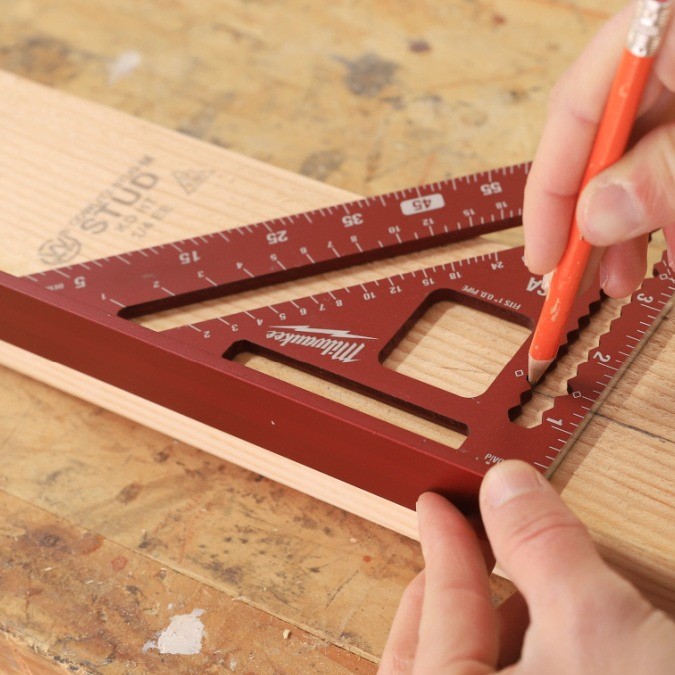
How to use a speed square? The most common use for this tool is marking 90-degree and 45-degree cuts. These are the backbone of most woodworking projects. To mark a 90-degree cut, start by placing the square on the board. The fence should rest against the edge of the lumber. Then, slide the square to your desired measurement location. Hold the tool firmly in place. Use a pencil to draw a line along the perpendicular edge of the square. This line will be perfectly straight. Consequently, your cut will be accurate.
For a 45-degree cut, the process is slightly different. You will still place the fence against the board’s edge. However, you will use the diagonal leg of the square to mark the line. This diagonal edge creates a perfect 45-degree angle. This is essential for framing and trim work. Therefore, you can quickly switch between angles without complex calculations. It saves a significant amount of time on the job site.
Furthermore, consistency is key when marking lines. Always use a sharp pencil. A dull pencil creates a thick line, which can lead to inaccuracies. Additionally, ensure the square is pressed firmly against the wood. Any movement during marking will result in a crooked line. Therefore, develop a habit of holding the tool with steady pressure. This practice will improve the quality of your work. It ensures that every joint fits together perfectly. Thus, mastering these basic cuts is the foundation of good carpentry.
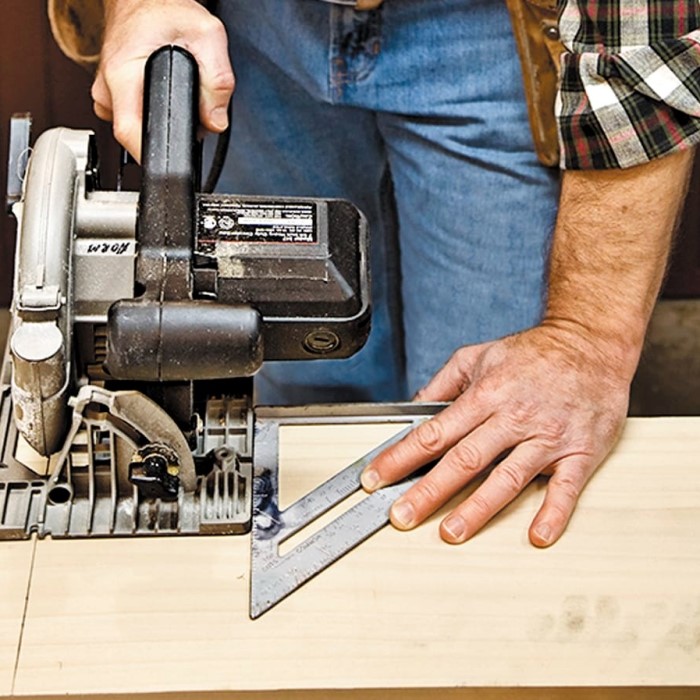
Using the Speed Square as a Saw Guide
How to use a speed square? Did you know you can use this tool as a saw guide? Many people do not realize this hidden function. It allows for perfectly straight crosscuts with a circular saw. To do this, place the square on the board. Align the fence with the cut line you have marked. Then, hold the square firmly against the wood. You will run the base plate of the saw against the square’s edge.
This technique is incredibly useful for making quick, accurate cuts. It eliminates the need for a straight-edge clamp. Consequently, it speeds up the work process significantly. However, you must exercise caution. Ensure the saw blade does not cut into your square. Keep the blade on the waste side of the line. Additionally, make sure the square is clamped or held very securely. Safety should always be your top priority.
Moreover, this method works best for smaller boards. The speed square is compact. It may not provide enough support for cutting large sheets of plywood. For those tasks, a larger straight-edge is recommended. Nevertheless, for 2x4s and dimensional lumber, the speed square is perfect. It acts as a stable guide for the saw. Therefore, it helps you achieve professional-looking cuts every time. It is another reason why this tool is so valuable to DIYers.
Advanced Techniques: Layout of Rafters and Angles
How to use a speed square? Beyond basic cuts, the speed square excels at advanced layout work. Roof framing requires precise angle measurements. This tool simplifies that process. You can use the degree scale to mark any angle from 0 to 90 degrees. To do this, pivot the square. The pivot point should stay at the same spot on the board. Rotate the tool until the desired degree aligns with the edge of the board. Then, mark your line.
For example, you might need to mark a 30-degree angle for a roof rafter. You would pivot the square until the 30-degree mark hits the board’s edge. Then, trace the appropriate side of the square. This method is much faster than using a protractor. It allows for rapid, repeatable marks. Consequently, you can layout multiple rafters in a short amount of time. Efficiency is critical in construction projects.
Furthermore, the tool includes scales for “common” rafters and “hip/valley” rafters. These scales help you determine the length of the rafter. You must understand the concept of “rise per foot of run.” Once you know the pitch of the roof, you can read the scale. It tells you the length of the rafter for every inch of run. This calculation is complex with a standard tape measure. However, the speed square consolidates this information. Therefore, it is an essential tool for any roofer or framer.
The Scribing Feature Explained
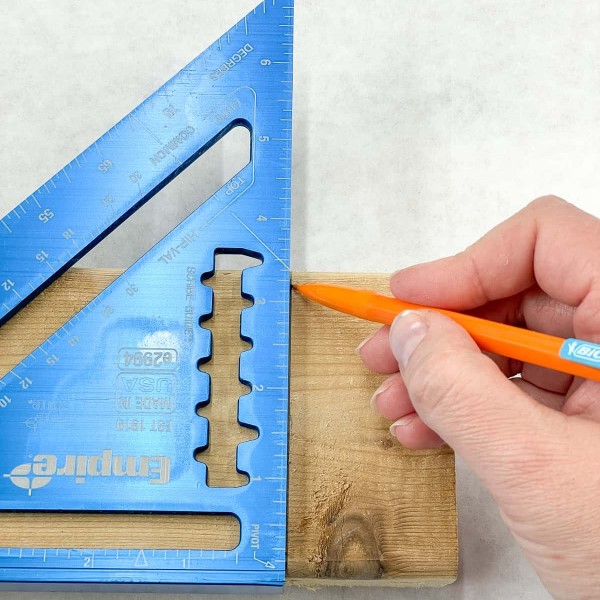
How to use a speed square? Another powerful feature of the speed square is scribing. Scribing allows you to mark a line parallel to the edge of a board. This is useful for ripping lumber to a specific width. The square has a series of notches along its inside edge. These notches are spaced 1/4 inch apart. They provide a quick way to mark parallel lines without measuring. To use this feature, place your pencil in the desired notch.
Next, slide the square along the board. The fence will ride against the edge. Your pencil will draw a line parallel to that edge. You can scribe lines at 1/4, 1/2, 3/4, and 1-inch increments. This is incredibly handy for making rip cuts. It ensures the width of the board remains consistent. Consequently, you can resize lumber quickly and accurately. This feature is often overlooked by beginners. However, it is a favorite trick of professional carpenters.
Moreover, scribing is useful for fitting trim. Sometimes a wall is not perfectly straight. You can scribe the line onto the trim board. Then, you can cut the trim to match the wall’s contour. This results in a tight, professional fit. Therefore, the scribing feature adds another layer of versatility. It solves common installation problems. It is a simple technique that yields high-quality results. Thus, learning to scribe effectively will elevate your DIY skills.
Checking for Square and Fixing Problems
A speed square is also excellent for checking your work. You can verify if a corner is truly square. To do this, place the square into the corner. The fence should hug one wall. The other leg should lie flat against the adjacent wall. If there is a gap, the corner is out of square. This simple check can prevent major headaches later. Therefore, always check your corners before assembling.
If a project is out of square, you can use the speed square to help fix it. For instance, if you are building a frame, you can push the corners into alignment. Use the square as a reference guide. Apply pressure until the frame aligns with the tool. Then, secure the joint with a fastener. This ensures the frame is true. A square frame functions better and looks more professional. Consequently, the tool acts as both a diagnostic and corrective device.
Furthermore, checking for square is vital for installing cabinets or shelves. If these items are not square, they may not function correctly. Doors might not open properly. Drawers might stick. Therefore, taking a few seconds to check with a speed square is worth the effort. It ensures the integrity of your installation. It confirms that your work meets professional standards. Thus, it is a critical step in the quality control process.
Essential Maintenance and Care Tips
Like any tool, a speed square requires care. It is generally very durable. However, it can get damaged. If you drop it on concrete, it might bend or nick. A bent fence will no longer give accurate readings. Therefore, try to store it safely in your tool bag. Do not throw it loosely into a box with heavy hammers. This preserves its precision.
Cleaning the square is also important. Sawdust and pitch can build up on the surface. This can obscure the markings. It can also create friction when using it as a saw guide. Simply wipe it down with a rag after use. For sticky residue, use a mild solvent. Keep the markings legible. If they wear off, the tool becomes useless. Some users apply a light coat of wax to protect the finish.
Furthermore, verify its accuracy periodically. You can check it against a known straight edge. Or, you can draw a line, flip the square, and draw another line. If the lines diverge, the square is no longer true. In that case, you should replace it. Speed squares are relatively inexpensive. It is better to buy a new one than to work with a faulty tool. Therefore, regular maintenance ensures reliability. It guarantees that your measurements remain precise for years to come.
FAQ: Your Top Questions Answered
What do you do with a speed square?
A speed square is primarily used for marking straight cut lines on lumber. It helps create perfect 90-degree and 45-degree angles. Furthermore, it serves as a saw guide for circular saws. It can also determine roof pitches and scribe parallel lines. Therefore, it is a multi-functional tool for cutting and layout.
Are speed squares easy to learn to use?
Yes, they are very easy to learn. The basic functions, like marking a straight line, are intuitive. With a little practice, anyone can use it effectively. More advanced features, like rafter layout, require some study. However, for most DIY tasks, the learning curve is minimal. Consequently, it is a great tool for beginners.
What is the 3/4/5 method for squaring?
The 3-4-5 method is a geometry rule for creating a perfect right angle. You measure 3 feet along one side and 4 feet along the other. The diagonal between these points should be exactly 5 feet. If it is not 5 feet, the corner is not square. You can use a speed square to verify this or to adjust the corner. This method is essential for framing large structures like decks or walls.
Conclusion
In conclusion, mastering this tool is a game-changer for any project. We have explored how to use a speed square for various tasks. From basic marking to advanced roof framing, its utility is unmatched. We discussed the importance of the pivot point and fence. We also looked at how to use it as a saw guide. Additionally, we covered the scribing feature. These skills will undoubtedly enhance your DIY capabilities. Therefore, keep practicing these techniques. You will find that your work becomes more precise. Your projects will look more professional. Ultimately, knowing how to use a speed square is a fundamental step in becoming a skilled woodworker.