Understanding the Basics of Fur Texture
Drawing realistic animal textures can be a challenge. Many beginners struggle with this specific skill. They often ask how to draw fur effectively. The process requires patience and observation. Fur is not just one solid color. It consists of many individual hairs. These hairs layer on top of each other. Consequently, the texture creates depth and shadow. You must understand the underlying form first. The fur follows the shape of the animal’s body. Therefore, you should start with the basic anatomy. Do not jump straight into drawing strands. Plan your drawing carefully. Look at reference photos closely. Notice the direction the fur grows. It usually flows from the nose outward. Additionally, observe the length of the hair. A short coat looks different from a long one. By understanding these fundamentals, you build a strong foundation. This preparation makes the drawing process much smoother.
Essential Tools for Your Project
Having the right materials makes a difference. You do not need expensive supplies to start. However, quality tools do help. For traditional artists, pencils are key. Use a range of graphite grades. For instance, 2H is great for light base layers. Softer pencils like 4B create dark shadows. Furthermore, a good eraser is essential. A kneaded eraser lifts graphite gently. This creates highlights without damaging the paper. You will also need textured paper. Smooth paper is difficult for layering. In contrast, medium-tooth paper holds graphite well. Digital artists need specific brushes. Most programs have fur texture brushes. You can also create your own. Experiment with different brush settings. Pressure sensitivity is crucial for variation. Therefore, invest in a good stylus. Finally, keep your tools sharp. A sharp pencil draws fine, crisp hairs. A dull pencil creates broad, smudged lines. You want control over your marks.
Layering Techniques for Depth
Realism is achieved through layers. You cannot draw fur in one go. It looks flat and unnatural that way. Instead, build up the texture gradually. Start with a base layer. Use a light pencil or mid-tone color. This represents the shadowed areas between hairs. Consequently, it establishes the form. Next, add the mid-tones. Use a slightly darker shade. Draw strokes in the direction of fur growth. Vary the length of your strokes. Natural fur is uneven. Therefore, avoid making lines too perfect. After the mid-tones, add the darkest shadows. These are usually found near the ears or under the chin. They provide contrast. Finally, add the highlights. This step brings the fur to life. Use a sharp pencil or white pastel. Draw individual hairs over the dark layers. This technique creates the illusion of volume. The viewer sees the layers beneath.
Mastering Pencil Strokes
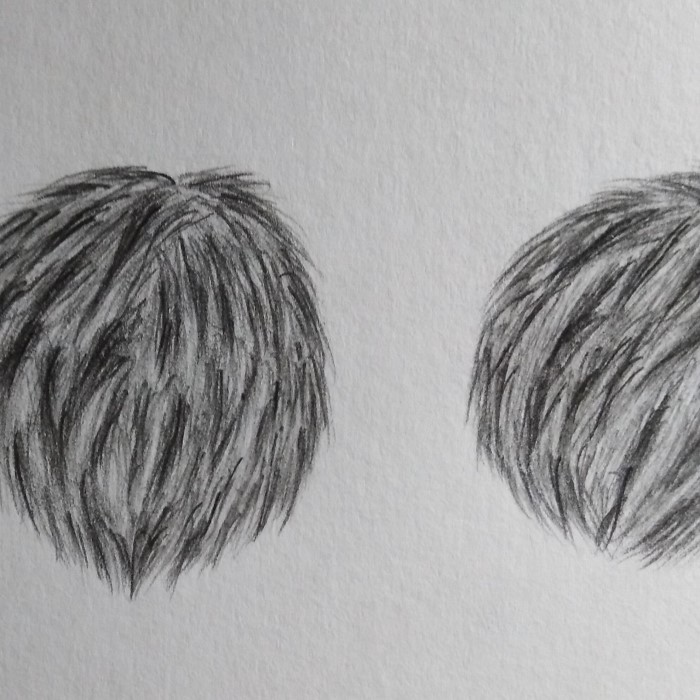
Your stroke technique is crucial. The way you move your hand matters. For fur, you need quick, flicking motions. Do not press too hard. Start with light pressure. Then, flick the pencil upward. This creates a tapered line. Hair is thick at the base and thin at the tip. A line of uniform width looks like wire. Therefore, practice the “flick” motion repeatedly. It should become second nature. Additionally, vary your stroke speed. A quick stroke is whispy and light. A slower stroke allows more graphite deposit. This creates a heavier, darker hair. Furthermore, consider the curvature of the body. Fur grows over muscles and bones. Your strokes must curve accordingly. Straight lines on a round shape look wrong. Consequently, rotate your paper. Find an angle that is comfortable for your wrist. This allows for smoother, more natural lines. Consistent practice improves your muscle memory.
Creating Depth with Light and Shadow
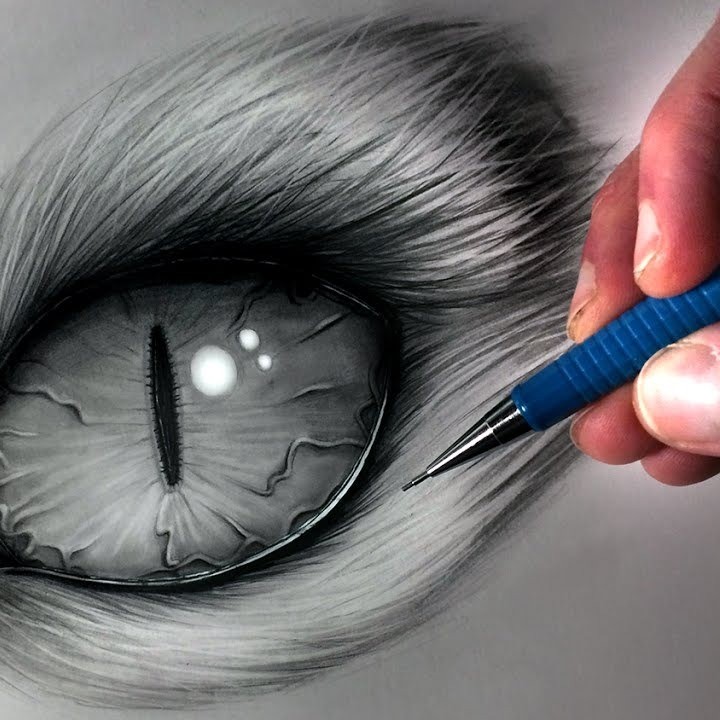
Lighting defines the form of the fur. Without light, the drawing looks flat. First, identify your light source. Where is the light coming from? This determines where highlights and shadows fall. The side facing the light will be lighter. The opposite side will be darker. However, fur has texture. It is not a smooth surface. Therefore, light catches individual hairs. You will see small, bright highlights. We call these “specular highlights.” They appear on the tips of the fur. In contrast, the shadows have depth. The core shadow is the darkest area. It falls on the form’s edge. Next, there is reflected light. Light bounces from the ground or other objects. It illuminates the shadow side slightly. Consequently, you should never make shadows pure black. They should have variation. Understanding these lighting principles transforms your art. It takes a simple sketch to a realistic portrait.
Digital Approaches to Fur
Digital art offers unique advantages. You have an undo button. You also have custom brushes. Many artists struggle with how to draw fur digitally. The process is similar to traditional art. However, the tools differ. Start by blocking in the base colors. Use a large brush for this. Do not worry about details yet. Then, create a new layer. Use a fur-specific brush. These brushes scatter multiple marks at once. They simulate the look of hair. Follow the fur direction carefully. Furthermore, use layer blending modes. Modes like “Multiply” are great for shadows. “Overlay” or “Screen” work well for highlights. This adds depth without losing the base color. Another benefit is smudge tools. You can blend colors smoothly. Yet, avoid over-blending. You still want to see individual strokes. Finally, add a layer of fine details. Use a single-pixel brush for stray hairs. These small details make the drawing pop.
Drawing Different Fur Types
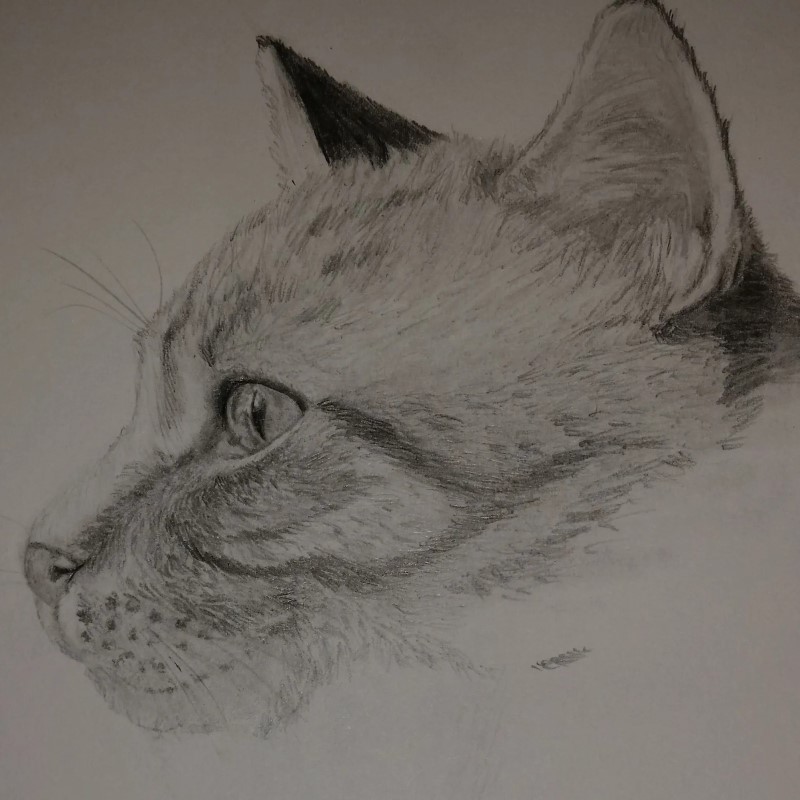
Not all fur is the same. Animals have different coat types. For example, a cat has sleek, short fur. A bear has thick, coarse fur. A wolf has a double coat. Therefore, you must adapt your technique. For short fur, use short, precise strokes. The pencil work should be very fine. The texture is subtle. You might use shading more than lines. In contrast, long fur requires long, flowing strokes. It moves with the wind. You need to show movement and flow.
Furthermore, consider the pattern. A zebra has stripes. A leopard has spots. These patterns follow the body’s contour. They are not just flat shapes. They curve with the animal’s form. Consequently, the pattern helps define the shape. When drawing a fluffy animal, focus on volume. The outline should be soft. There are no hard edges on a ball of fluff. Use a blending stump to soften the outer lines.
Adding the Final Details
The final touches make or break a drawing. This stage is about refinement. Look at your drawing from a distance. Does it have enough contrast? If not, deepen the shadows. Darker shadows make the highlights shine brighter. Next, focus on the eyes and nose. These areas draw the viewer’s attention. Ensure they are perfectly rendered. Then, return to the fur. Add “flyaway” hairs. These are the hairs that stick out.
They look messy, but they are realistic. They break the solid outline of the animal. Consequently, they make the drawing look alive. You can use a craft knife or an eraser pen. Scratch out tiny white lines for these hairs. Be careful not to tear the paper. Also, check your edges. Some edges should be soft. Others should be sharp. A hard edge separates the animal from the background. A soft edge shows the fur blending into the air. This variety adds interest.
Common Mistakes to Avoid
Beginners often make similar errors. One major mistake is drawing every hair. You cannot count every hair on an animal. Trying to do so results in a mess. It looks like a haystack. Instead, focus on clumps of fur. Group hairs together. This creates a more natural look. Another error is using the wrong stroke direction. Fur grows in specific patterns. If you draw against the grain, it looks odd. Always follow the reference photo. Furthermore, avoid outlining the animal. A dark outline around the body looks like a cartoon. Real animals do not have black outlines. Use the background color to define the edge. Additionally, watch your pencil pressure. Heavy pressure ruins the texture. It flattens the drawing. Start light and build up pressure slowly. Finally, do not ignore the anatomy. Fur sits on skin and muscle. If the structure is wrong, the fur looks fake.
FAQ: Common Questions About Drawing Fur
Q1: What is the best pencil for drawing fur?
There is no single best pencil. However, a range is recommended. Use hard pencils like 2H for the base layer. They create a smooth tone. Then, use softer pencils like 2B or 4B for the details. The hard pencil creates the shadow. The soft pencil creates the dark hair texture. Mechanical pencils are also great for fine lines.
Q2: How do I make fur look fluffy?
To achieve a fluffy look, focus on the edges. Do not draw a solid outline. Instead, use soft, irregular strokes around the border. Use a kneaded eraser to lift graphite. This creates a soft, glowing effect. Additionally, draw loose, wavy strands. Avoid straight, stiff lines. Layering light and dark tones also adds volume.
Q3: Is it easier to draw fur digitally or traditionally?
Both methods have pros and cons. Digital art allows for easy corrections. You can also use special fur brushes. This saves time on individual strokes. Traditional art feels more organic. It teaches you better hand control. Ultimately, the easier method depends on your skill set. Both require understanding of texture and lighting.
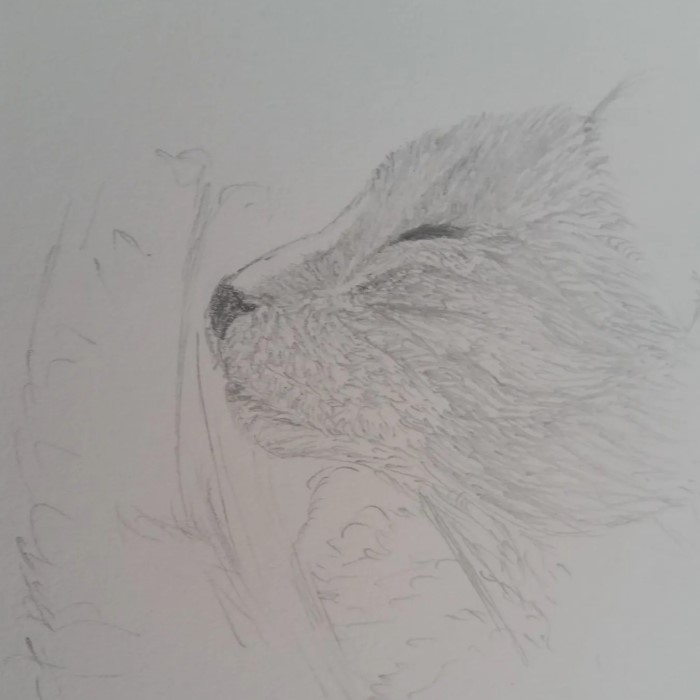
Q4: How do I draw white fur on white paper?
White fur is tricky. You cannot draw white with a graphite pencil. You must draw the shadows instead. Look closely at white fur. You will see grays and blues in the shadows. Draw these shadows lightly. Leave the paper white for the highlights. Use a kneaded eraser to clean up the bright areas. Contrast creates the illusion of white.
Conclusion: Bringing Your Art to Life
Mastering texture is a rewarding journey. It elevates your artwork significantly. Understanding how to draw fur is a valuable skill. It allows you to capture the spirit of animals. Remember to be patient with yourself. This technique takes time to develop. Start with the basics of anatomy and lighting. Then, build your layers slowly. Use the right tools for the job. Whether you use pencils or a tablet, the principles remain the same. Observe the world closely. Look at how light interacts with hair. Practice your strokes every day. Soon, you will create realistic portraits. Your drawings will have life and depth. So, pick up your pencil today. Start creating something beautiful. The path to better art is in your hands.