Introduction to Natural Body Art
Mehendi, commonly known as henna, is an ancient art form. It holds significant cultural importance in many parts of the world. Traditionally, people apply it during weddings and festivals. It is not just a decorative art but also a symbol of joy and celebration. In recent years, the popularity of natural body art has surged. People are moving away from chemical-laden dyes. They prefer natural alternatives for skin and hair. Consequently, learning how to make mehendi at home has become a valuable skill. It allows you to control the ingredients. You can ensure the paste is fresh and free from harmful additives.

Creating your own paste offers a sense of satisfaction. It connects you to the traditional roots of the practice. The process is surprisingly simple. However, it requires patience and the right technique. You cannot simply mix powder and water. There is a science behind achieving the perfect consistency and color. The leaves of the henna plant contain a dye molecule called lawsone. This molecule stains the skin when properly released. Therefore, understanding the mixing process is crucial. This article will guide you through every step. You will learn about selecting the best ingredients. You will also learn how to store your paste effectively. By the end, you will be ready to create beautiful designs.
The Benefits of Homemade Henna
There are numerous advantages to making your own paste. First and foremost is safety. Commercial cones often contain chemicals. These chemicals can cause severe allergic reactions. They might include PPD (paraphenylenediamine), which is harmful to the skin. In contrast, homemade paste is natural. You know exactly what goes into your mixture. This is especially important for children and those with sensitive skin. Furthermore, fresh paste produces a much darker stain. Commercial tubes often sit on shelves for months. They lose their potency over time. When you make it at home, you use fresh ingredients.
Therefore, the dye release is potent and effective. You also have control over the consistency. Some people prefer a thick paste for intricate designs. Others might want a thinner consistency for hair application. You can adjust the recipe to suit your specific needs. Additionally, it is cost-effective. Buying raw henna powder is much cheaper than buying ready-made cones. You can make a large batch for a fraction of the price. This is ideal for festivals or family gatherings. Finally, it is an eco-friendly choice. You reduce plastic waste by reusing cones and avoiding commercial packaging. Making your own mehendi is a step towards a healthier lifestyle.
Essential Ingredients for the Perfect Paste
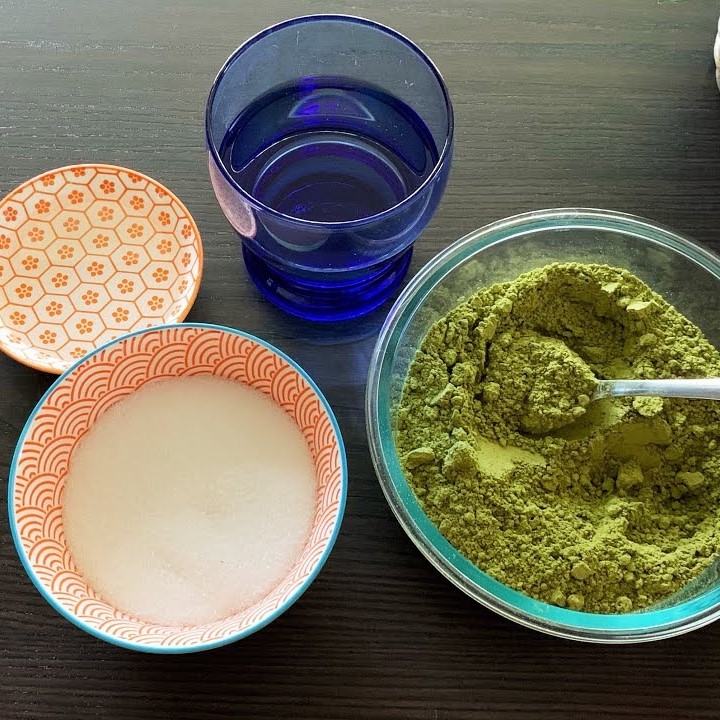
How to make mehendi at home? To create a high-quality paste, you need specific ingredients. The star of the show is, of course, henna powder. You should look for 100% natural henna powder. Check the label to ensure there are no added chemicals. The color of the powder should be green. However, the shade of green can vary. Older powder might be olive green, while fresh powder is vibrant. Next, you need a sour liquid. This is crucial for dye release. Lemon juice is the most common choice. It is acidic and easily available. Alternatively, you can use tea water or vinegar. The acid helps break down the cellulose in the leaves. This releases the lawsone dye molecule.
Another important ingredient is sugar. You can use regular white sugar, honey, or molasses. Sugar acts as a binding agent. It helps the paste stick to the skin better. It also prevents the paste from cracking as it dries. Consequently, the stain becomes darker and more even. Essential oils are the final key component. They are not just for fragrance. Oils like eucalyptus, lavender, or tea tree oil are “terps.” This means they contain terpenes. Terpenes help the dye release faster and darker. They also make the paste smoother for application. Avoid using cooking oils. They do not have the same chemical properties. With these four ingredients, you are ready to start.
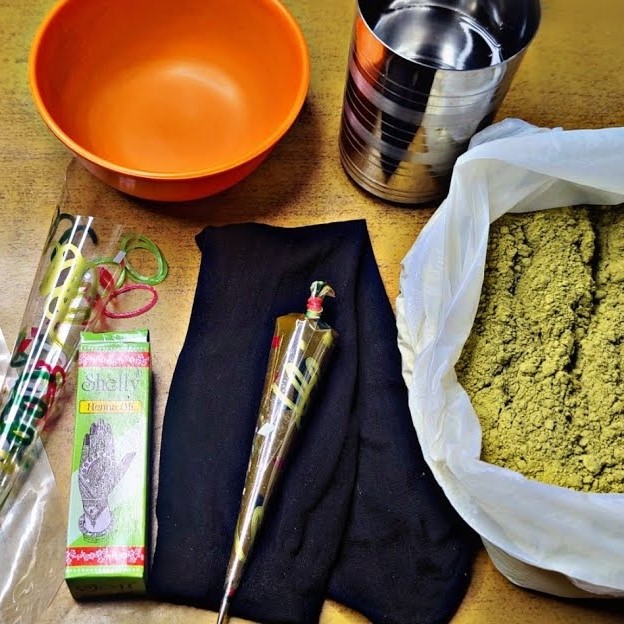
Selecting and Preparing Your Tools
How to make mehendi at home? Before you begin the mixing process, gather your tools. Being prepared makes the process smoother. You will need a mixing bowl. Avoid using metal bowls. Metal can react with the henna and affect the color. Instead, use a glass, ceramic, or plastic bowl. You will also need a spoon or a whisk. Some people prefer using a fork to break up lumps. A plastic spoon works perfectly fine. Next, you need something to strain the mixture. Henna powder often contains twigs and debris. A fine mesh strainer or a piece of nylon stocking is ideal. This ensures your paste is silky smooth. Smooth paste is essential for fine lines.
For application, you will need cones or an applicator bottle. You can buy empty cones online. You can also make your own using plastic sheets and tape. A jacquard bottle with a metal tip is another option. It gives you more control over the flow. Additionally, have some paper towels ready. Henna can be messy, and quick cleanup is necessary. You might also want some plastic wrap. This covers the bowl while the dye releases. Finally, prepare a warm spot for the paste to rest. The temperature affects how quickly the dye releases. Having everything in place before you start saves time. It ensures a stress-free experience.
Step-by-Step Guide: Basic Mixing Method
Now that you have your ingredients, let’s start the process. This is the standard method for how to make mehendi at home. First, sift your henna powder. This is a vital step. Put the powder through your strainer. Remove any large particles or clumps. This ensures a smooth texture. Place about 20 grams of sifted powder into your bowl. Next, add your sour liquid slowly. Start with a small amount. Pour the lemon juice in gradually. Stir the mixture continuously. You want to achieve a consistency similar to mashed potatoes. Ensure there are no lumps. Lumps will clog your cone.
Once the initial mixing is done, cover the bowl. Use plastic wrap to seal it tight. Let it sit in a warm place for about one hour. This resting period allows the dye to begin releasing. After an hour, add your sugar and essential oil. Add about one teaspoon of sugar and 15 drops of oil. Then, add more liquid slowly. Stir vigorously until the paste is smooth. The texture should be like toothpaste. It should not be too runny. If it falls off the spoon immediately, it is too thin. If it does not fall at all, it is too thick. Cover the bowl again. Let it sit for another few hours. The top layer will turn brown. This indicates the dye is ready.
Advanced Recipe: The “Jamila” Method
Some henna artists prefer a specific technique. This is often called the “Jamila” method, named after a famous henna powder. It involves a different mixing order. First, sift the powder into the bowl. Add a small amount of sugar. Mix these dry ingredients together. This ensures the sugar is evenly distributed. Then, add your essential oil and a splash of lemon juice. Mix this into a thick paste. Cover it and let it sit for 15 minutes. The essential oils start to work immediately. This method helps with dye release. After the rest, add more lemon juice. Stir thoroughly to achieve the perfect consistency.
The result is often a stringy texture. “Stringy” means the paste stretches slightly when you pull it. This is highly desirable for draping lines. It allows for smooth application. This method is particularly good for professional artists. It provides more control and precision. However, the basic method works just as well for beginners. You can try both methods to see which one you prefer. Remember that different powders react differently. Some powders absorb more liquid. Others might need less acid. Experimentation is key. Keep notes on what works best for the brand you use. Over time, you will develop your own perfect recipe.
Dye Release and Straining Process
The most critical part of learning how to make mehendi at home is dye release. You cannot use the paste immediately. It needs time for the dye to become available. The top of the paste will oxidize. It will turn a dark brown color. This is a sign that the henna is ready. You might see orange dots on the surface. This is called “tropical stain.” It indicates that the dye is active. To test it, put a small amount on your palm. Wait for five minutes. If you see a bright orange stain, the paste is ready. If the stain is pale yellow, it needs more time. Temperature plays a big role here. In a warm room, the dye releases faster.
In a cold room, it might take overnight. Once the dye is ready, you must strain it again. Even if you sifted the powder, lumps can form during mixing. The paste needs to be absolutely smooth for cones. Place your nylon stocking or strainer over a clean bowl. Use a spoon to push the paste through. This can be a bit of a workout. However, it is essential for a professional result. Once strained, the paste is ready to be packed. Do not skip the straining step. Lumps will ruin your design. They block the tip of the cone and break the flow.
Filling Your Cones and Application
How to make mehendi at home? Filling cones requires a steady hand. Take your empty cone or plastic sheet. Roll it into a cone shape if necessary. Secure it with tape. Place the cone in a glass to hold it upright. This makes filling easier. Use a spoon to transfer the paste into the cone. Fill it about two-thirds full. Do not overfill it. You need space at the top to tie it off. Tap the cone on the table gently. This removes air bubbles. Air bubbles cause the paste to sputter during application. Once filled, twist the top of the cone. Tie it with a rubber band or string. Trim the tip of the cone with scissors. Make a very small cut. You can always make the hole bigger, but you cannot make it smaller.
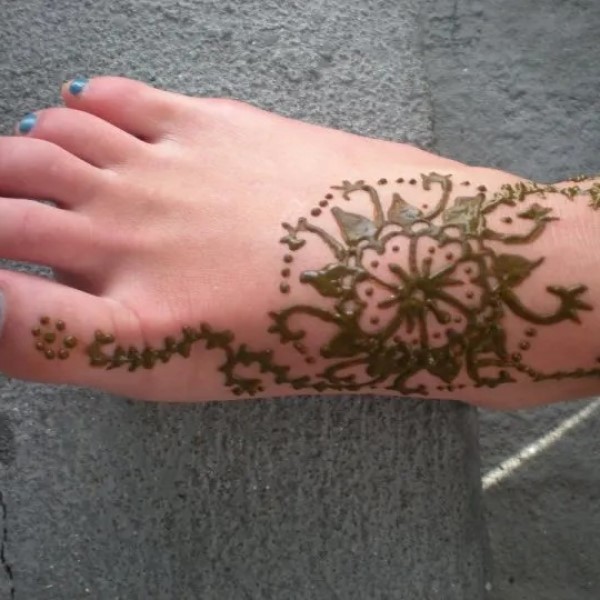
Now you are ready to apply the henna. Clean your skin with rubbing alcohol first. This removes oils and lotions. The henna will stick better. Hold the cone like a pen. Apply gentle, even pressure. Practice on a piece of paper first. Get a feel for the flow. Once comfortable, start your design on the skin. Remember, the longer the paste stays on, the darker the stain. Leave it on for at least four to six hours. Many people leave it on overnight. Wrapping the design with tissue and plastic helps keep it warm and moist. This boosts the stain. The application process is an art in itself.
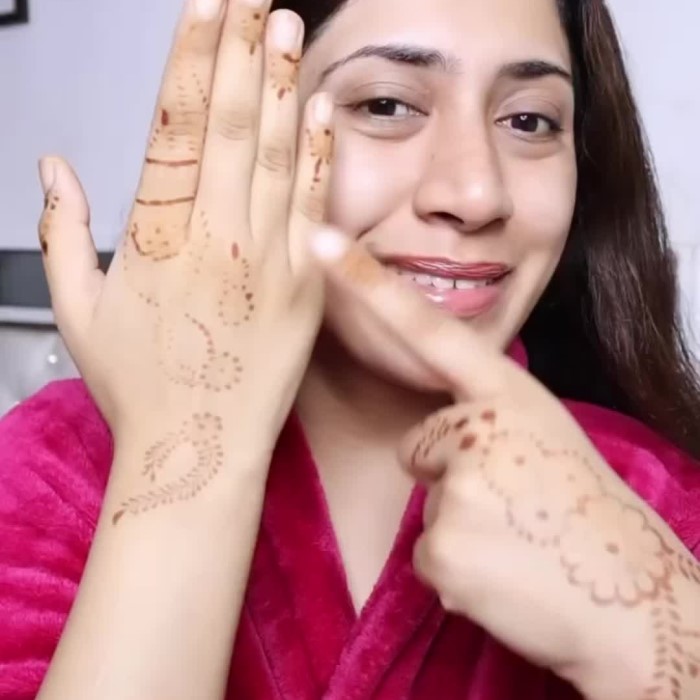
Tips for a Darker and Long-Lasting Stain
How to make mehendi at home? Everyone wants a deep, dark stain. The color starts as orange. It then darkens to a rich maroon or brown over 48 hours. There are several tricks to achieve this. First, keep the paste moist while it is on your skin. Dry paste stops releasing dye. Use a lemon and sugar seal. Mix one part lemon juice with one part sugar. Apply this over the dried paste with a cotton ball. It creates a sticky glaze. This helps the paste stay in place. It also keeps it slightly moist. Alternatively, use a henna sealant spray. This is very convenient.
Second, heat is your friend. Henna loves warmth. It stains best when the body is warm. Avoid being in air conditioning while the paste is on. If it is cold, wrap your hand with a scarf or sock. You can also use a heating pad on low setting. Third, do not wash the paste off. Scrape it off instead. Water stops the oxidation process. If you wash it, the stain might turn out lighter. Scrape the paste gently with a butter knife. Use oil to remove any stubborn bits. Finally, avoid water for the first 12 hours after removing the paste. Apply a natural balm like coconut oil to protect the design. These steps ensure a long-lasting, beautiful stain.
Frequently Asked Questions About Homemade Mehendi
1. How long does homemade henna paste last?
Homemade henna paste is best used fresh. You should use it within three to five days if kept at room temperature. The dye will degrade over time. However, you can extend its life by freezing it. Freeze the paste immediately after mixing.
2. Can I use coffee or tea instead of lemon juice?
Many people try this, but it is not always recommended. Coffee and tea are popular myths for darkening hair. However, for skin application, they are not as effective. Lemon juice has the right acidity level. It releases the dye molecule effectively.
3. Why did my henna stain turn out orange and light?
There are several reasons for a light stain. The most common cause is insufficient dye release time. The paste needs time to become active. Another reason is that the paste dried too quickly. You need to keep it moist with a sealant.
4. Is homemade mehendi safe for children?
Yes, homemade mehendi is generally safe for children. Since you are using natural ingredients, it is non-toxic. However, you should still be careful. Avoid getting the paste in their eyes or mouth. Do a small patch test first to check for allergies. Some children might be sensitive to essential oils. If they have sensitive skin, skip the essential oils. Always supervise children during the application process.
Conclusion: Embracing the Art of Henna
Making your own henna paste is a rewarding journey. It connects you to an ancient tradition. You gain complete control over the ingredients. This ensures a safe and natural experience. The process is simple once you understand the basics. From sifting the powder to waiting for dye release, each step matters. You have learned how to make mehendi at home using fresh, simple ingredients.
Whether you are preparing for a wedding, a festival, or just for fun, homemade paste is superior. It offers the best color and texture. Do not be afraid to experiment with different recipes. Find the consistency and mixture that works best for you. With practice, your skills will improve. You will soon be creating beautiful art with your own fresh paste. Enjoy the process and the beautiful results. The art of henna is a gift of nature. Embrace it with confidence and creativity.