The Importance of Calibration in Modern 3D Printing
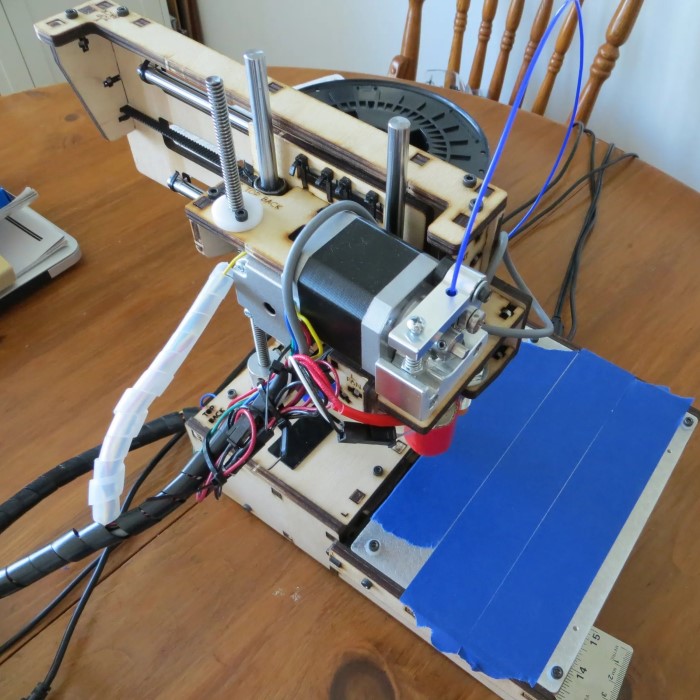
Three-dimensional printing has evolved significantly by 2026. However, the fundamental principles remain unchanged. A printer is essentially a robot. It follows instructions to create physical objects. Therefore, precision is the key to success. Many users face issues like warping or stringing. These problems often stem from a lack of calibration. Consequently, understanding how to calibrate a 3d printer is the most valuable skill for any maker. It bridges the gap between a failed mess and a masterpiece.
Furthermore, modern printers come with advanced sensors. While these sensors help, they are not infallible. You cannot rely solely on auto-leveling features. Mechanical parts loosen over time. Belts stretch and pulleys slip. Thus, regular maintenance and calibration are mandatory. Think of it like tuning a musical instrument. You must tune it to play beautiful music. Similarly, you must calibrate your printer for perfect prints. This process ensures that the machine moves exactly where it should.
Moreover, calibration saves both time and money. Failed prints waste expensive filament. They also waste hours of printing time. By investing an hour in calibration, you save days of frustration. You will experience higher success rates. Your prints will have better dimensional accuracy. Additionally, the surface finish will improve dramatically. This guide provides a comprehensive walkthrough. We will cover every aspect of the calibration process. Whether you are a beginner or an expert, this knowledge is essential. You will gain total control over your machine.
Preparing Your Machine for the Calibration Process
How to calibrate a 3d printer? Before diving into software settings, check the hardware. The physical frame is the foundation of your printer. If the frame is loose, calibration will not help. Therefore, start by inspecting all the screws. Use a screwdriver to tighten them. However, do not overtighten them. This can strip the threads. Just ensure everything is snug. Next, examine the gantry. It must be square to the base. If it is crooked, the print layers will not stack correctly.
Furthermore, check the motion system. The belts must be tensioned correctly. A loose belt causes skipped steps. This results in layer shifts. You want the belts to be tight like a guitar string. But they should not be so tight that they strain the motor. Additionally, inspect the wheels on the carriage. They should roll smoothly. They should not wobble. You can adjust the eccentric nuts to tighten them. This removes any play in the system.
Moreover, lubrication is vital for smooth movement. Apply a small amount of grease to the lead screws. Also, grease the linear rails. This reduces friction. Consequently, the motors work less. This improves the lifespan of your machine. Once the hardware is solid, you can proceed to the software. Ensure your printer’s firmware is up to date. Newer firmware often includes better calibration tools. Connect your printer to your computer. Or use the onboard screen if available. Preparation is the first step towards success. Never skip this crucial stage.
Mastering the Art of Bed Leveling
How to calibrate a 3d printer? Bed leveling is perhaps the most critical step. The first layer defines the success of the print. If the nozzle is too close, it scratches the bed. If it is too far, the print will not stick. Therefore, you must master this skill. Most modern printers in 2026 have auto-leveling sensors. These sensors measure the bed’s irregularities. They create a mesh map. Consequently, the printer compensates for an uneven bed. However, you still need to set the Z-offset correctly.
To begin, heat up the nozzle and bed. Materials expand when heated. Therefore, leveling should be done at printing temperatures. Place a piece of paper on the bed. Move the nozzle to the first corner. Lower the Z-axis until the nozzle touches the paper. You should feel a slight resistance. Pull the paper. It should slide with a bit of friction. Repeat this for all four corners. Then, check the center. This manual process ensures a good baseline.
Furthermore, utilize the mesh visualization tools. Many slicers offer this feature. They show you a topographical map of your bed. You can see high and low spots. This helps you understand your bed’s condition. If the bed is severely warped, you might need a shim. Or you can use a glass plate for a flat surface. In 2026, some printers use “scanner” modes. They scan the surface with a laser. This provides ultra-precise data. Regardless of the technology, the goal is the same. You need a consistent gap between the nozzle and the bed. This guarantees perfect first layer adhesion.
Fine-Tuning Extruder Steps for Accuracy
How to calibrate a 3d printer? The extruder is the heart of your printer. It pushes filament through the hot end. It must deliver the exact amount of plastic. If it pushes too much, you get over-extrusion. This leads to blobs and zits. If it pushes too little, you get under-extrusion. This causes weak prints and gaps. Therefore, calibrating the extruder steps is essential. This is often called calibrating the E-steps.
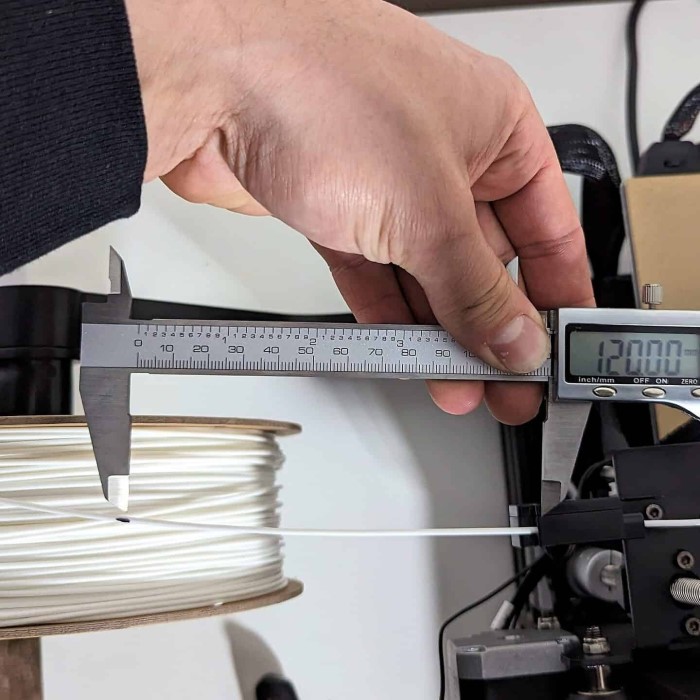
First, you need to measure the current flow. Mark a point on your filament 120mm from the extruder. Use a ruler for accuracy. Then, command the printer to extrude 100mm of filament. You can do this via the control panel. After the extrusion stops, measure the distance again. Ideally, the mark should be 20mm from the extruder. If it is different, your E-steps are incorrect. You need to calculate the new value. Use the formula: (Current E-steps * 100) / Actual Distance Extruded.
Furthermore, enter this new value into the firmware. Save the settings to memory. Then, repeat the test. Verify that exactly 100mm is extruded. This ensures the motor moves the correct distance. Additionally, check your extruder hardware. Some extruders have “slipping” issues. The gear spins but does not grip the filament. This ruins the calibration. Ensure the tension spring is tight enough. The gear should bite into the filament slightly. This mechanical precision leads to reliable printing. Accurate E-steps mean the printer puts down exactly the plastic it intends to.
Adjusting Flow Rate and Temperature Settings
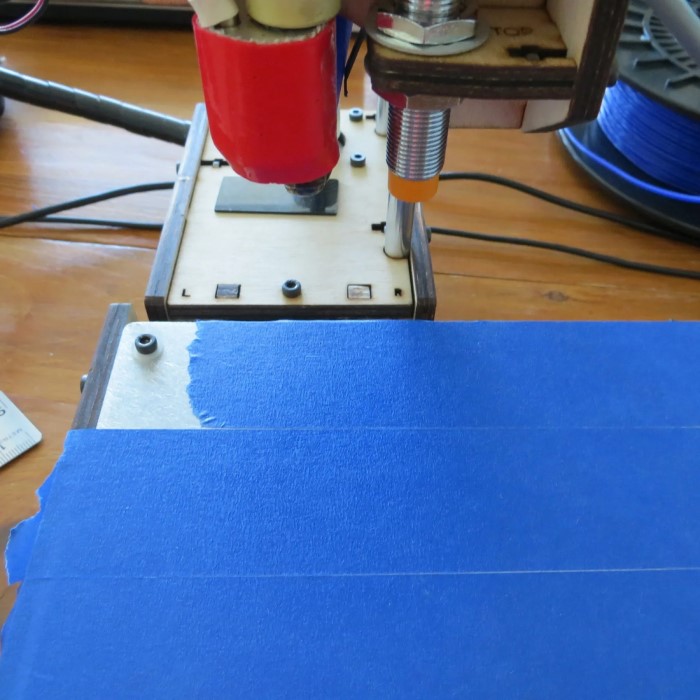
Once the E-steps are correct, look at the flow rate. Flow rate is a slicer setting. It determines how much plastic the nozzle extrudes during a print. Even with correct E-steps, different materials behave differently. Some filaments are thicker. Some melt more easily. Therefore, you adjust the flow rate to compensate. A standard test is printing a hollow cube. Print it with a single perimeter wall.
After printing, measure the wall thickness. Use digital calipers for this. The wall should match your slicer setting. For example, if you set a 0.4mm line width, measure the wall. If it measures 0.45mm, you are over-extruding. You need to lower the flow rate. Calculate the adjustment. If you set 100% flow and get 0.45mm, lower it to roughly 90%. Then, print again and measure. Fine-tuning this setting results in incredibly clean surfaces.
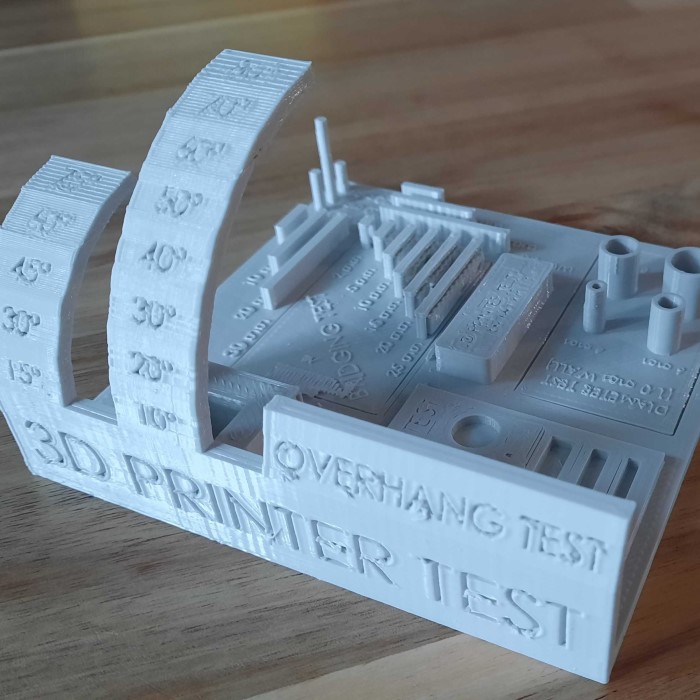
Moreover, temperature affects flow. Higher temperatures make plastic runnier. Lower temperatures make it thicker. Therefore, you must find the sweet spot. Print a temperature tower. This is a model that tests different temperatures. You can print it all in one go. Observe which temperature looks the best. Look for good layer adhesion. Also, look for minimal stringing. Once you find the ideal temperature, note it down. Use it for that specific brand of filament. Proper flow and temperature work together. They ensure the material behaves exactly as you expect.
Eliminating Ghosting and Vibration Artifacts
How to calibrate a 3d printer? Have you ever seen ripples on the surface of a print? This is called ghosting. It usually appears near sharp corners. It happens because the printer vibrates. The heavy print head changes direction quickly. The frame shakes. Consequently, the nozzle moves slightly off course. This creates a ghost image of the feature. To fix this, you must address the mechanics.
First, check the belt tension again. Loose belts exacerbate vibration. Also, ensure the frame is rigid. You can add brackets to strengthen the frame. Furthermore, look at the acceleration settings. High acceleration causes rapid direction changes. This generates more force. By lowering the acceleration, you reduce vibration. However, this slows down the print. In 2026, many printers use “Input Shaping.” This is a software feature. It predicts the vibration. It moves the motors to cancel it out.
To calibrate this, you need an accelerometer. Some printers have it built-in. Others require an external module. The printer measures its own vibration frequency. It then tunes the Input Shaper to match. This is a game-changer. It allows you to print at high speeds without ghosting. If you do not have this feature, simply reduce speed. A slower print is a cleaner print. However, upgrading your firmware to support Input Shaping is highly recommended. It brings your printer to a professional level.
Ensuring Dimensional Accuracy for Parts
Sometimes a print looks beautiful but does not fit. This is a dimensional accuracy issue. You print a hole, but the screw does not fit. This is incredibly frustrating. The problem is usually with the printer’s movement. Or it is a shrinkage issue with the plastic. Filaments like ABS shrink significantly when cooling. Therefore, you must account for this.
First, print a test cube. Measure the X, Y, and Z dimensions. Use precise calipers. Compare them to the digital model. If the cube is 20.2mm instead of 20mm, your prints are too big. This means the nozzle is slightly off position. You can adjust the “steps per mm” for the X and Y axes. This is similar to the E-steps calibration. However, be careful. Changing these values affects the geometry of circles and squares.
Furthermore, consider the filament shrinkage. You can scale your model in the slicer. If you know ABS shrinks by 1%, scale the model by 101%. This compensates for the material properties. Additionally, check your wall overlap settings. If the walls overlap too much, the print expands. This happens in the inner dimensions of holes. You can increase the “horizontal expansion” compensation. This tells the printer to pull the walls in slightly. Achieving dimensional accuracy requires patience. You test, measure, adjust, and repeat. But the result is functional parts that fit together perfectly.
Maintaining Your Calibration for Long-Term Success
Calibration is not a one-time event. It is a continuous process. Your printer changes as you use it. Belts loosen. Wheels wear down. Therefore, you must check calibration regularly. Establish a maintenance routine. Once a month, check the belt tension. Lubricate the rods. Also, re-run the bed leveling test. This keeps the machine running smoothly.
Furthermore, keep a log of your settings. Note the temperatures for each filament brand. Record your flow rate adjustments. This saves time in the future. You do not have to recalibrate from scratch. You can simply look up your previous settings. Additionally, listen to your printer. New noises often indicate a problem. A grinding sound might mean a loose pulley. A clicking sound might mean a clogged nozzle. Address these issues immediately.
Finally, clean your printer. Dust is the enemy of mechanical parts. Dust on the rails causes wear. It also finds its way into the nozzle. A clean printer is a precise printer. By following these habits, you extend the life of your machine. You also ensure that every print is a success. Learning how to calibrate a 3d printer is a journey. It connects you with your machine. You understand its needs. You become a true maker.
Frequently Asked Questions About 3D Printer Calibration
1. How often should I calibrate my 3D printer?
You should perform basic checks before every large print. This includes cleaning the bed and checking the first layer. A full calibration is necessary every few months. However, you must do it immediately if you notice print quality issues. If you move the printer or change parts, recalibrate everything. Regular maintenance prevents the need for major overhauls. It keeps your machine in peak condition.
2. Do I need special tools for calibration?
You do not need many tools. A set of hex keys is usually enough for mechanical adjustments. However, digital calipers are highly recommended. They allow you to measure accurately. A feeler gauge can help with bed leveling. For advanced users, an accelerometer helps with vibration calibration. Most calibration relies on observation and simple tests.
3. Why does my first layer fail even after leveling?
First layer issues can stem from several factors. The bed surface might be dirty. Oils from your hands prevent adhesion. Clean the bed with isopropyl alcohol. The nozzle temperature might be too low. Increase the temperature slightly for the first layer. Also, check your Z-offset. Even a leveled bed needs the correct starting height. The paper method is just an approximation.
4. Does changing filament require recalibration?
Yes, different materials behave differently. You usually do not need to recalibrate the hardware. However, you should adjust the software settings. Temperature and flow rate vary between brands. PLA prints differently than PETG. Create a profile for each material type. This ensures consistent results without hardware changes.
Conclusion
Mastering 3D printing is a rewarding endeavor. It transforms you from a consumer into a creator. The difference between a novice and an expert often lies in calibration. Understanding how to calibrate a 3d printer allows you to unlock the full potential of your hardware. You stop blaming the machine. You start solving problems. This guide has walked you through the essential steps. From bed leveling to flow rate adjustments, each step builds upon the last.
Take the time to know your machine. Embrace the process of tuning. It is not a chore. It is a part of the craft. As technology advances in 2026, these fundamental skills remain relevant. A well-calibrated printer produces strong, beautiful, and functional parts. It works reliably for years. So, grab your tools. Start the process. Watch your prints transform from good to perfect. Happy printing.