Introduction to Drawing Boys for Young Artists
Learning how to draw a boy is an exciting journey for any young artist. Many children and teenagers want to capture the human form in their sketches. However, the human figure can seem complicated at first. There are proportions to consider. There are angles to master. But, with the right approach, anyone can learn. Drawing is not just a talent. It is a skill that grows with practice. Therefore, this guide simplifies the process into manageable steps. We break down complex shapes. We turn them into simple lines and circles. Consequently, the fear of drawing fades away.
Furthermore, drawing offers benefits beyond just creating art. It improves fine motor skills. It enhances observation abilities. When a child studies a subject to draw it, they see the world differently. They notice details they missed before. For example, they see how a shirt folds. They see how hair falls on a forehead. This observation is a key part of cognitive development. In addition, art provides an emotional outlet. Teens often use drawing to express feelings they cannot put into words. A drawing of a boy can represent a friend, a hero, or even themselves. It is a safe space for expression.
Moreover, the methods in 2026 focus on fun and accessibility. We encourage mistakes. We promote experimentation. You do not need expensive tools to start. A simple pencil and paper are enough. The goal is to spark creativity. Once the basics are understood, the possibilities are endless. Kids can move from simple cartoons to more realistic portraits. Teens can develop their own unique style. They might enjoy manga, comic book styles, or realism. This article provides the foundation. It is the first step on a long and enjoyable artistic path. So, let us pick up a pencil and begin.
Essential Materials to Start Your Drawing Journey
Before we dive into the techniques of how to draw a boy, we need the right tools. Good materials make the process smoother. They also make the result more satisfying. Fortunately, you do not need a lot of expensive equipment. First, you need paper. Standard printer paper is fine for practice. However, a sketchbook is a better investment. It keeps all your drawings in one place. It also shows your progress over time. Look for paper that is slightly thick. Thin paper tears easily when you erase.
Next, you need pencils. A standard HB pencil is a great starting point. It makes dark lines but is not too soft. For sketching, many artists prefer a 2B pencil. It is softer and darker. It glides on the paper easily. You will also need a good eraser. A kneaded eraser is excellent for artists. It does not leave crumbs on the paper. You can shape it to erase small details. Additionally, a regular white vinyl eraser works well for larger areas. Erasing is a big part of drawing. You will make light lines first. Then, you will erase them as you refine the picture. Therefore, a good eraser is your best friend.
Finally, consider other useful tools. A sharpener is essential. A dull pencil creates smudgy lines. You want your lines to be crisp. A ruler can help with measuring proportions. It ensures the figure is not leaning too much. For teens who want to add color, colored pencils or markers are great. They bring the drawing to life. In 2024, digital tools are also popular. Many kids use tablets. Apps like Procreate or Sketchbook are powerful. They allow you to undo mistakes instantly.
Understanding Proportions: The Foundation of the Face
One of the biggest challenges in how to draw a boy is getting the face right. The face is where the character comes alive. To make a face look real, we must understand proportions. Proportions are the sizes of parts compared to the whole. For a front-facing boy, we use guidelines. Start with an oval shape. This is the head. Then, draw a vertical line down the center. This line ensures the face is symmetrical. Next, draw a horizontal line across the middle. This is the eye line. The eyes sit on this line.
Furthermore, the placement of other features follows rules. The bottom of the nose is usually halfway between the eye line and the chin. The mouth is about halfway between the nose and the chin. The ears sit between the eye line and the nose line. These rules are not rigid. Every face is unique. Boys often have slightly larger foreheads. Their chins might be a bit squarer than girls. However, these guidelines give you a framework. If you place the eyes too high, the boy will look like an alien. If you place the mouth too low, he will look like a monkey. Therefore, following the map helps.
In addition, remember that kids and teens look different from adults. A young boy has a rounder face. His eyes are bigger compared to the rest of the face. His nose is smaller. As a boy grows into a teenager, his face gets longer. His jawline becomes more defined. His neck gets thicker. Consequently, the age of your character changes the proportions.
How to Draw a Boy Step by Step for Beginners
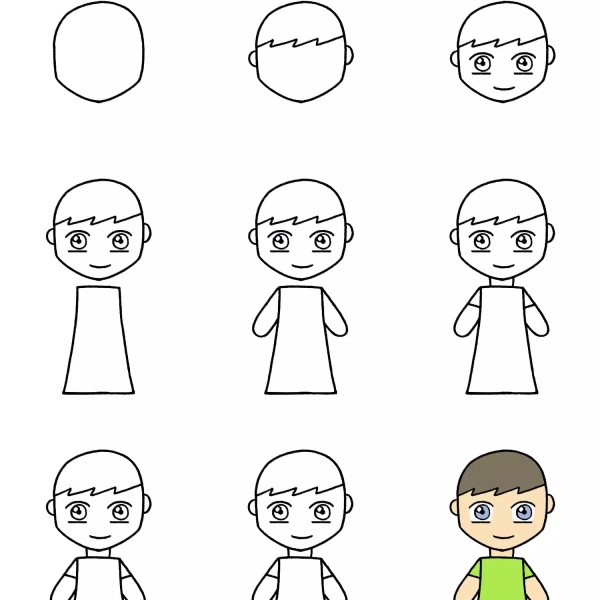
Now, let’s put the theory into practice. Here is a simple method for how to draw a boy. We will break it down. First, draw a large circle for the head. Under the circle, draw a curved line for the jaw and chin. Connect them to form the head shape. It should look like an upside-down egg. Next, divide the face with lines. Draw a vertical line down the center. Draw a horizontal line across the middle for the eyes. Add a shorter line below for the nose. Add another for the mouth. These lines keep everything in place.
Secondly, sketch the eyes. Place them on the horizontal line. The space between the eyes should be about one eye’s width. Boys’ eyebrows are often thicker and lower on the forehead than girls. Draw simple arches above the eyes. Then, add the nose. It sits on the vertical line. A simple curve or a slight angle works well for a cartoon style. For the mouth, draw a horizontal line. You can add a slight curve for a smile. Do not forget the ears. They start at the eye line and end at the nose line. They look like “C” shapes.
Thirdly, we draw the hair. Hair is fun but can be tricky. Do not draw every single hair. Instead, draw the shape of the hair. Outline the outer shape first. Then, add lines inside to show the direction of the hair. For boys, hair often overlaps the forehead.
Adding Personality: Hairstyles and Expressions
A drawing becomes special when it shows personality. Once you master the basic steps, you can experiment. How to draw a boy involves more than just a generic face. You want to create a character. Hair is a major part of this. In 2026, there are many trendy hairstyles for boys. Some boys have short buzz cuts. Others have long, flowing hair. Some have mohawks. To draw hair, think about texture. Short hair requires short, spiky strokes. Long hair requires flowing, curved lines. Look at pictures of real boys for inspiration. See how the light hits the hair. Add a few highlights to make it look shiny.
Moreover, facial expressions tell a story. A blank face is boring. Change the shape of the eyebrows to show emotion. Eyebrows raised high mean surprise. Eyebrows furrowed low mean anger. The mouth is also expressive. A wide “O” shape shows shock. A curved line shows happiness. A wavy line might show nervousness. You can also play with the eyes. Big, shiny eyes look excited. Half-closed eyes look sleepy or cool. Consequently, combining these features creates endless possibilities. You can draw a happy boy with spiky hair. You can draw a serious boy with glasses. These details give your character a soul.
In addition, accessories add interest. Does your boy wear a baseball cap? Maybe he has headphones around his neck. Perhaps he wears glasses. These items make the drawing unique. They also suggest hobbies.
Body Proportions and Action Poses
Drawing the face is great, but the body is important too. A figure drawing lesson on how to draw a boy must include the body. For kids and teens, the “stick figure” method is a good start. It helps you plan the pose. Draw a line for the spine. Add small circles for the joints like elbows and knees. This stick figure acts as a skeleton. It is the framework for the body. You can move these lines around. You can make the figure run, jump, or sit. It is much easier to change a stick figure than a fully drawn body.
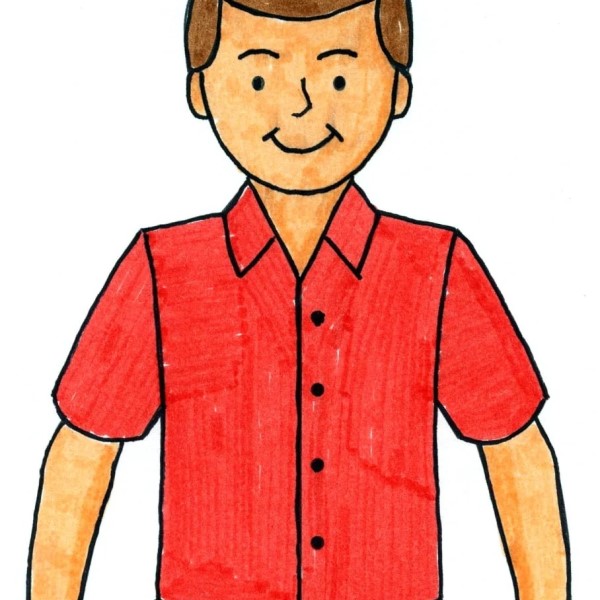
Once the stick figure is ready, you add the “flesh.” Draw cylinders over the arm and leg lines. Draw a chest shape over the spine line. Boys typically have straighter figures than girls. Their shoulders are wider. Their hips are narrower. For a cartoon style, you can exaggerate these shapes. You might draw a large chest and skinny legs for a funny look. For a more realistic look, study anatomy. Look at where muscles connect. However, for beginners, simple shapes work best. Just ensure the left side matches the right side. Symmetry is key for a standing figure.
Furthermore, action poses make drawings exciting. A standing boy is static. A running boy is dynamic. To show movement, tilt the body. Do not make the figure perfectly vertical. Bend the arms and legs. Use “line of action.” This is an imaginary line that flows through the body. It curves to show motion. If the boy is kicking a ball, his whole body curves.
Common Mistakes to Avoid While Drawing
When learning how to draw a boy, beginners often make similar mistakes. Recognizing these pitfalls helps you improve faster. One common mistake is stiff hands. Many kids draw hands like mittens or hidden behind the back. Hands are difficult. However, they are expressive. Start with simple shapes. Draw a square for the palm. Draw sausages for the fingers. Do not be afraid to draw them. With practice, they get easier. Another mistake is placing the eyes too high. Remember the guidelines. Eyes belong in the middle of the head. If you place them near the forehead, the boy looks bald or strange.
Another issue is heavy lines. Beginners often press too hard with their pencils. This makes it hard to erase mistakes. It also smudges the paper. Start with light, sketchy lines. Use your whole arm, not just your wrist. This creates smoother curves. Once you are happy with the shape, then you press harder. Darken the final lines. This is called “inking.” It makes the drawing clean. Also, be careful with symmetry. It is easy to make one eye bigger than the other. constantly check your drawing in a mirror. Looking at it in reverse reveals mistakes your brain missed. This is a professional trick.

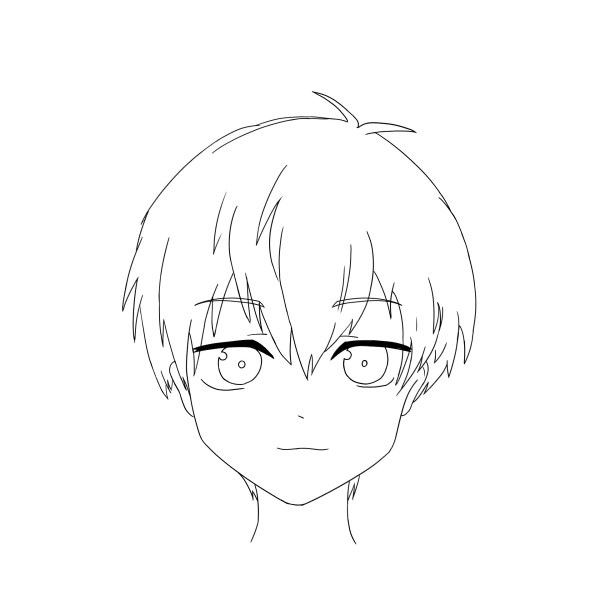
Advanced Tips for Teens: Moving Towards Realism
For teenagers who have mastered the basics, the next step is realism. How to draw a boy realistically involves more detail. You move from symbols to observation. For example, beginners draw an eye like a football shape. In realism, you study the anatomy of the eye. You draw the eyelids. Shading becomes crucial. Light and shadow give the face volume. You need to understand where the light comes from. If the light is from the right, the shadows are on the left. This makes the face look 3D instead of flat.
To achieve this, use a range of pencils. Use hard pencils (H) for light lines. Use soft pencils (B) for dark shadows. Blending tools like tortillons help smooth the shading. You blend the graphite to create gradients. These gradients represent skin tones. Real skin is not one color. It has highlights, mid-tones, and deep shadows. Study reference photos. Do not guess how light hits a face. Look at a real photo. Analyze it. Where are the darkest darks? Where are the lightest lights? Copy what you see. This trains your eye to see value. Value is the lightness or darkness of a color.
FAQ: Answering Your Top Drawing Questions
How to draw easy a boy?
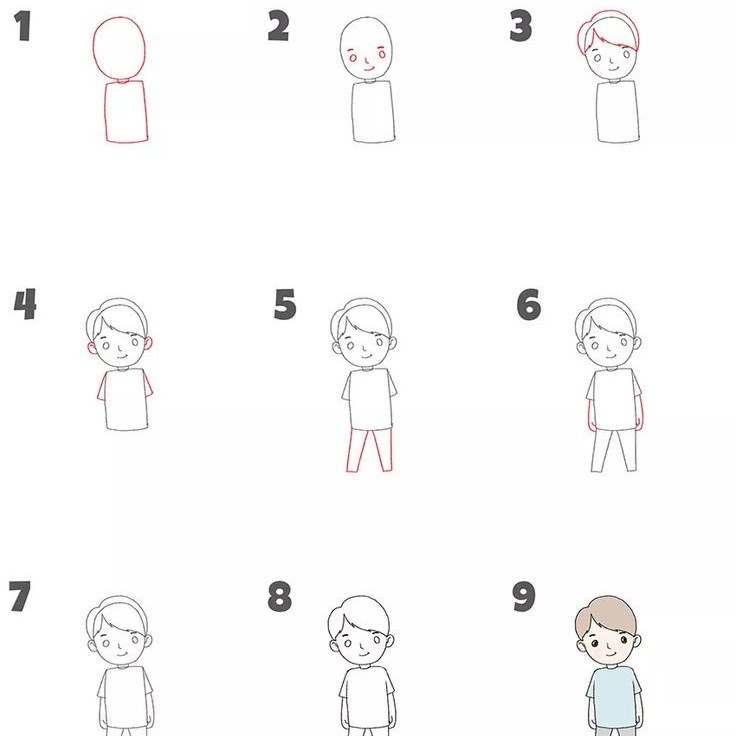
Drawing an easy boy starts with simple shapes. First, draw a circle for the head. Then, draw a square or rectangle for the body. Add stick arms and legs. Next, turn the stick arms into sausages. Turn the stick legs into cylinders. Draw a simple face with two dots for eyes and a curve for a mouth. Add hair on top. Finally, draw simple clothes like a t-shirt and shorts. Keep the shapes round and soft. This makes the boy look friendly. Do not worry about details. Cartoon styles are the easiest for beginners. You can create a cute boy with just a few lines.
What can a 7 year old draw realistic?
Seven-year-olds are developing fine motor skills. They can draw subjects that are not too complex. A realistic cat or dog is a great choice. They can focus on basic textures like fur. Flowers and plants are also good. They have clear shapes and colors. A simple landscape with a house and a tree is achievable. They can observe the shapes of the leaves and the clouds. Insects like butterflies are also fun. They have symmetry. This helps with understanding balance. The key is to encourage observation. Ask them to look closely at the object. What shape is it? Where are the legs? Guide them gently.
How to draw kuromi very cute?
Kuromi is a popular character known for being cute. To draw her, start with her skull-shaped hat. Draw a rounded skull shape with two pointy ears on top. Then, draw her face below it. Kuromi has big, expressive eyes. Draw two large ovals. Add small circles inside for the shine. Her nose is a small black oval. She usually has a frowning mouth, but you can make her smile. Her body is small and round. Draw a simple dress and tiny feet. To make her “very cute,” make her head slightly bigger than her body. This is a “chibi” style. It makes any character look adorable. Add pink cheeks for extra cuteness.
How to make a realistic boy?
To make a realistic boy, you must focus on shading and anatomy. Start with a reference photo. Do not draw from memory. Study the proportions carefully. Use a grid if it helps. Sketch the basic shapes lightly. Then, slowly build up the details. Pay attention to the eyes. They are the most important part. Use a kneaded eraser to lift highlights. This creates the shine in the eye. For the skin, use a blending stump to smooth the graphite. Create smooth transitions between light and dark. Avoid hard outlines. Use shadows to define the nose and lips. Hair should be drawn in clumps, not single strands. Be patient. A realistic drawing takes many hours to complete.
Conclusion
Mastering how to draw a boy is a rewarding experience. It opens up a world of creativity. You can tell stories with your art. You can capture the likeness of friends and family. The journey begins with simple circles and lines. It progresses to complex shading and anatomy. Remember that every artist starts as a beginner. The key is consistent practice. Keep a sketchbook. Draw every day. Do not be afraid to make mistakes. They are part of learning. Whether you are a kid drawing a superhero or a teen sketching a portrait, the process is the same. Observe, practice, and enjoy. The world needs your art. So, pick up that pencil and start drawing today.