Introduction
Creating a DIY sensory table is a fantastic way to engage children in interactive, educational play. Sensory tables provide kids with the opportunity to explore different textures, colors, and materials. The hands-on experience helps to develop fine motor skills while sparking curiosity and creativity. In today’s blog, we will delve into several creative DIY sensory table ideas that you can easily implement at home. By the end of this article, you will understand the benefits of sensory play and how to create an enriching environment for your kids.
Benefits of Sensory Play for Children
Engaging in sensory play offers numerous advantages for children during their developmental journey. It promotes learning through exploration while fostering valuable physical, mental, and emotional skills. Sensory play allows kids to interact with different materials, stimulating their senses and supporting overall growth.
Cognitive Development Through Sensory Play
Sensory play strengthens critical thinking and problem-solving. Children discover cause-and-effect relationships by experimenting with materials. Activities like sorting and matching improve memory and concentration. Exposure to textures, colors, and sounds builds sensory pathways in the brain, enhancing learning efficiency.
Enhancing Fine and Gross Motor Skills
Sensory play exercises hand-eye coordination and muscle strength. Pouring, scooping, and grasping items help refine fine motor skills. Activities like digging and lifting develop gross motor abilities. These physical skills are essential for daily tasks and school readiness.
Encouraging Imagination and Creativity
Sensory play sparks imaginative thinking. Children create stories, scenarios, and explore pretend play with sensory items. Open-ended materials promote creativity as kids invent new uses or design their own games. These activities allow children to express themselves freely and build confidence.
Materials Needed
Creating a sensory table at home can be simple and cost-effective. Gathering the right materials ensures your table is fun and functional.
Budget-Friendly Materials
You don’t need to spend much to build a DIY sensory table. Start with inexpensive items you may already have at home or purchase affordably:
- Plastic bins: Use shallow bins or trays for easy access to sensory materials.
- Cardboard boxes: Perfect for temporary or lightweight designs.
- PVC pipes: Great for framing sturdy DIY tables.
- Old furniture: Repurpose wooden coffee tables or desks.
- Recyclable materials: Save jars, yogurt tubs, and lids for sensory fillers.
- Craft fillers: Sand, rice, pasta, and beans are inexpensive sensory tools.
These materials allow you to set up a versatile and creative play area without high expenses.
Tools and Craft Supplies
Building a sensory table requires basic tools and supplies. You won’t need high-tech equipment, just practical items like:
- Measuring tape: Ensures accurate dimensions for fitting bins and compartments.
- Saws: Useful for cutting wood, PVC pipes, or cardboard boxes.
- Screwdriver and screws: Assemble durable pieces securely.
- Glue or adhesive strips: Attach lightweight materials with ease.
- Sandpaper: Smooth rough edges for child safety.
- Paint or markers: Add color or decorate the table for themed use.
Equipped with these tools, you’ll have everything you need to construct a sensory table that’s ready for hours of creative play.
Step-by-Step Guide
Building a DIY sensory table can be an enjoyable and rewarding project. Follow these simple steps to create a functional and fun table for sensory play.
Choosing the Right Table Base
Select a sturdy base to ensure stability during play. Here are a few ideas:
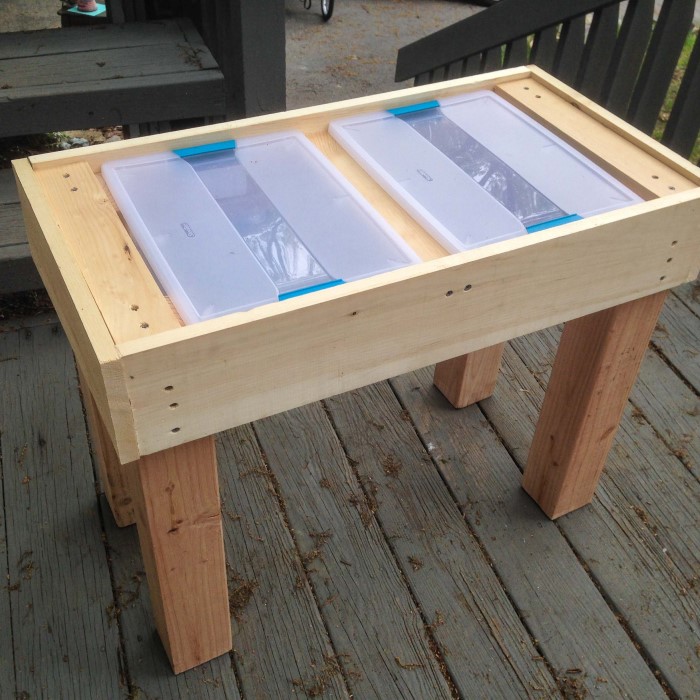
- Repurpose old furniture: Use an old coffee table or desk to save time and money.
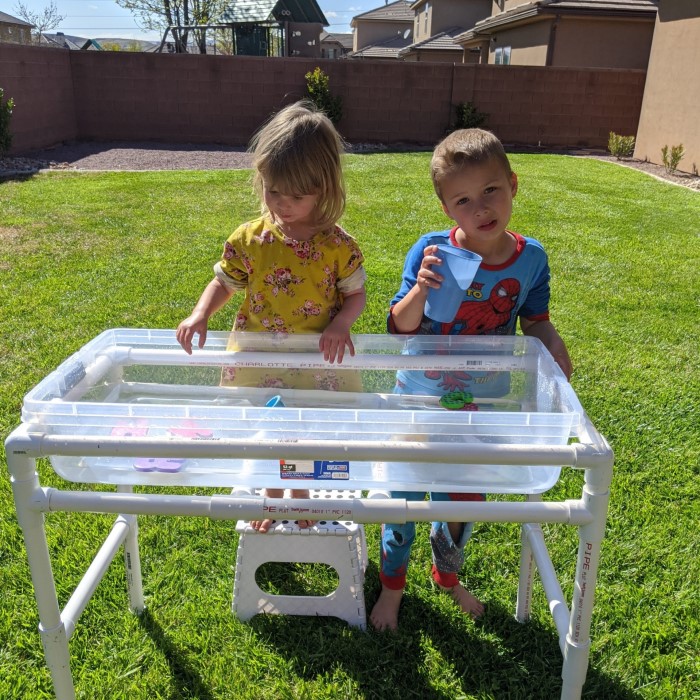
- Use PVC pipes: These are lightweight and durable, perfect for creating custom table frames.
- Select plastic bins: These can act as both compartments and the table itself when placed on a frame.
Make sure the height of the table suits your child’s comfort. This ensures long play sessions without strain.
Adding Storage and Compartments
Organize sensory materials with added storage. This keeps everything tidy and accessible. Consider these options:
- Attach baskets or bins beneath the table: Use hooks or screws to secure them.
- Divide the table surface: Use wooden partitions to create separate compartments for different materials.
- Add shelves or boxes nearby: Make space for tools, fillers, and accessories.
This helps in quick setup and clean-up after activities.
Ensuring Durability and Safety
Safety is crucial when crafting for kids. Focus on these points:
- Smooth all edges: Sand down wood or PVC pipes to prevent cuts and scrapes.
- Use non-toxic paint or varnish: Ensure materials are kid-safe and long-lasting.
- Secure all parts tightly: Avoid loose screws or unstable attachments for stability.
- Waterproof materials if needed: Protect against damage when using water or messy fillers.
A sturdy, safe sensory table lasts longer and provides worry-free playtime.
By following these steps, you can create a personalized sensory table that inspires fun and creativity. Ensure you involve your child during the setup process to boost excitement for sensory play.
Sensory Table Fill Ideas for Different Themes
Sensory table themes add variety to play and keep kids engaged. Picking creative ideas stimulates curiosity and learning. Here are some exciting fill ideas for different themes.
Nature-Inspired Sensory Table Ideas
Bring the outdoors inside with nature-inspired sensory tables. These ideas foster a connection with nature:
- Sand and rocks: Mimic a miniature desert or outdoor playground.
- Leaves and pinecones: Perfect for exploring textures and seasonal beauty.
- Shells and pebbles: Create a beach environment for discovery.
- Potting soil and seeds: Encourage planting and watering activities to teach about growth.
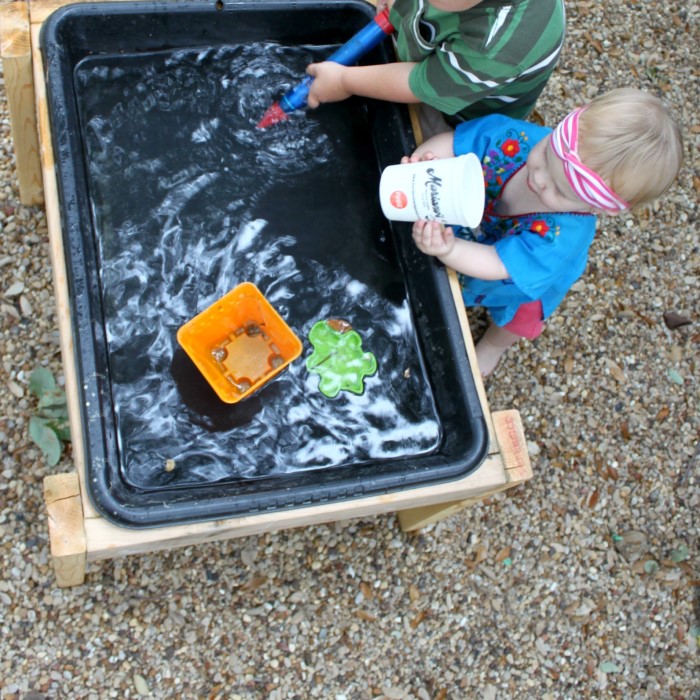
- Water with floating leaves: Introduce kids to concepts like buoyancy and movement.
These setups provide sensory stimulation while teaching about natural elements.
Seasonal Sensory Table Setups (Spring, Summer, Fall, Winter)
Seasonal themes can make sensory tables more dynamic. Children learn to relate elements to seasons:
- Spring: Add plastic flowers, faux grass, and toy insects for a blooming garden setup.
- Summer: Use water beads, seashells, and mini boats to create a beach-themed table.
- Fall: Incorporate dried corn kernels, colorful leaves, and small pumpkins.
- Winter: Fill with fake snow, cotton balls, and mini snowmen or penguin figurines.
Changing themes regularly keeps the sensory table exciting and fresh for kids.
Food-Based Sensory Table Materials
Edible items make sensory play safe and fun for younger kids. Try these ideas:
- Dry pasta shapes: Offer a fun tactile experience with varied sizes and textures.
- Rice or lentils: Great for pouring, scooping, and sorting activities.
- Cereal: Serve as a crunchy filler that’s also safe for toddlers.
- Gelatin: Let kids poke and squish for a fun, wobbly sensory experience.
- Fruit slices: Include orange wedges or apple slices for vibrant smells and textures.
Food-based materials are ideal for toddlers and ensure harmless play.
Each sensory table idea can be customized to fit kids’ interests and developmental needs. Switch up themes often to maintain interest and encourage creativity.
Play Activities to Incorporate with a Sensory Table
Sensory tables are versatile tools for promoting learning through play. By incorporating specific activities, you can make sessions more engaging and educational. These activities help kids explore, learn, and have fun simultaneously.
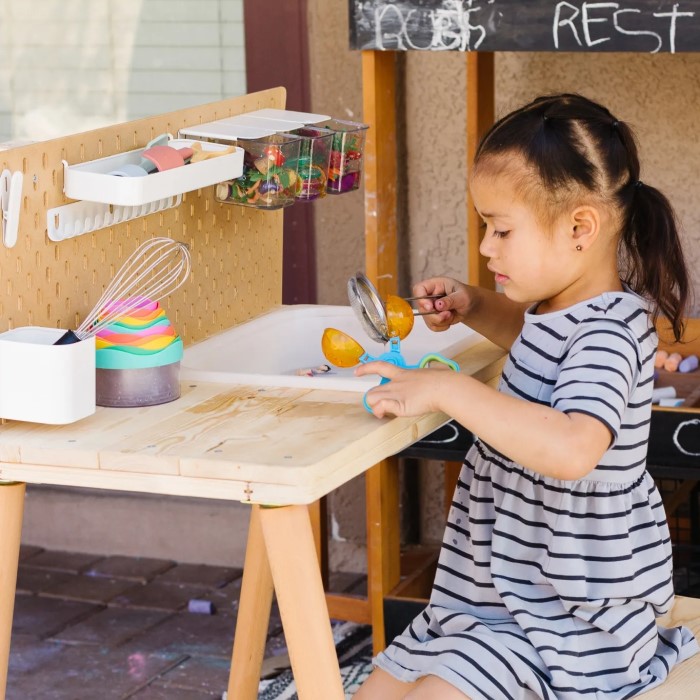
Hands-On Experience with Measuring Tools
Introduce kids to simple measuring tools during sensory play. This activity encourages math and science exploration:
- Use measuring cups and spoons: Fill them with rice, sand, or water.
- Explore volume and capacity: Compare how much each container can hold.
- Introduce scales: Weigh items like beans or small toys to understand balance and comparison.
- Practice counting: Count scoops of filler material while introducing numbers.
Hands-on measuring is an excellent way to build foundational STEM skills.
Exploring Textures with Sand, Water, and Slime
Textures provide rich sensory experiences and keep children curious. Offer a variety of materials for them to explore:
- Sand: Let kids scoop, mold, and build shapes.
- Water: Use floating objects or create waves for play.
- Slime or playdough: Encourage poking, stretching, and shaping for tactile play.
- Mixed materials: Combine items like pebbles, beads, or sponges to enhance exploration.
These activities stimulate touch while fostering creativity and sensory awareness.
Role-Playing Games and Scenarios
Use sensory tables to spark imaginative play and storytelling. Incorporate props and themes for role-playing:
- Construction zone: Add toy trucks, rocks, and sand.
- Underwater world: Use water, toy sea creatures, and shells.
- Cooking station: Add pots, spoons, dried pasta, or pretend food.
- Treasure hunt: Hide small items in sensory fillers for kids to discover.
Role-playing encourages social interaction, communication skills, and creative thinking.
Incorporating these activities with your DIY sensory table creates endless opportunities for fun and learning. Tailor the activities to your child’s interests to keep playtime engaging.
Tips for Maintaining and Organizing a Sensory Table
Cleaning and Hygiene Practices
Keeping a sensory table clean is essential for safe and enjoyable play. Follow these practices:
- Wash materials regularly: Clean sensory fillers like rice, sand, and beans to remove dirt.
- Disinfect tools: Wipe down measuring cups, spoons, and toys with kid-safe cleaning solutions.
- Dry items before reuse: Wet fillers like pasta or rice can spoil if not completely dried.
- Remove unusable fillers: Dispose of damaged or unsafe materials to prevent contamination.
- Wipe the table surface: Use a damp cloth after messy play sessions to remove spills and residue.
- Use washable liners: Place waterproof mats under the table for easier clean-up after activities.
Hygiene ensures kids stay healthy while enjoying sensory play.
Storage Solutions for Accessories and Tools
Organizing sensory table accessories keeps playtime efficient and clutter-free. Consider these storage ideas:
- Use labeled bins: Sort fillers by type (sand, rice, etc.) with labeled containers for easy access.
- Add stackable boxes: Store measuring tools and props in compact boxes for space-saving arrangements.
- Install hooks nearby: Hang scoops, spoons, and small accessories within arm’s reach.
- Include shelves: Place nearby shelving units for larger organizing needs.
- Divide compartments: Use partitions within boxes to differentiate tools or props.
- Rotate supplies: Swap out fillers and accessories based on themes to keep the table fresh.
A well-organized sensory table promotes creativity and reduces cleanup time after play.
Ideas for Different Age Groups
Creating sensory tables for various age groups ensures tailored experiences that match developmental milestones. Sensory play can help toddlers, preschoolers, and older children learn while having fun.
Toddler-Friendly Sensory Activities
Toddlers benefit from simple sensory table setups that are safe and engaging. Focus on age-appropriate fillers and tools:
- Soft materials: Use cotton balls, pom-poms, or fabric scraps for gentle tactile exploration.
- Edible fillers: Provide Cheerios, dry pasta, or gelatin for safe sensory play.
- Colorful objects: Offer bright balls, ribbons, or stacking cups to stimulate visual senses.
- Pouring and scooping tools: Include small containers, spoons, and cups to improve hand coordination.
- Water play: Add floating toys or sponges for a fun and mess-free experience.
Keep activities simple and supervised to ensure safety and enjoyment for toddlers.
Sensory Table Hacks for Preschoolers
Preschoolers thrive on activities that challenge their growing skills and curiosity. Use materials and setups that encourage learning:
- Sorting and matching: Provide buttons, small toys, or colored beads for categorizing by size or color.
- Role-playing themes: Create pretend play setups like a mini farm or grocery store with sensory fillers.
- Interactive tools: Introduce measuring cups, toy scales, or funnels to explore quantities and functions.
- Creative crafts: Incorporate items like playdough, stamps, or pipe cleaners for artistic play.
- Learning stations: Divide the table into sections for digging, pouring, or building challenges.
These activities promote imagination, motor skills, and early problem-solving development for preschoolers.
Advanced Activities for Older Children
Older kids need sensory table ideas that are interactive, brain-stimulating, and challenging. Set up activities to match their interests and abilities:
- STEM experiments: Add magnets, small gears, or building blocks for engineering and discovery play.
- Science themes: Include items like fossils, mini telescopes, or microscopes for explorative learning.
- Complex textures: Offer kinetic sand, slime, or gravel for more intricate sensory experiences.
- Creative storytelling props: Add figurines, lego pieces, or toy animals for role-playing scenarios.
- Art materials: Include paints, brushes, or clay for detailed craftwork.
Each setup encourages older children to think critically, solve problems, and express creativity.
Tailoring sensory tables for different age groups helps maintain engagement while supporting their developmental needs.
FAQs
How to Encourage Kids to Play with a Sensory Table
Creating excitement is key to engaging children with a sensory table. Use these strategies:
- Involve them during setup: Let kids help choose materials and themes for the table.
- Demonstrate activities: Show them how to scoop, pour, or sort items to spark interest.
- Create fun challenges: Add games like treasure hunts or sorting tasks to make play interactive.
- Change themes regularly: Keep the table fresh by rotating fillers based on their preferences.
- Invite friends for group play: Social interaction can increase curiosity and enjoyment.
These steps make sensory tables exciting and encourage children to explore their creativity freely.
Safety Tips for Using a Sensory Table
Safety is essential for worry-free play. Take these precautions:
- Use non-toxic materials: Ensure all fillers and accessories are safe for children.
- Smooth rough edges: Sand down sharp surfaces to prevent cuts.
- Supervise younger kids: Avoid choking hazards by keeping small items out of reach.
- Wash hands before and after play: Prevent the spread of germs during sensory table activities.
- Secure attachments: Tighten loose screws or unstable parts to ensure stability.
- Avoid allergens: Check for possible allergy triggers in fillers like seeds or grains.
Following these tips provides a safe environment for kids to enjoy sensory play.
How Often Should You Rotate Sensory Table Themes?
Refreshing themes maintains curiosity and excitement. Here’s a simple guide:
- Rotate biweekly or monthly: Change fillers every 2–4 weeks to keep activities engaging.
- Incorporate seasonal themes: Match setups with seasonal changes like summer beaches or winter snow.
- Align with interests: Adjust themes based on what excites your child, such as animals or vehicles.
- Reuse materials creatively: Mix old fillers with new accessories to create fresh experiences.
- Balance simplicity and variety: Ensure themes remain engaging but manageable for cleanup.
Consistent rotation fosters learning and motivates kids to explore the sensory table repeatedly.
Conclusion: The Lasting Impact of DIY Sensory Tables
Incorporating a DIY sensory table into your child’s playtime can lead to significant developmental benefits. By using creative materials and themes, you can foster curiosity and engagement. Sensory play is not just a fun activity; it provides essential learning opportunities for growth. Remember, the goal is to make play enjoyable while promoting cognitive, social, and emotional skills.
By embracing DIY sensory tables, you create spaces that are both enjoyable and educational. As you explore these ideas, consider what works best for your child. Engage them in the process, allowing them to contribute ideas and materials. Ultimately, the journey of creative exploration is what makes sensory play so valuable in a child’s development.
In summary, remember to embrace the creativity involved in building a DIY sensory table. With a focus on engagement, exploration, and learning, you can transform simple materials into an exceptional sensory experience for your children. Dive into this world of sensory play today and watch your kids thrive!