Introduction to Melted Crayon Artm
Melted crayon art idea is a fun, creative way to make colorful designs. It transforms old crayons into vibrant artwork through heating techniques. The process involves melting melted crayon art ideas until they become liquid, then using the melted material for artistic projects.
This form of art is popular because it’s easy, versatile, and eco-friendly. It allows you to reuse broken and unused crayons, minimizing waste. You can create abstract designs, personalized crafts, or even decorative objects.
Melted crayon art is also perfect for kids and beginners. The projects can be simple, yet offer endless options for creativity. From unique home decor to playful crafts, melted crayons unlock countless possibilities for artistic expression.
Whether you’re a seasoned artist or just starting to explore creativity, melted crayon art ideas bring something fresh to every project. You’ll find this art medium inspiring and full of color-rich potential.
Tools and Materials Needed for Melted Crayon Projects
To create stunning melted crayon art, you need the right tools and materials. Here’s a simple guide to get you started:
Essential Tools:
- Crayons: Gather an assortment of crayons, old or new, in various colors.
- Heat Source: Use a hairdryer, heat gun, or an oven for melting crayons safely.
- Canvas or Surface: Choose a canvas, paper, or any heat-resistant surface for your artwork.
- Peeler or Knife: Have a tool ready to peel off crayon wrappers.
- Hot Glue Gun: Use this to stick crayons onto your surface (optional for some projects).
- Heat-Resistant Gloves: Ensure safety while handling hot surfaces or melted wax.
Additional Materials:
- Protective Coverings: Use newspaper, cardboard, or a drop cloth to protect workspaces.
- Molds: Consider silicone molds if you’re creating shapes or new crayon forms.
- Paint Brushes: Helpful for spreading or controlling melted wax.
- Jars or Containers: Great for projects like crayon-infused candles.
- Skewers or Toothpicks: For creating fine details or swirling melted colors.
Optional Additions:
- Glitter: Add sparkle to your melted crayon art.
- Stencils: Use these to create patterns or shapes on your canvas.
- Accessories for Design: Try items like beads, buttons, or sequins for mixed-media projects.
Having these tools and materials ready makes any “melted crayon art ideas” easier to execute. Whether you are creating abstract designs or functional decor, these supplies will set you up for success.
Tips for Safely Melting Crayons at Home
Melting crayons is fun, but safety must come first. Handling hot materials demands care and preparation. Here’s how to stay safe while enjoying melted crayon art.
Use a Well-Ventilated Workspace
Ensure good airflow to avoid inhaling fumes from heated wax. Work near an open window or use a fan.
Handle Heat Sources with Care
Use only safe tools like hairdryers, heat guns, or ovens. Never leave heat sources unattended. If using an oven, monitor temperature closely.
Protect Your Workspace
Cover surfaces with newspaper or cardboard to catch spills. Keep delicate items away from hot wax.
Wear Protective Gear
Wear heat-resistant gloves to protect your hands. Use aprons or old clothes to avoid stains.
Supervise Kids During Projects
If children are involved, provide close supervision. Teach them about safety measures while crafting.
Avoid Using Harmful Materials
Do not mix crayons with flammable or toxic substances. Stick to safe additions like glitter or buttons.
Keep Tools Organized
Place all tools like knives and hot glue guns safely when not in use. Avoid clutter on your workspace.
Test Techniques First
Practice melting small amounts first to control wax flow. Perfect your methods before starting larger projects.
By following these safety tips, you can enjoy melted crayon art ideas with peace of mind.
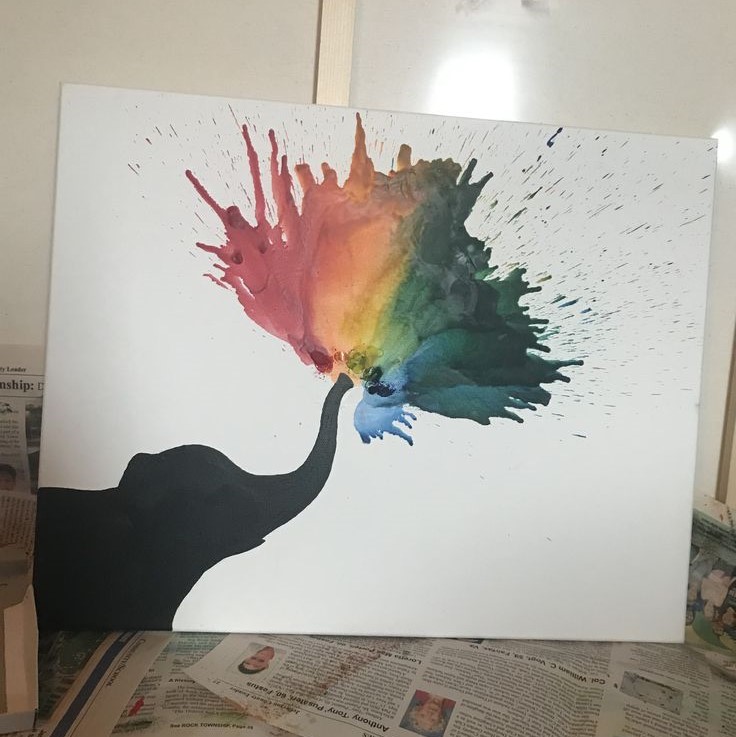
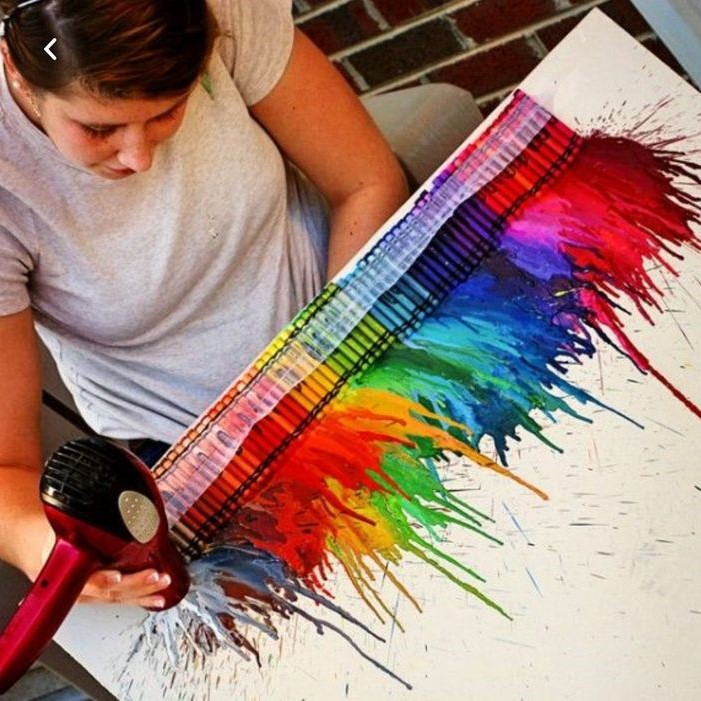
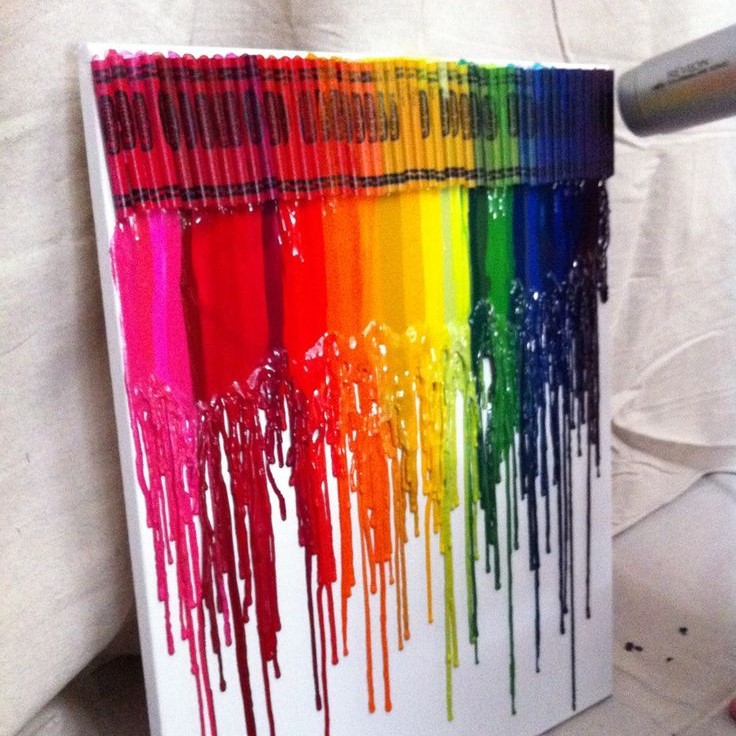
Wall Art and Abstract Designs Using Melted Crayons
Melted crayons can create striking wall art and abstract designs. Their vibrant colors bring any space to life. Here’s how you can use melted crayon art ideas to design beautiful visuals for your walls.
Step 1: Choose Your Surface
Pick a sturdy surface like a canvas, wooden board, or heavy paper. Ensure it is heat-resistant.
Step 2: Select Your Crayon Colors
Pick colors that complement each other or match your theme. You can mix warm and cool tones.
Step 3: Arrange the Crayons
Glue crayons along the edge of your canvas or place them randomly. Check if you want specific patterns.
Step 4: Melt the Crayons
Use a hairdryer or heat gun to direct heat onto the crayons. As they melt, the wax drips down, forming unique designs. Tilt the canvas to control the wax flow and create abstract effects.
Step 5: Add Details
After the wax cools, you can add painted details or embellishments like glitter. Use stencils or brushes for additional patterns.
Step 6: Frame or Hang Your Artwork
Once the artwork is dry, frame it or hang it as a centerpiece for your wall.
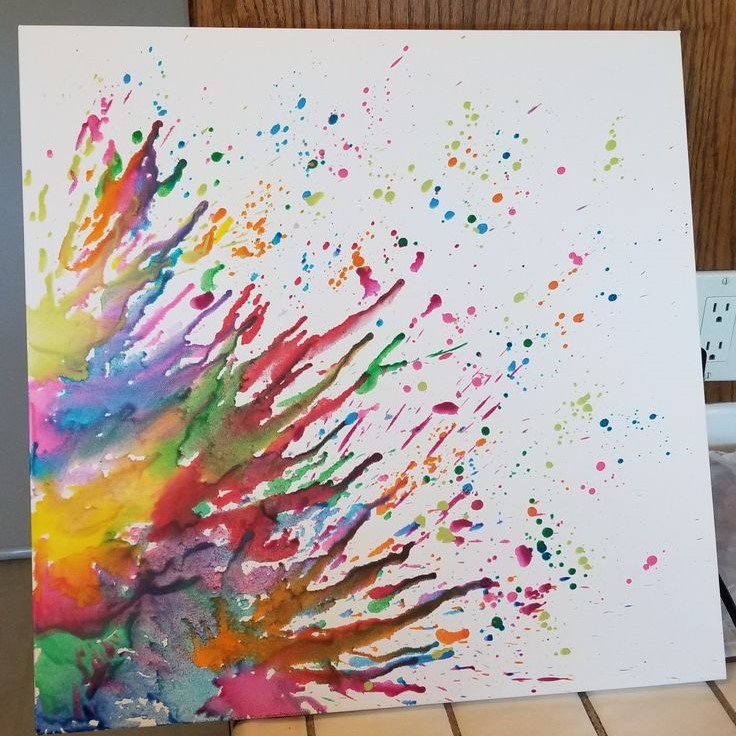
Tips for Abstract Designs
- Experiment with swirling colors using brushes or skewers while the wax is still hot.
- Blend layers of color for a dynamic, textured look.
- Try negative space techniques by covering parts of your canvas before melting.
Creating wall art with melted crayons is fun, creative, and customizable. With minimal effort, you can design bold decorations that redefine your space.
Creating Decorative Candles and Jars with Melted Crayons
Melted crayons can be used to make stunning decorative candles and jars. These projects are simple and offer endless creativity. Adding vibrant crayon colors to candles and jars makes them unique and visually appealing.
Materials You’ll Need:
- Crayons: Choose colors that suit your theme or desired look.
- Plain Candles: Pick white or unscented candles to highlight crayon colors.
- Heat Source: Use a microwave, stove, or heat gun to melt crayons safely.
- Candle Molding Containers: Silicone molds or leftover jars work well.
- Wicks: Buy candle wicks or reuse them from old candles.
- Jars or Glass Containers: Perfect for holding melted crayons for jar decor.
- Stirring Sticks: Wooden skewers work for mixing wax and crayon colors.
- Protective Covering: Protect your workspace with old newspapers or a drop cloth.
Steps to Make Decorative Candles:
- Prepare Your Wax Base: Melt wax in a microwave or over low heat on your stove.
- Add Crayon for Color: Break crayons into small pieces and stir them into the melted wax until dissolved.
- Attach the Wick: Secure a wick inside the mold or jar using a glue drop or weight.
- Pour the Wax: Pour the melted crayon and wax mixture into the mold or jar carefully.
- Let It Set: Allow the candle to cool and harden for a few hours.
- Decorate: Add glitter or embellishments for an extra touch.
Creating Decorative Jars:
- Melt Crayons Directly: Heat crayons until they become liquid.
- Swirl Inside the Jar: Pour the melted crayon inside and swirl it around the jar’s interior.
- Layer Colors: Use different crayons to create layers or gradient effects.
- Cool and Finish: Let the jar cool before using it as decor or a storage container.
Additional Tips:
- Use pastel shades for soft, calming decor.
- Mix glitter with melted crayons for a sparkling effect.
- Experiment with various jar shapes for diverse designs.
Decorative candles and jars made with melted crayon art ideas not only brighten your space but also serve as amazing handmade gifts. Try these fun and easy projects to bring a touch of color and creativity to your home.
DIY Crayon Drip Canvas Projects
DIY crayon drip canvas projects offer an exciting way to express your creativity. This technique transforms melted crayons into colorful designs that brighten any space. Here’s how to create your own stunning art using this method.
Materials Needed
- Crayons: Select a variety of colors based on your preferred palette.
- Canvas: Use a blank, heat-resistant canvas as your base.
- Glue: Hot glue is ideal for securing crayons.
- Heat Gun or Hairdryer: These tools help melt the crayons effectively.
- Protective Cover: Use newspapers or drop cloths to protect your workspace.
- Optional Additions: Include glitter, stencils, or brushes for creative effects.
Steps to Create a Crayon Drip Canvas
- Prepare Your Workspace: Lay down protective coverings to catch spills and protect surfaces.
- Choose Your Crayons: Pick colors that complement each other or match your design theme.
- Arrange the Crayons: Glue crayons at the top of the canvas or arrange them in desired patterns.
- Apply Heat: Aim a hairdryer or heat gun at the crayons to melt them gradually.
- Control the Wax Flow: Tilt the canvas to guide the melted wax in specific directions.
- Add Details: After cooling, enhance your artwork with glitter or painted accents.
Creative Tips for Unique Designs
- Use stencils to create defined shapes or patterns.
- Experiment with color blending while the wax is still hot.
- Try negative space techniques by covering portions of the canvas.
- Layer multiple designs by repeating the melting process.
Final Touches
Once your artwork dries, clean up edges if needed, and frame it for display. DIY crayon drip canvas projects are simple yet impactful. They make perfect additions to home decor or heartfelt handmade gifts.
Making Colorful Crayon Molds and Shapes
Creating molded shapes using melted crayons is both fun and practical. This technique allows you to repurpose old crayons into colorful, unique forms. You can use these molds for toys, crafts, or even decorative pieces.
Materials Needed
- Crayons: Choose a mix of colors for vibrant results.
- Heat Source: Use an oven, microwave, or double boiler to melt the crayons efficiently.
- Silicone Molds: Opt for silicone molds in different shapes like animals, letters, or geometric designs.
- Knife or Peeler: Use these to remove crayon wrappers.
- Protective Cover: Lay down newspaper or a drop cloth to prevent mess.
Steps to Create Crayon Molds
- Peel and Break Crayons: Peel off wrappers and break crayons into small pieces.
- Choose Your Mold: Select silicone molds in the shapes you want to create.
- Melt the Crayons: Heat the crayon pieces in a microwave-safe container or double boiler.
- Pour into Molds: Carefully pour the melted crayons into the silicone molds.
- Let it Cool: Place the mold in a cool area or refrigerator until the wax hardens.
- Remove Shapes: Gently pop the hardened crayons out of the molds.
Creative Tips for Molding Crayons
- Blend Colors: Mix two or more crayon colors for a marbled effect.
- Add Glitter: Sprinkle glitter into the molds for added sparkle.
- Layer Colors: Pour one color, let it cool slightly, then add another for striped designs.
Uses for Crayon Shapes
- Art Supplies: Use molded crayons for drawing or coloring projects.
- Decor: Display colorful molds as table accents or wall decorations.
- Fun Crafts: Create personalized gifts shaped as stars, hearts, or animals.
Making crayon molds is an easy way to recycle old crayons creatively. Enjoy experimenting with shapes and colors to craft unique items for children or your home.
Fun Melted Crayon Crafts for Kids
Melted crayon crafts are a delightful way for kids to explore their creativity. These colorful projects are simple, safe, and engaging. They help children transform ordinary crayons into fun, imaginative creations. Here are some exciting ideas to get started:
1. Crayon Drip Art for Kids
- Materials Needed: Crayons, canvas or paper, glue, and a hairdryer.
- Steps:
- Peel the crayons and glue them at the top of the canvas.
- Use a hairdryer to melt the crayons, letting the wax drip down.
- Add glitter or stickers once the wax cools for a fun finish.
- Tip: Let kids choose their favorite colors for a personalized touch.
2. DIY Rainbow Crayon Molds
- Materials Needed: Old crayons, silicone molds, and an oven.
- Steps:
- Break crayons into small pieces and place them in molds.
- Heat in the oven at 250°F until melted.
- Cool the molds, then pop out colorful new crayon shapes.
- Tip: Use molds shaped like stars, hearts, or animals for added fun.
3. Crayon Stained Glass Effects
- Materials Needed: Wax paper, crayons, grater, iron, and craft scissors.
- Steps:
- Grate crayons into small shavings.
- Place shavings between two layers of wax paper.
- Have an adult carefully iron on low heat to melt the crayons.
- Cut the wax paper into shapes like butterflies or flowers.
- Tip: Hang the creations on windows for a vibrant “stained glass” effect.
4. Crayon Doodle Rocks
- Materials Needed: Smooth rocks, crayons, and an oven.
- Steps:
- Bake rocks in the oven at 200°F for 10 minutes.
- Let kids draw on the warm rocks with crayons; the heat melts the wax.
- Cool the rocks and use them for decoration or paperweights.
- Tip: Encourage kids to create colorful patterns or characters on the rocks.
5. Crayon Sun Catchers
- Materials Needed: Clear plastic lids, crayons, string, and a heat gun.
- Steps:
- Melt crayons in plastic lids using a heat gun.
- Let the melted wax cool inside the lids.
- Punch a hole and attach string to hang the sun catchers.
- Tip: Combine primary colors to teach kids about color blending.
These melted crayon art ideas are perfect for keeping kids entertained and inspired. They also make fantastic keepsakes or gifts. Most importantly, they encourage creativity and hands-on learning for young artists.
Upcycling Old Crayons into New Art Supplies
Breathing new life into old crayons can spark creativity while reducing waste. Broken or unused crayons are versatile and can be transformed into functional art supplies. Here are some innovative ideas to upcycle crayons for fresh artistic use:
1. Make New Multi-Color Crayons
- Steps:
- Peel and chop old crayons into small pieces.
- Use silicone molds in desired shapes or simple muffin tins.
- Melt crayons in an oven preheated to 250°F.
- Let cool completely, then remove from molds.
- Benefit: These chunky, multi-color crayons are fun and perfect for kids’ art projects.
2. Create Crayon Paint
- Steps:
- Melt old crayons in a microwave-safe bowl.
- Add a small amount of water to adjust consistency.
- Use brushes to paint vibrant, wax-based artwork on paper or canvas.
- Benefit: This turns crayons into a new medium for expressive artwork.
3. DIY Crayon Markers
- Steps:
- Melt crayons with equal parts coconut oil in a microwave or double boiler.
- Pour the mixture into empty glue stick containers.
- Allow to cool and solidify.
- Benefit: Makes easy-to-use markers that glide smoothly for bold, colorful designs.
4. Turn Crayons into Chalk
- Steps:
- Combine melted crayons with plaster of Paris and a little water.
- Pour the mixture into silicone or cardboard molds.
- Let the molds dry and harden overnight.
- Benefit: Upcycle wax into hand-crafted chalk for outdoor or classroom art.
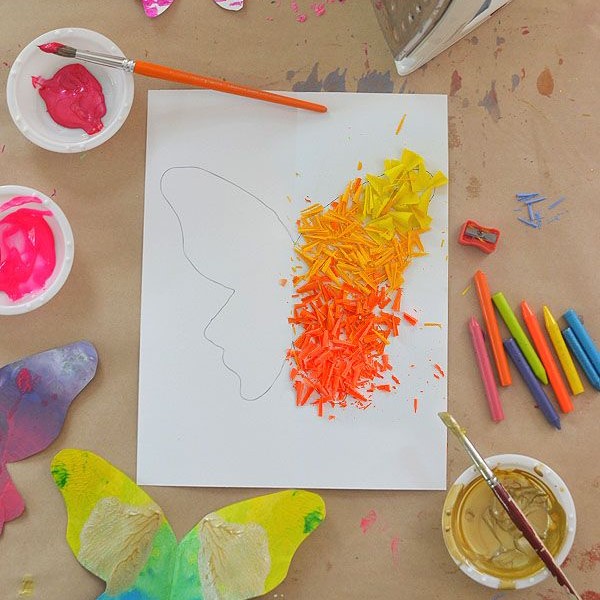
5. Shaved Crayon Sprinkles for Mixed Media Art
- Steps:
- Use a grater to shave old crayons.
- Sprinkle the shavings onto melted wax backgrounds or glue-covered surfaces.
- Press gently to secure and set designs.
- Benefit: Adds vibrant, textured effects to mixed-media creations.
By upcycling old crayons, you can craft unique, eco-friendly art supplies. These melted crayon art ideas ensure nothing goes to waste while encouraging imaginative creations.