Introduction
A Bunsen burner drawing is a useful way to understand its structure and parts. It helps visualize how the burner operates and is constructed. Drawings can serve educational purposes in science classes or for lab safety instructions.
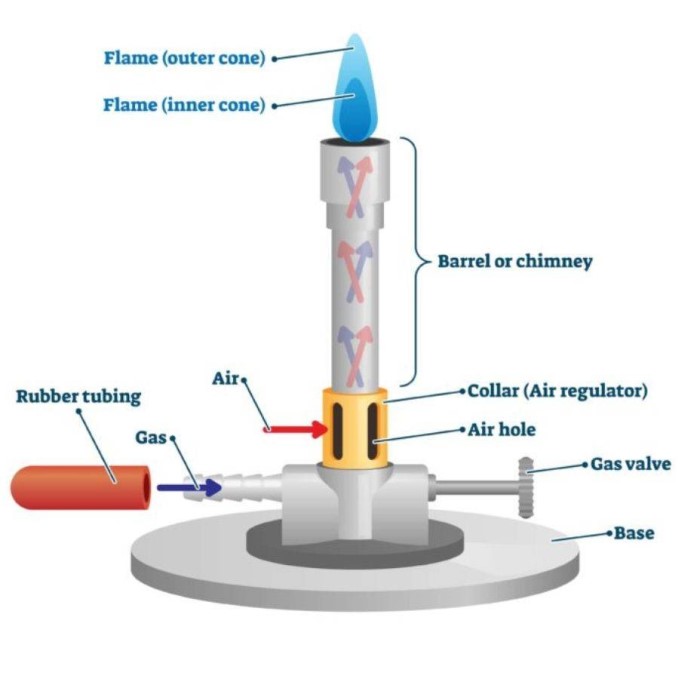
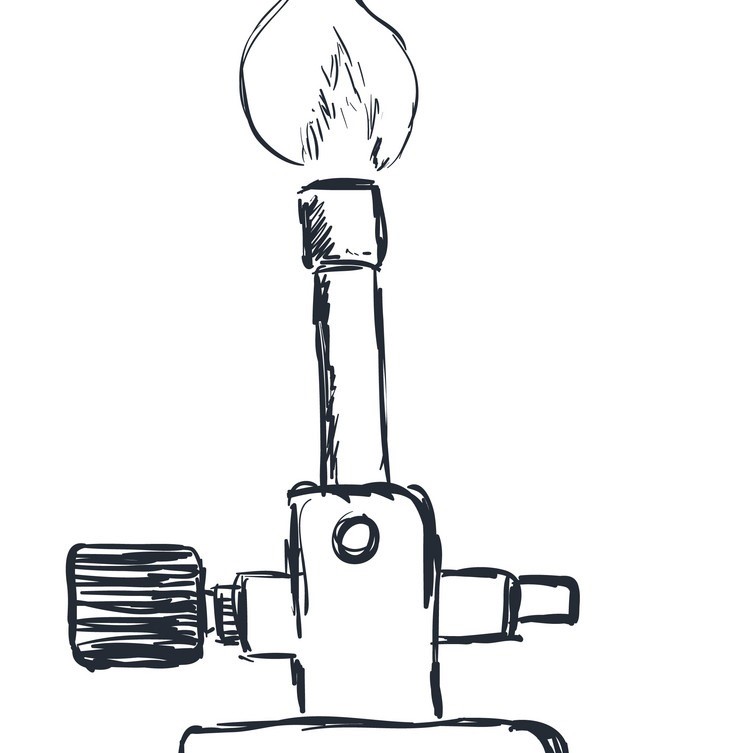
The Bunsen burner includes key components like the barrel, collar, and base. These features are essential for understanding how gas mixes with air to produce a flame. A well-made drawing highlights these parts for clarity.
Creating a Bunsen burner drawing involves practice and attention to detail. This guide aims to help simplify the process. Whether for students or artists, learning to draw a Bunsen burner can improve technical drawing skills. With the right techniques, your drawing can look clear and accurate while showcasing the burner effectively.
Use this drawing for projects, presentations, or lab designs. It is both practical and educational for various purposes.
Tools and Materials Needed for Your Drawing
Before creating a Bunsen burner drawing, gather the right tools and materials. Having the right items ensures a smoother drawing process and better results.
Basic Drawing Tools
- Paper: Choose sturdy paper suitable for detailed sketches.
- Pencils: Use graphite pencils for precise lines and shading.
- Eraser: Opt for a soft eraser to correct mistakes without damaging your paper.
- Ruler: A ruler helps create straight lines for the burner’s structure.
- Compass: Use a compass for drawing symmetrical circular components like the collar.
Additional Materials
- Color Pencils or Markers: Enhance your drawing’s realism with colors for different parts.
- Tracing Paper: Helps refine your sketch without starting over.
- Reference Images: Keep photos or diagrams for accurate component placement.
Optional Tools for Digital Drawings
- Drawing Tablet: Ideal for digital sketches and advanced detailing.
- Graphic Software: Programs like Photoshop or Illustrator offer features for clean designs.
- Stylus Pen: Enables precise marks and better control for digital illustrations.
Equipping yourself with these tools ensures your drawing is detailed and accurate. Proper preparation can help you focus on creating a clear and realistic Bunsen burner drawing.
Step-by-Step Guide to Drawing a Bunsen Burner
Creating a Bunsen burner drawing requires clear steps. Focus on accuracy and detail throughout the process. Follow these steps to ensure your drawing effectively represents the essential parts of the burner.
Sketching the Basic Structure
Draw the Base:
- Begin with a Rectangle: Start your drawing by sketching a rectangle that represents the base of the burner. Ensure the dimensions are sufficient to support the structure above.
- Use a Ruler: For accuracy and neatness, utilize a ruler for drawing straight edges. This will help achieve clean lines and a professional-looking base.
- Proportional Sizing: Pay attention to the proportions of the base in relation to the other components you will be adding. The base should not be too large or too small compared to the barrel and collar, ensuring visual balance in the overall design.
Outline the Barrel:
- Sketch the Cylinder: Above the rectangular base, draw a vertical cylinder to represent the main barrel of the burner. This cylinder will house the flame and is typically the central focal point of the burner design.
- Maintain Uniformity: Ensure that the diameter of the barrel is relatively consistent from the bottom to the top for a realistic cylindrical shape.
- Consider Height: The height of the barrel should be proportional to the base; it should not be excessively tall or too short, as it impacts the overall aesthetic of the burner.
Position the Collar:
- Add a Second Cylinder: Near the midsection of the barrel, sketch another cylindrical shape that wraps around it. This represents the collar, which helps regulate air intake.
- Adjustable Design: Indicate visible details or lines to suggest that the collar can be adjusted. This can be shown through ridges or a slight gap that emphasizes its functionality.
- Ensure Alignment: Make sure the collar is centered around the barrel to maintain symmetry and enhance the overall design integrity of the burner.
Add the Gas Port:
- Draw the Extension: At the bottom of the burner, near the base, sketch a small extension that represents the gas inlet. This feature is crucial as it connects the burner to the gas supply.
- Define the Shape: The gas port can be depicted as a small rectangle or tube protruding from the base, signifying where gas will enter the burner for combustion.
- Placement Consideration: Position the gas port thoughtfully so that it does not interfere with the structural integrity of the base or other components while ensuring it is easily accessible in the final design.
Keep the lines light for easier adjustments. Use a compass for circular components, ensuring symmetry and accuracy. Label lightly if needed for clarity.
Adding Details to the Components
- Enhance the Barrel: Add shading to show its cylindrical shape. Start with light strokes.
- Detail the Collar: Mark the opening and small ridges to represent air vents.
- Refine the Base: Include bolts or textured patterns for a realistic touch.
- Define the Gas Port: Add a connection point where the gas tube attaches to the burner.
Use reference images for accurate component placement. Color pencils can differentiate specific parts, like the collar and barrel.
Finalizing and Refining Your Drawing
Bolden Key Lines:
- Darken Main Outlines: Begin by carefully revisiting the main outlines of your drawing. Use a darker pencil or a fine-tip marker to trace over the primary shapes, ensuring they stand out clearly.
- Ensure Clarity: Focus on highlighting essential structural lines, such as those defining the base, barrel, and collar. This will enhance the overall visibility of the drawing and make it easier to identify each component.
- Consider Line Weight: Vary the thickness of the lines as needed; thicker lines can emphasize primary components while thinner lines may work well for secondary details, creating a sense of hierarchy in the drawing.
Add Shadows:
- Introduce Depth: To create a three-dimensional look, add shadows beneath the barrel and around its edges. This will provide a sense of weight and stability to the structure.
- Determine Light Source: Decide on a consistent light source direction (e.g., top left). Ensure that shadows align accordingly, with darker shading opposite the light source and lighter areas adjacent to it.
- Blending Techniques: Use techniques such as hatching, cross-hatching, or blending with a smudge tool or your finger to create smooth transitions in the shading. This adds realism and depth to your drawing.
Clean Up Edges:
- Erase Unnecessary Lines: Once you have darkened the key outlines and added shadows, carefully erase any stray lines or sketch marks that may detract from the overall appearance. This will result in a cleaner look.
- Refine Edges: Pay close attention to corners and intersections to ensure that the edges are crisp and well-defined. This step enhances the professionalism of the finished drawing.
- Final Inspection: After cleaning, take a moment to inspect the drawing as a whole. Make any additional touch-ups to ensure it looks polished and cohesive.
Highlight Features:
- Use Colored Pencils or Markers: To enhance the realism of your drawing, consider utilizing colored pencils or markers to bring life to various elements of the burner.
- Add Color Thoughtfully: Choose colors that correspond to the materials you are representing, such as metallic grays for the barrel or vibrant colors for any knobs or decorative features.
- Apply Techniques for Realism: Blend colors or layer them for gradient effects to mimic the appearance of different materials effectively. Add highlights and subtle tones to specific areas for a more dynamic and professional finish.
Review your drawing. Compare it to reference images to ensure accuracy. Refine any misplaced proportions, and ensure all components align properly. A clear and detailed drawing helps explain how a Bunsen burner works visually.
Common Mistakes to Avoid When Drawing a Bunsen Burner
Creating a detailed and accurate Bunsen burner drawing can be challenging. Avoiding common mistakes helps improve your results. Here are some pitfalls to watch out for:
1. Incorrect Proportions
- The barrel, base, and collar must have accurate relative sizes.
- Oversized or undersized components make the drawing look unrealistic.
- Use a ruler for straight edges and a compass for circular shapes.
2. Ignoring Symmetry
- A Bunsen burner is symmetrical around its vertical axis.
- Uneven parts make the drawing appear sloppy and unclear.
- Regularly check symmetry as you progress.
3. Missing Key Components
- Forgetting parts like the gas port or air vents reduces educational value.
- Always work from a reference image to include all necessary details.
4. Excessive Eraser Use
- Constant erasing damages the paper and causes smudges.
- Sketch lightly to reduce mistakes needing erasing.
- A soft eraser minimizes wear and tear on the paper.
5. Insufficient Shading
- Flat drawings lack depth and realism.
- Proper shading highlights the cylindrical shape of the barrel.
- Add shadows to define edges and create a 3D effect.
6. Overcomplicating the Design
- Adding unnecessary features distracts from the core structure.
- Focus on simplicity and function over excessive details.
- Keep the design clear and easy to interpret.
7. Poor Alignment
- Misaligned parts disrupt the look of the burner.
- Use alignment tools like rulers for better precision.
- Regularly step back to review overall alignment.
By avoiding these mistakes, you can ensure your Bunsen burner drawing is clear and professional. Attention to detail and continuous practice lead to better results.
Tips for Making Your Drawing More Realistic
Creating a realistic Bunsen burner drawing improves its educational and functional value. Accurate depiction helps explain its structure and operation effectively. Follow these tips to enhance realism in your drawings.
Focus on Proportions
- Ensure each part of the burner is proportional to others.
- Use measurement tools like rulers and compasses for precision.
- Compare your drawing with reference images frequently.
Add Accurate Shading
- Shade curved parts, like the barrel, to show depth.
- Use light-to-dark gradient for 3D effects.
- Add shadows under components for realism.
Include Textures and Details
- Sketch fine details like air vents on the collar.
- Add bolts or patterns on the base for authenticity.
- Use consistent lines for clean visual appeal.
Choose the Right Colors
- Use color pencils or markers for accurate part differentiation.
- Highlight components, like the collar and barrel, with distinct shades.
- Match your colors to real-life burners for accuracy.
Maintain Clean Lines
- Keep your outlines bold and precise for clarity.
- Avoid smudges by working patiently.
- Review edges regularly and erase stray marks.
Use Reference Images
- Consult clear diagrams or photos of actual burners.
- Study how each part is connected and aligned.
- Compare your drawing for corrections and adjustments.
By applying these tips, your Bunsen burner drawing will look more detailed and professional. Attention to realism elevates your work, whether for educational or artistic purposes.
Practical Applications
Bunsen burner drawing hold value in both educational and practical scenarios. They simplify complex concepts visually.
Educational Uses
- Science Classes: Illustrate the parts and functions to support learning. Visuals help students grasp details.
- Lab Instructions: Show safety features and operation guidelines. Clear diagrams reduce risks during experiments.
- Project Presentations: Enhance the explanation of experiments with detailed and accurate drawings.
Research and Development
- Lab Equipment Design: Aid in prototyping or modifying lab tools. Engineers use drawings to refine devices.
- Component Analysis: Break down functionality for a clearer understanding of each part’s role.
Creative and Artistic Purposes
- Technical Art Practice: Improve drawing skills by sketching scientific objects with precision.
- Educational Resources: Combine art and science, creating engaging study materials for students.
Practical Documentation
- Inventory Management: Use drawings to catalog equipment in laboratories.
- Repair Instructions: Provide visuals for fixing components to restore functionality. Clear guides assist technicians.
Bunsen burner drawings are versatile tools across various fields. Their practical uses add clarity and boost productivity.
Frequently Asked Questions
1. What is the purpose of a Bunsen burner drawing?
A Bunsen burner drawing helps visualize its structure and key components. It’s useful for education and lab safety.
2. Can beginners create accurate Bunsen burner drawings?
Yes, beginners can create clear drawings by following basic steps and using appropriate tools.
3. What tools are essential for drawing a Bunsen burner?
Key tools include paper, pencils, erasers, rulers, compasses, and optional digital drawing tools.
4. How do you make a drawing more realistic?
Focus on proportions, shading, textures, and clean outlines. Reference images help enhance accuracy.
5. Are mistakes common? How can I avoid them?
Yes, mistakes like incorrect proportions or symmetry occur. Use rulers and sketch lightly to prevent them.
6. Is color necessary in Bunsen burner drawings?
Color improves realism but isn’t mandatory. Use colored pencils if a detailed representation is needed.
7. Can digital tools replace traditional drawing methods?
Digital tools offer precision and flexibility but traditional methods are equally effective for most purposes.
8. How can I use my drawing practically?
Your drawing can help in teaching, lab design, or as a visual aid in presentations.
By understanding these FAQs, you can create better, more accurate Bunsen burner drawings.
Conclusion: Embracing Art in Science
In conclusion, creating a bunsen burner drawing is not only an enjoyable artistic endeavor but also a means to appreciate the marriage of art and science. As you learn how to render the various components accurately, you develop skills that enhance your observational abilities and creativity. Don’t hesitate to explore background features and alternative views to make your drawing truly unique. Let your artistic expression shine through while celebrating the science behind the bunsen burner. Embrace the process, and enjoy your journey into the fascinating world of scientific art!