Creating something beautiful with your own hands is a deeply satisfying experience. In a world of digital messages, handmade items stand out. They carry a personal touch that store-bought items often lack. Therefore, many crafters are turning to the elegant art of paper quilling. This intricate craft involves rolling strips of paper to form decorative designs. It transforms simple materials into stunning works of art. Consequently, it has become a popular choice for personalized gifts. You can create anything from floral greetings to framed masterpieces.
The versatility of this craft is truly remarkable. It suits beginners and experienced artists alike. Furthermore, the materials required are affordable and accessible. This guide explores how you can use this technique for gifts. We will cover everything from basic tools to advanced design ideas. Whether for a birthday or a holiday, a quilled item delights the recipient. It shows time, effort, and love. So, let us explore the world of rolled paper creativity.
The Essentials of Paper Quilling Tools
To begin your creative journey, you need the right set of tools. Fortunately, the barrier to entry is relatively low. The most fundamental tool is the slotted tool. This device helps you roll paper strips with ease. You simply insert the paper end and twist. Consequently, it creates a tight and even coil. Another essential item is the needle tool. It is slightly more challenging to master. However, it produces coils with a smaller center hole. This results in a more polished final look. In addition to rolling tools, you need tweezers. These help hold delicate shapes while the glue dries.
- Slotted Tool: This is the best option for beginners. It grips the paper securely. Therefore, it prevents slipping while you roll. It is perfect for creating consistent basic coils.
- Needle Tool: This tool allows for finer control. It creates a tiny center in the coil. As a result, your designs look more professional and delicate.
- Quilling Paper Strips: You cannot use regular printer paper. Specific quilling paper is pre-cut into precise widths. The standard size is 3mm or 5mm. These strips come in endless colors and gradients.
- Glue and Scissors: A fine-tip glue applicator is vital. It allows for precise application. You do not want wet, messy glue ruining your art. Sharp scissors are needed for fringing and cutting.
Mastering the Basic Coiling Techniques
Before you can create complex images, you must learn the basics. Paper quilling relies on a vocabulary of shapes. The foundation of almost all designs is the tight coil. You roll the paper strip until it reaches the end. Then, you secure it with a dab of glue. However, most designs use loose coils. These are rolled first and then allowed to expand. Consequently, they form a relaxed circle. You can then pinch this circle into various shapes.
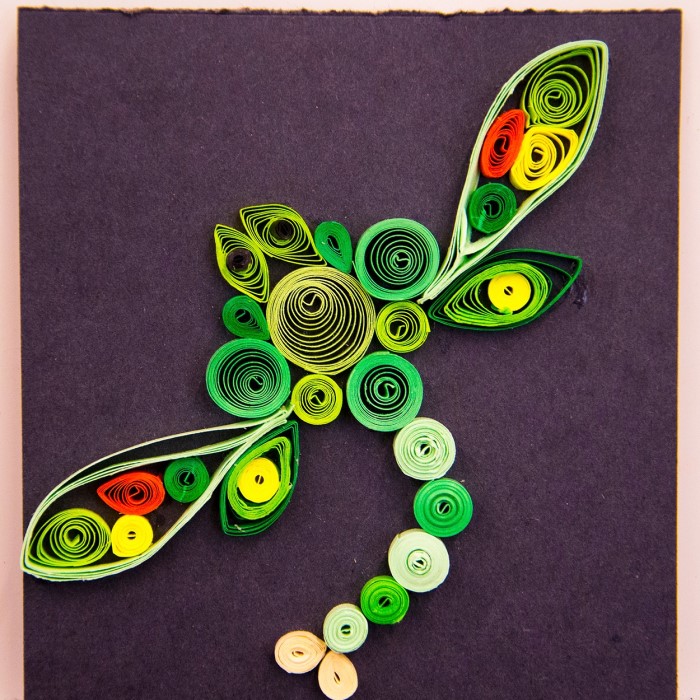
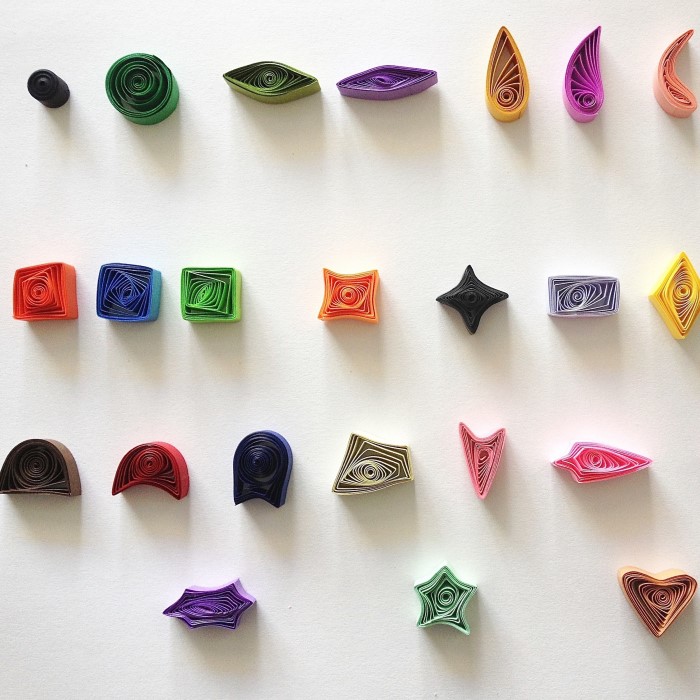
- Teardrop Shape: You pinch one side of a loose coil. This creates a point. It resembles a drop of water. This shape is fundamental for making flower petals.
- Marquise Shape: You pinch both ends of a loose coil. It looks like an eye or a diamond. This shape is excellent for leaves and geometric patterns.
- S-Curl: You roll both ends of a strip in opposite directions. This creates an elegant “S” shape. It is often used for vines and decorative borders.
- Heart Shape: You create a teardrop first. Then, you push the rounded end inward. This forms a dimple. It is perfect for romantic cards.
Furthermore, consistency is the secret to success. Your shapes should look identical in size. Therefore, practice is essential. Do not rush the learning process. Watch how the paper responds to your touch. Over time, your fingers will develop muscle memory. You will roll and pinch without thinking. Additionally, learn to control the glue. Too much glue creates a mess. Too little glue results in weak bonds. A tiny drop is usually sufficient. Consequently, patience is a virtue in this craft. Once you master these fundamental shapes, the possibilities are endless. You can combine them to create intricate flowers, animals, and abstract patterns.
Designing Unique Greeting Cards
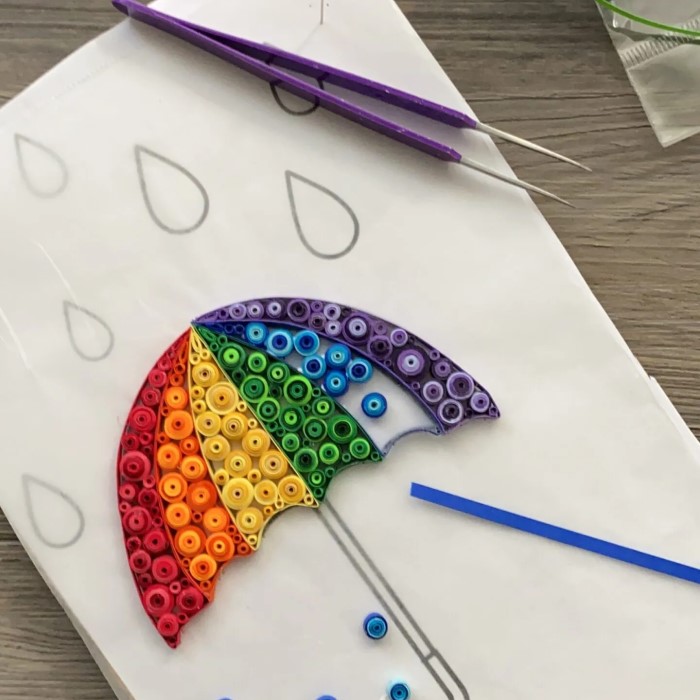
One of the most popular applications for quilling is greeting cards. A quilled card is a keepsake, not just a card. People often frame them as art. Therefore, they serve a dual purpose. To start, you need a sturdy card base. Heavier cardstock works best. It must support the weight of the paper coils. Light paper will buckle under the glue. Firstly, plan your design lightly in pencil. This serves as a guide. You do not need to draw every detail. Just mark the outlines.
- Layout Planning: Decide where the focal point will be. It could be a large flower or a central heart. Then, arrange the background elements around it.
- Gluing Strategy: Apply the design directly to the paper. Work in sections. Do not try to glue everything at once.
- Dimensional Effect: Use different paper widths. Thicker strips stand out more. This creates a beautiful 3D relief effect. Shadows play across the surface, adding depth.
Moreover, consider the occasion. For birthdays, use bright and cheerful colors. You can quilled candles, balloons, or cakes. For weddings, white and gold paper creates elegance. You can design intertwined hearts or rings. Furthermore, use a blank inside. Write your personal message clearly. The quilled art on the cover speaks volumes. It shows you care deeply. Consequently, these cards are rarely thrown away. They become treasured memories. The texture invites touch. Recipients will run their fingers over the swirls. This tactile quality makes these cards truly special. It elevates a simple gesture into a grand gift.
Creating Memorable Quilled Gifts
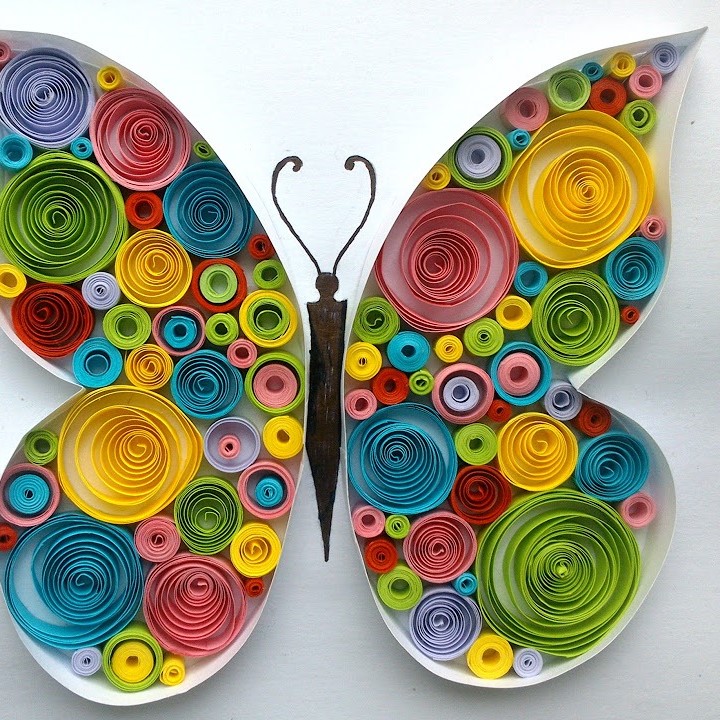
Beyond cards, this craft offers endless gifting possibilities. You can transform ordinary objects into personalized treasures. For instance, consider framing your quilled artwork. A framed floral arrangement lasts forever. It serves as beautiful home decor. Therefore, it makes an excellent housewarming gift. You can match the colors to the recipient’s decor. Additionally, you can quill on three-dimensional surfaces. Wooden boxes, photo frames, and vases work well.
- Jewelry: Quilled paper jewelry is lightweight and unique. You can make earrings and pendants. Seal them with a hard varnish. This makes them durable and water-resistant.
- Decorated Journals: Cover a plain notebook with quilled patterns. It turns a diary into a bespoke item. It encourages the recipient to write or sketch.
- Ornaments: Create quilled shapes for Christmas trees. Use metallic or sparkly paper strips. These handmade ornaments become family heirlooms.
- Shadow Boxes: Create a scene inside a shadow box frame. This protects the delicate paper art. It also adds a sense of depth and theater.
Furthermore, personalization is key. Monograms are incredibly popular. You can quill a large letter representing the recipient’s name. Fill the letter with flowers or abstract shapes. This personal touch shows great thoughtfulness. Consequently, the gift becomes one-of-a-kind. It cannot be found in any store. The time invested makes the gift more valuable. It reflects the relationship between the giver and the receiver. When you gift quilled art, you gift your time and creativity. That is the ultimate expression of love. Therefore, do not limit yourself to paper. Explore new surfaces and forms. Push the boundaries of what paper can do.
Exploring Color Theory and Design
Color plays a crucial role in the impact of your art. Understanding color theory elevates your designs. It makes them visually appealing. For example, a monochromatic scheme uses one color. It uses different shades and tints. This creates a subtle and sophisticated look. Conversely, a complementary scheme uses opposite colors. This creates high contrast and vibrancy. Therefore, your design will pop.
- Gradient Effects: Use graduated shades of paper strips. This creates an ombre effect. It is stunning for large petals or backgrounds. The color transitions are smooth and mesmerizing.
- Contrast: Use dark strips to outline light shapes. This defines the edges clearly. It prevents the design from looking washed out.
- Texture through Color: Use two different colored strips glued together. Roll them to create a multi-toned coil. This adds visual interest and complexity.
Moreover, consider the psychology of color. Red evokes passion and energy. Blue suggests calm and trust. Yellow brings happiness and warmth. Therefore, choose colors that match the sentiment. A sympathy card might use soft blues and purples. A graduation card might use bold golds and blacks. Furthermore, balance is important. Distribute your colors evenly across the canvas. Do not clump all dark colors in one spot. This creates visual tension. Instead, let the eye travel smoothly across the piece. Transition words help guide the viewer. Similarly, color placement guides the viewer’s emotions. Mastering color is just as important as mastering rolling techniques. It turns a craft project into art.
Troubleshooting Common Quilling Issues
Beginners often face challenges. This is a normal part of the learning process. One common issue is uneven tension. Your coils might be too loose or too tight. Consequently, your shapes look irregular. To fix this, practice consistent pressure. Roll the paper firmly but not aggressively. Another issue is messy glue. Glue stains ruin the pristine look of the paper.
- Tears and Rips: Paper strips are delicate. Sometimes they tear while rolling. Do not throw the strip away. Glue the torn ends together. You can hide the seam inside the coil.
- Warped Base Paper: Wet glue causes paper to warp. To prevent this, use less glue. Also, use a thick cardstock base. You can also place a heavy book on the card while it dries.
- Finger Cramps: Rolling for hours can strain your hands. Take frequent breaks. Stretch your fingers. Use an ergonomic slotted tool. It reduces the stress on your wrist.
- Inconsistent Sizes: Your circles might vary in size. Always use a circle template ruler. It ensures every loose coil is exactly the same diameter.
Furthermore, do not get discouraged. Every mistake is a lesson. If a shape does not look right, unroll it. Try again. The paper is forgiving. You can usually reuse the strip. However, if it is crinkled, discard it. Fresh paper creates the best results. Moreover, keep your hands clean. Oils from your skin can mark the paper. Therefore, wash your hands before starting. This keeps your white paper bright and clean. With time, these problems will disappear. Your speed and precision will improve naturally. Consequently, you will enjoy the process much more.
The Benefits of Quilling as a Hobby
Engaging in paper quilling offers benefits beyond just creating gifts. It is a therapeutic activity. The repetitive motion of rolling paper is meditative. It quiets the mind. Consequently, it reduces stress and anxiety. Many people find it a form of yoga for the brain. You focus entirely on the present moment. The worries of the day fade away. Furthermore, it improves fine motor skills. Handling the thin strips requires dexterity.
- Mindfulness: The focus required promotes mindfulness. You pay attention to the paper, the glue, and the shape. This breaks the cycle of negative thoughts.
- Creativity: It encourages creative thinking. You visualize a design and bring it to life. This boosts problem-solving skills in other areas.
- Community: There is a large online community. You can share your work and get feedback. This fosters a sense of belonging.
- Affordability: It is an inexpensive hobby. You do not need a studio or expensive machinery. A small kit fits in a drawer.
Moreover, it provides a sense of accomplishment. Finishing a project feels great. You hold a tangible result of your effort. This boosts self-esteem. Therefore, it is an excellent hobby for all ages. Children learn patience and precision. Adults find a creative outlet. Seniors keep their hands and minds active. In addition, it is eco-friendly. You can use recycled paper strips. It produces very little waste. Consequently, it is a sustainable choice. Whether you quill for five minutes or five hours, the benefits are real.
FAQ: Your Questions Answered
Is paper quilling easy?
Yes, it is very easy to start. The basic techniques are simple to learn. Children and adults can pick it up quickly. With practice, you can master complex designs.
How to do paper quilling step by step?
First, cut or buy paper strips. Next, insert a strip into your slotted tool. Roll the paper to create a coil. Then, take it off the tool and let it expand. Pinch it into a shape. Finally, glue it onto your project.
What does paper quilling mean?
It is an art form. It involves rolling, twisting, and shaping strips of paper. You glue them together to form decorative designs. It is also known as paper filigree.
Is quilling an expensive hobby?
No, it is quite affordable. Basic tools and paper are cheap. You do not need large machines. It is one of the most cost-effective crafts available.
Conclusion
The art of paper quilling opens a door to endless creativity. It transforms humble paper into intricate treasures. Whether you make a simple card or a complex frame, the result is magical. This craft allows you to express love and appreciation. Furthermore, the process itself is relaxing and rewarding. You create unique gifts that last a lifetime. Therefore, do not hesitate to start. Gather your tools and strips today. Discover the joy of rolling paper. You will find a new passion. Your friends and family will cherish your handmade creations. It is a hobby that truly keeps on giving.