Introduction to a Timeless Craft
Creativity is an essential part of the human experience. It allows us to express ourselves. It also helps us relax. One of the most engaging hobbies gaining traction in 2026 is string art. This unique craft combines artistic vision with geometric precision. It involves the use of colorful threads. These threads are wound around nails. The nails are hammered into a wooden board. Consequently, intricate designs and patterns emerge. The process seems simple. However, the results can be stunningly complex. People of all ages enjoy this activity. It is accessible to beginners. Yet, it offers depth for experts. The trend has evolved significantly. Modern designs now incorporate abstract shapes. They also use typography and landscapes.
Furthermore, this art form offers a tactile experience. In a digital world, working with your hands is satisfying. You feel the texture of the wood. You feel the tension of the string art. This connection to materials is grounding. Many people seek offline activities. They want to disconnect from screens. Therefore, this craft serves as a perfect digital detox. It forces you to focus. You must concentrate on the pattern. This focus creates a state of flow. Time passes quickly. Worries fade away. It is a form of active meditation.
Additionally, the community around this hobby is growing. Online forums and social media groups are active. Creators share their patterns there. They exchange tips and tricks. This sense of community encourages newcomers. The barrier to entry is low. You do not need expensive equipment. You can start with basic supplies. Thus, it is a budget-friendly hobby. This accessibility drives its popularity in 2026. It is a craft that truly welcomes everyone.
The Mathematics Behind the Beauty
At first glance, this art form looks purely artistic. However, a strong mathematical foundation supports it. This is particularly evident in geometric patterns. The concept relies on the “curve of pursuit.” This is a mathematical idea. It creates the illusion of curves. But the lines are actually straight. The string never bends. It is always pulled taut. The curve is an optical illusion. It forms through the intersection of straight lines. Therefore, this craft is a practical application of geometry. It is a fantastic educational tool. Teachers often use it in classrooms. Students learn about angles and coordinates. They see math come to life.
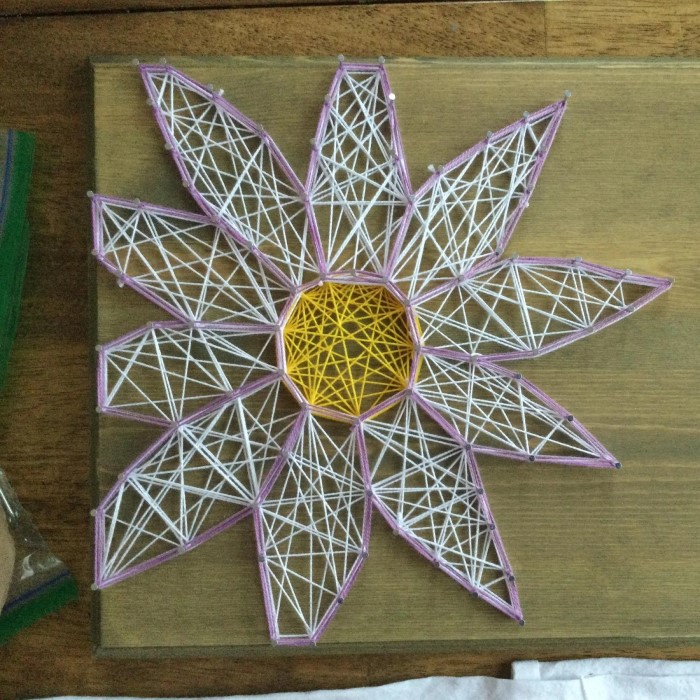
Moreover, symmetry plays a huge role. Many designs rely on radial symmetry. The pattern radiates from a central point. This requires precise planning. The placement of the nails must be accurate. If the spacing is uneven, the pattern distorts. Consequently, the artist must measure carefully. This teaches precision and patience. It is a blend of left-brain logic and right-brain creativity. You calculate the positions. Then, you choose the colors. This duality makes the craft unique. It appeals to analytical minds. It also appeals to artistic souls.
Furthermore, the density of the string affects the image. More layers create darker areas. Fewer layers let the wood show through. This allows for shading. You can create depth in a portrait. You can make a landscape look three-dimensional. This technique is called “string painting.” Understanding these principles elevates your work. It transforms a simple project into a masterpiece. The math is not a restriction. It is a tool for expression.
Essential Tools and Materials Needed
You must gather the correct supplies before starting. Quality materials make the process easier. They also ensure a better result. First, you need a base. Wood is the standard choice. Soft woods like pine or cedar are excellent. They are easy to hammer nails into. Plywood is also a popular option. It is affordable and readily available. However, you should avoid hardwoods. They are difficult to work with. The nails might bend. Next, you need nails. Small, thin nails work best. They usually have small heads. The head holds the string in place. You should choose nails about one inch long. This length provides a good hold.
Additionally, you need string or thread. Embroidery floss is the most common choice. It comes in many vibrant colors. It is also easy to work with. Crochet thread is another option. It is thicker. It creates a bolder line. Some artists use yarn for large projects. But yarn is fuzzy. It lacks the crisp look of thread. You also need a hammer. A light hammer offers better control. A heavy one can damage the wood. Furthermore, you need a pattern. You can buy books with patterns. Or you can print them from the internet. Tape is necessary to hold the pattern. Scissors are needed to cut the string.
Preparing Your Workspace and Design
Preparation is the key to a successful project. You should not rush this stage. First, prepare your wooden board. It might need sanding. Sandpaper removes rough edges. It creates a smooth surface. You can also paint the wood. A solid color background looks professional. Black creates a stunning contrast. White looks clean and modern. Let the paint dry completely. This usually takes a few hours. While the paint dries, select your design. Think about the difficulty level. Beginners should choose simple outlines. Hearts or stars are great starts. Advanced crafters might try portraits.
Next, you need to transfer the design. Place the pattern on the wood. Secure it with tape. Make sure it is centered. Now, you will mark the nail points. The pattern usually has dots. These dots indicate where nails go. You can use a marker. Or you can hammer directly through the paper. The latter method is faster. However, it leaves paper residue. You will have to tear the paper away later. This can be messy. Therefore, marking points is often cleaner. Remove the paper after marking. You are left with a guide on the wood.
Furthermore, planning the route is smart. Look at your design. Decide where you will start. Decide where you will finish. Some patterns require a specific sequence. Random stringing creates a chaotic look. Planned stringing creates order. You can outline the shape first. Then, you can fill it in. This technique defines the edges clearly. It gives the art a polished look. Take your time with the setup. A well-prepared board is a joy to work on. It prevents frustration later. The foundation determines the quality of the final piece. So, measure twice and hammer once.
Mastering Basic Techniques
Now the real fun begins. It is time to drive the nails. Start hammering the nails into your marked spots. Hold the nail firmly. Use a gentle tapping motion at first. Once the nail is stable, drive it in. Leave about half an inch exposed. The height of the nails should be consistent. This ensures a level surface for the string. If nails are uneven, the string may slip off. Work your way around the pattern. Patience is vital here. Do not rush the hammering. Bent nails are frustrating. You can use a pair of pliers. Hold the nail with them. This saves your thumbs.
Once all nails are in place, remove the paper pattern. This reveals the shape created by the nails. Now, you will add the string art. Tie a knot around the first nail. Make it a double knot. This secures the thread. You can add a drop of glue. This ensures the knot holds. Then, start winding the string. There are two main techniques. The first is outlining. You loop the string around each nail. You go in a sequential line. This draws the border of the shape. It creates a clear definition. The second technique is filling. You stretch the string across the shape. You go from one side to the other.
Furthermore, you can vary the pattern. You can cross the strings randomly. This creates a “spider web” effect. It looks dense and chaotic. Alternatively, you can be methodical. You can create geometric patterns. For instance, go from nail one to nail ten. Then from nail two to nail eleven. This creates a consistent weave.
Advanced String Art Patterns for 2026
The craft has evolved significantly by 2026. Artists are pushing boundaries. They are creating incredible 3D effects. One popular technique is layering. You create a base layer with one color. Then, you add a second layer with another. This adds depth to the image. For example, a bird might have a shadow. The shadow is created with darker thread behind the main color. This technique mimics painting. It brings the artwork to life. Another advanced method is multi-stringing. You use multiple threads at once. You loop them simultaneously. This creates a thicker line. It speeds up the filling process. It also adds texture.
Furthermore, typography is a major trend. People create custom quotes. They spell out names or dates. The letters are formed by nails. The string fills the inside of the letters. This makes personalized gifts. They are very popular for weddings. Designing fonts requires patience. The curves of letters are tricky. You need many nails to make a smooth curve. Fewer nails create a jagged look. Therefore, planning the nail placement is crucial. You must space the nails closely on curves.
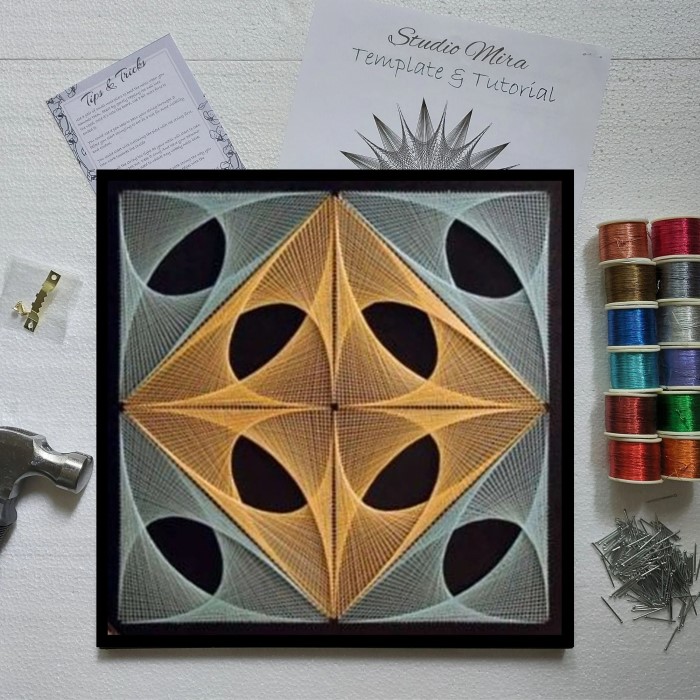
Moreover, geometric art remains a staple. But it has become more complex. Artists use mathematical algorithms. They create spirograph-like designs. These designs feature intricate spirals. The repetition is soothing. The symmetry is pleasing to the eye. These advanced projects take time. They might take several days to complete. But the result is a masterpiece. It is a conversation piece. It showcases true skill. As you gain confidence, try these patterns. Challenge yourself. Move beyond simple shapes. Explore the limitless possibilities of thread.
Troubleshooting and Common Mistakes
Beginners often encounter hurdles. This is a normal part of learning. One common issue is running out of string. You are in the middle of a project. Suddenly, the thread ends. Do not panic. You can easily join a new thread. Tie the old thread to a nearby nail. Then, tie the new thread to the same nail. Cut off the loose ends. Continue working. It is barely noticeable. To prevent this, estimate your thread needs. It is better to have too much than too little. Another problem is tangled thread. Embroidery floss tangles easily. It knots up. This is frustrating.
Therefore, manage your thread length. Cut manageable lengths. Do not cut a piece longer than your arm. If you use the whole skein, keep it organized. You can use a bobbin. This keeps the thread neat. If a tangle happens, do not pull. Gently loosen the knot with a needle. Patience solves the tangle. Another mistake is uneven nail height. Some nails stick out higher than others. This looks unprofessional. The string slides down. It bunches up. You can fix this. Gently tap the high nails down. Or use pliers to pull low nails up. Be careful not to damage the wood.
Furthermore, string tension causes issues. You might pull too hard. The nail leans over. The wood splinters. This ruins the pattern. Loosen your grip. Let the thread flow through your fingers. It should be taut but not tight. Conversely, loose string art looks messy. If you see a loose loop, fix it. You can unspool the string back to that point.
The Therapeutic Benefits of Crafting
This hobby is not just about the product. It is also about the process. Mental health professionals recognize the benefits. Crafting reduces stress. It lowers anxiety levels. The repetitive motion is soothing. It calms the nervous system. This is known as the “relaxation response.” Your heart rate slows down. Your blood pressure decreases. In our busy 2026 lives, this is vital. We are constantly bombarded with information. We are always connected. Taking time to unplug is necessary. This craft forces a break. It demands focus. You cannot check your phone easily. Your hands are busy.
Moreover, it boosts self-esteem. You start with raw materials. You end with a finished piece. This sense of accomplishment is powerful. It builds confidence. You realize you can create beauty. You learn a new skill. This stimulates the brain. For children, it teaches patience. It teaches them to follow instructions. It allows for creative expression. They can choose their own colors. They can design their own patterns. This autonomy is empowering.
Furthermore, it is a social activity. You can join a class. You can craft with friends. This social connection combats loneliness. It builds community. You share a common interest. You support each other’s work. Even online communities provide this support. Posting your finished work invites praise. It encourages you to keep going. Therefore, the benefits are holistic.
Creative Project Ideas to Try
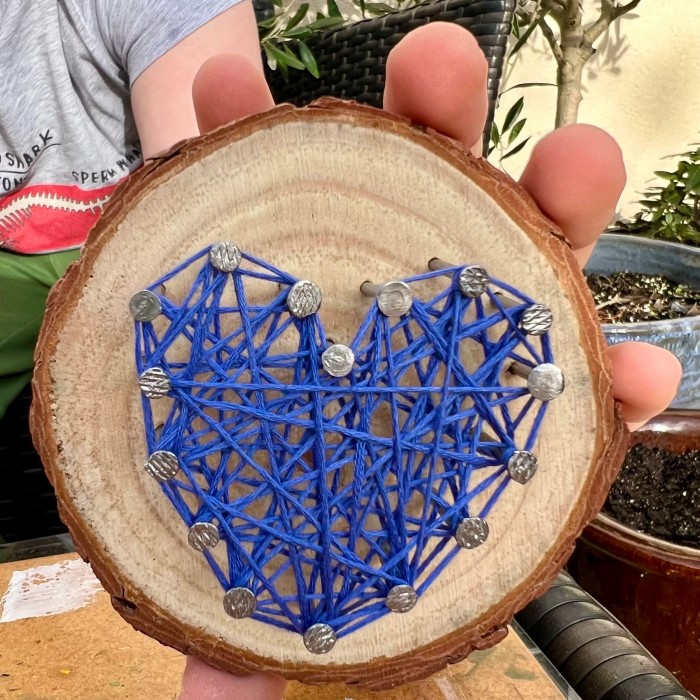
Are you looking for inspiration? There are endless possibilities. Start with a classic. A heart shape is timeless. It fits any decor. You can use red thread. Or you can use pink or purple. It makes a great gift. Another idea is a map. Outline your home state or country. Fill it with strings in state colors. This is a patriotic piece. It looks great on a gallery wall. You can also add a small heart. Place it on the city where you live. This personalizes the art. It makes it special.
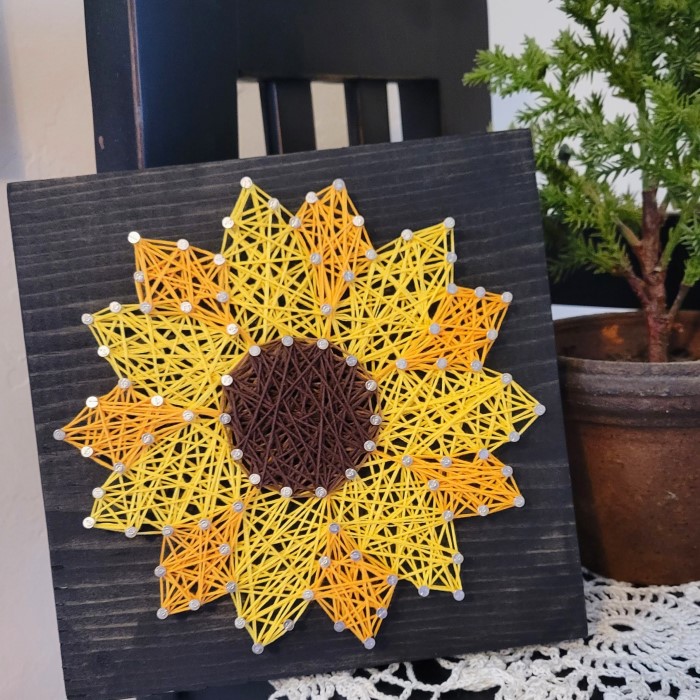
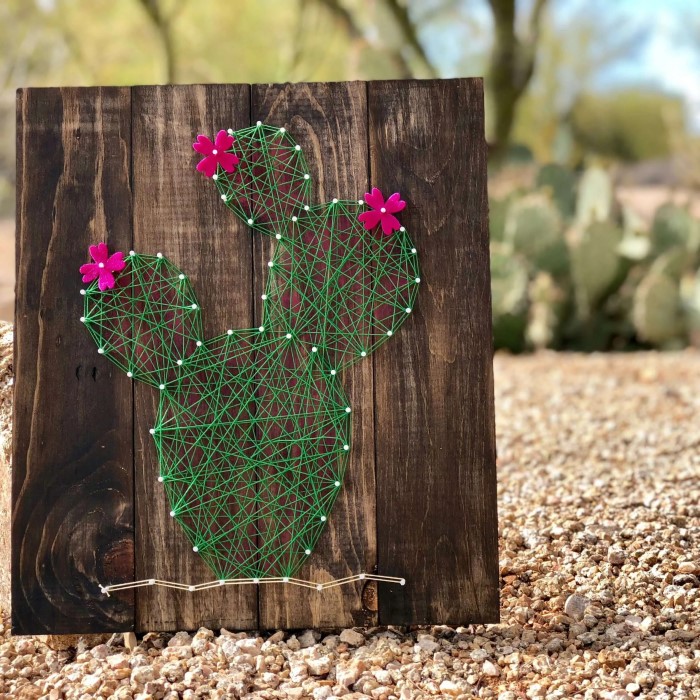
Furthermore, try a seasonal theme. Create a pumpkin for autumn. Use orange thread. Add a green stem. Create a snowflake for winter. Use white or silver thread. These pieces rotate with the holidays. They keep your home decor fresh. Nature is a great muse. Flowers are popular subjects. Daisies and sunflowers are cheerful. They use bright colors. They brighten up a room. Animals are also a hit. A simple owl silhouette is easy. A complex lion’s mane is a challenge. Choose a project that fits your skill level.
Additionally, consider functional art. You can make a jewelry organizer. Use a larger board. Space the nails further apart. Hang your necklaces and bracelets on the nails. It is useful and decorative. You can make a key holder. Add hooks to the bottom of the board. Decorate the top with string art. This adds personality to your entryway. You can also make greeting cards. Use small pieces of wood. Create miniature designs. Glue a card backing to them. They are unique. They show you care. The only limit is your imagination. Look around you. Everything is a potential pattern.
FAQ: Answering Your Top Questions
What do you need to do string art?
You need a few basic supplies. First, you need a wooden board. It serves as the canvas. Second, you need nails. They define the shape. Third, you need embroidery floss or thread. This creates the design. Fourth, you need a hammer. You use it to drive the nails. Finally, you need a pattern. It guides your placement. These items are affordable. You can find them at any craft store.
How do you avoid mistakes in string art?
Planning is the best prevention. Start with a simple pattern. Make sure your nails are secure. Do not hammer them too deep. Keep the nail height consistent. Use a consistent tension on the string. Do not pull too hard. If you make a mistake, relax. You can unwind the string art. Then, you can try again. Mistakes are part of the learning curve. Do not get discouraged.
What type of string is best for string art?
Embroidery floss is the most popular choice. Crochet thread is also good. It is slightly thicker. It covers more area quickly. Thicker yarn can be used for kids. It is easier for them to see. However, thin thread creates finer detail. It is better for complex patterns. Choose the material that suits your project.
Conclusion
The world of crafting is vast. However, few hobbies are as rewarding as string art. As we move through 2026, this craft continues to captivate hearts. It appeals to our need for creation. It appeals to our need for relaxation. Whether you are a seasoned artist or a beginner, this medium has something for you. The techniques are easy to learn. The possibilities are endless. So, pick up a hammer. Choose your favorite colors. Start your journey today. You will discover the artist within. You will create something beautiful. Let your creativity flow through the string art.