Unveiling the Magic of Paper Art
Decoupage is a fascinating craft that allows anyone to become an artist. It involves decorating objects by gluing colored paper cutouts onto them. This technique creates a unique visual effect. It often looks like the design is painted directly onto the surface. Many crafters love this hobby because it is accessible and affordable. You do not need expensive equipment to start. Furthermore, the possibilities for creativity are truly endless. You can transform a plain wooden box into a vintage treasure. Alternatively, you can turn a glass jar into a beautiful vase. The core concept involves cutting out pictures. Then, you paste them onto a surface. Finally, you cover them with varnish or lacquer.
This process seals the paper and protects the design. Consequently, the final product looks professional and polished. The word itself comes from the French verb “decouper,” which means “to cut out.” However, the art form has roots that stretch back much further than modern France. It is a perfect activity for families, children, and solo crafters alike. Whether you are a seasoned artist or a complete beginner, this guide will help you understand the basics. We will explore the history, materials, and methods required to master this art. Ultimately, it is about seeing the potential in everyday items.
A Journey Through History and Origins
The history of this craft is rich and diverse. It did not start as a simple pastime for housewives. Instead, it has a noble and ancient lineage. Historians believe the technique originated in East Asia. Specifically, it likely began in Siberia. Nomadic tribes used cut-out felt to decorate their tombs and sacred objects. From there, the art form traveled to China. By the 12th century, Chinese peasants were creating similar designs on lanterns and boxes. They used brightly colored paper to create stunning patterns. However, the modern popularity of the craft exploded in Europe.
- Venetian Influence: In the 17th century, Venetian cabinetmakers began using printed engravings to decorate furniture. They wanted to mimic the look of expensive Japanese lacquerwork. This made luxury styles accessible to the middle class.
- French Aristocracy: The craft soon moved to France. Marie Antoinette and her court ladies were avid fans. They spent hours cutting and pasting intricate designs. The term “decoupage” was solidified during this era.
- Victorian England: In the 19th century, the hobby became a staple in Victorian households. Ladies created elaborate screens, screens, and boxes. It was considered a refined and proper activity for young women.
Therefore, when you engage in this craft today, you are participating in a centuries-old tradition. It connects modern crafters with artisans from the past. Understanding this history adds depth and appreciation to every project you undertake.
Essential Tools and Materials for Success
To begin your journey, you need the right supplies. Fortunately, the barrier to entry is low. You likely have many of these items in your home already. However, investing in quality materials will improve your results significantly.
- The Base Object: You can decorate almost anything. Wood, glass, metal, ceramic, and plastic are popular choices. Ensure the surface is clean and dry before starting.
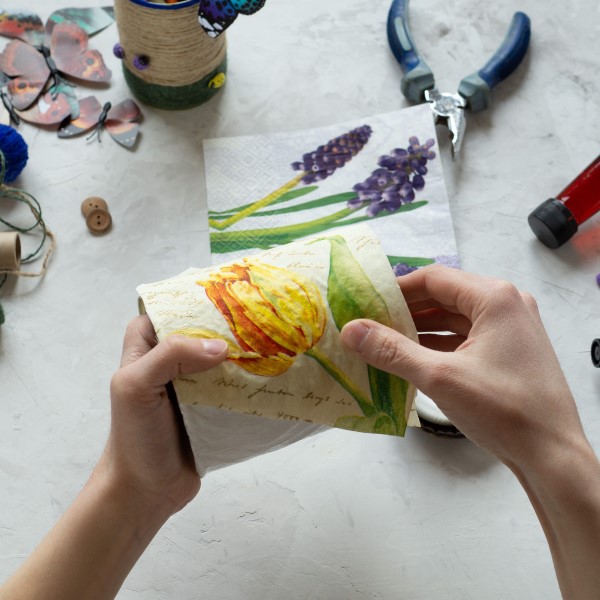
- Paper Sources: The heart of the project is the paper. You can use wrapping paper, magazine cutouts, tissue paper, or fabric. Specialized rice paper and napkins are favorites among serious crafters.
- Adhesives: You need a specific glue. It is often called “decoupage medium” or “mod podge.” This glue acts as both an adhesive and a sealer. You can also make your own by mixing white school glue with water.
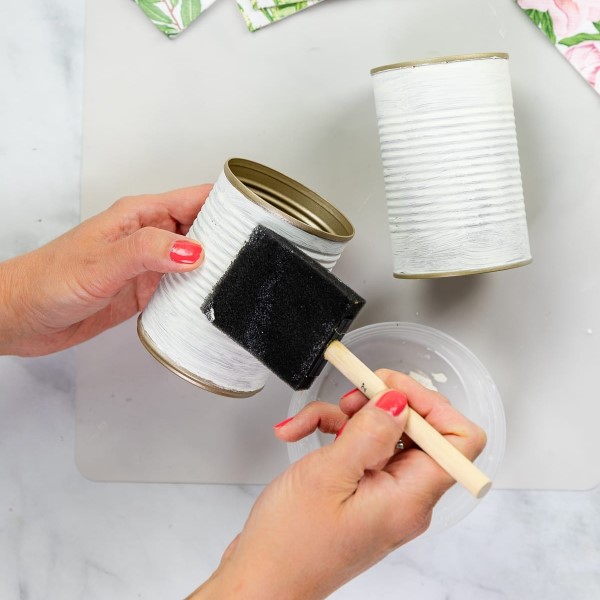
- Application Tools: A good brush is essential. Foam brushes work well for smooth applications. They minimize brush strokes. Additionally, a brayer or a soft cloth helps smooth out air bubbles.
- Cutting Tools: Sharp scissors are a must. Precision tip scissors allow for detailed cutting. For straight edges, a craft knife and a metal ruler provide clean lines.
- Protective Finish: While the glue seals the paper, a topcoat adds durability. Use a clear acrylic sealer or varnish. This protects your work from scratches and moisture.
Gathering these items beforehand ensures a smooth and enjoyable crafting experience.
Preparing Your Surface for Perfection
Preparation is the most critical step in the process. Skipping this stage often leads to disappointing results. The surface must be ready to accept the paper and glue. Therefore, take your time to prep your object correctly.
- Cleaning: First, remove all dirt and grease. Use a mild soap and water solution for most items. For glass or plastic, rubbing alcohol works better to remove oils. Let the item dry completely.
- Sanding: If you are working with wood or rough surfaces, sanding is necessary. Use fine-grit sandpaper to create a smooth finish. Sand in the direction of the grain. Wipe away the dust with a tack cloth.
- Priming: Some surfaces require a base coat of paint. Priming creates a neutral background. It also helps the glue adhere better. For example, a dark wood box might need a white base coat to make light-colored paper pop.
- Planning: Before you apply any glue, arrange your cutouts on the object. Move them around until you are happy with the composition. Take a photo of the final arrangement. This serves as a reference guide.
Consequently, a well-prepared surface ensures that the paper lies flat. It also guarantees that the adhesive bonds strongly. This foundational work prevents peeling and bubbling later on.

Mastering the Basic Application Technique
Once your materials are ready, you can start the actual application. The process is straightforward, but it requires a steady hand and patience. Follow these steps to achieve a smooth finish.
- Cutting: Cut your images carefully. Follow the outlines precisely. You can use a craft knife for intricate details. Remember, clean cuts result in a more professional look.
- Gluing: Apply a thin layer of glue to the back of your paper cutout. You can also apply a bit to the surface of the object. Be careful not to use too much glue. Excess glue can cause the paper to wrinkle or tear.
- Positioning: Place the paper onto the object. Start from one edge and lower it down slowly. This method helps prevent air bubbles from getting trapped underneath.
- Smoothing: Immediately use your fingers or a brayer to smooth the paper. Work from the center outwards. Apply gentle pressure to push out any excess glue or air. Use a damp cloth to wipe away glue that squeezes out the sides.
- Drying: Allow the piece to dry completely. Do not rush this step. Moving wet paper can cause tears.
- Sealing: Once the glue is dry, apply a top coat of sealer over the entire object. Let it dry and sand lightly between coats. Apply multiple thin coats rather than one thick coat.
By following these steps, you will create a durable and beautiful piece of art.
Exploring Advanced Styles and Effects
After mastering the basics, you might want to experiment with advanced techniques. There are several styles that can elevate your projects. These methods create different textures and visual illusions.
- 3D Decoupage: This style involves layering multiple copies of the same image. You cut out specific elements from each layer. Then, you stack them using foam pads or silicone glue. The result is a stunning three-dimensional relief.
- Crackle Finish: You can use special crackle mediums to give your project an antique look. The varnish dries with fine cracks. This technique is perfect for vintage-style home decor.
- Fabric Decoupage: You are not limited to paper. Fabric can be used on furniture or clothing. You must prepare the fabric properly. Usually, this involves washing it without fabric softener.
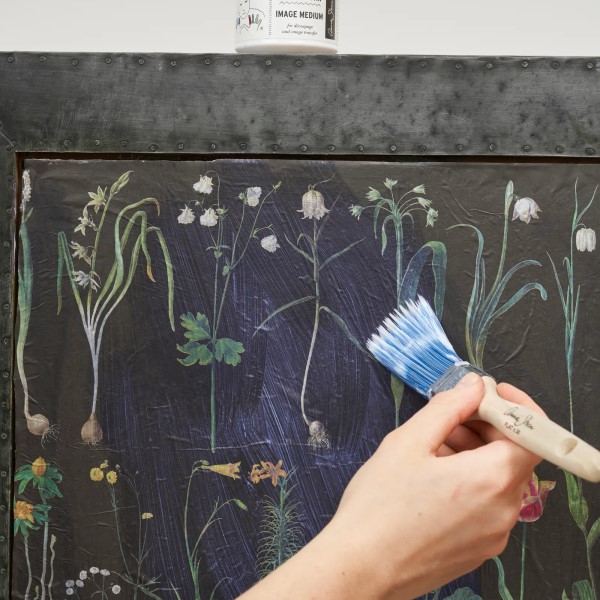
- Image Transfer: This is a magical technique. You use a special gel medium to transfer a photocopy image onto the surface. The paper backing is rubbed away. This leaves the ink embedded in the surface. It looks like the image is part of the object.
- Reverse Decoupage: This is commonly used on glass plates. You apply the image to the back of the plate. You build the layers in reverse order. The design is then viewed through the glass. This creates a smooth, usable surface on the top.
Trying these advanced methods keeps the hobby fresh and exciting. It challenges your skills and expands your creative repertoire.
Creative Project Ideas for Every Skill Level
Finding inspiration is sometimes the hardest part of crafting. Here are several project ideas categorized by difficulty level. These suggestions will help you choose your next creation.
- Beginner Projects:
- Coasters: Use ceramic tiles and decorate them with patterned napkins. This is a quick and easy project.
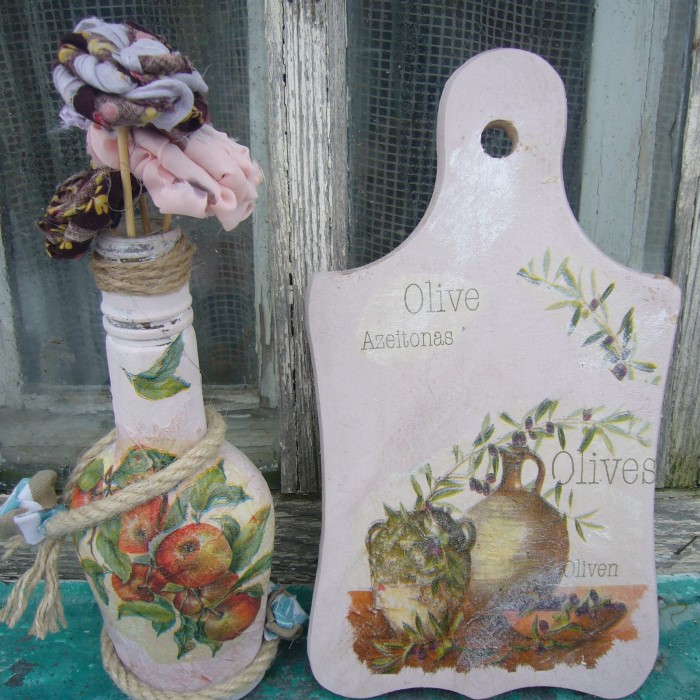
- Glass Jars: Turn empty pasta sauce jars into decorative storage containers. They look great on a desk or shelf.
- Greeting Cards: Create custom cards for birthdays or holidays. Use cardstock as a base and layer paper cutouts on top.
- Intermediate Projects:
- Furniture Upcycling: Breathe new life into an old side table. Use large floral patterns or maps to cover the top.
- Picture Frames: Decorate a plain wooden frame to match a room’s theme. This makes a wonderful personalized gift.
- Jewelry Boxes: Apply velvet paper inside and decorative paper outside. It creates a luxurious storage spot for trinkets.
- Advanced Projects:
- Lampshades: Covering a lampshade requires patience. The curved surface presents a challenge. However, the glowing result is spectacular.
- Room Dividers: Large screens offer a vast canvas. You can create a mural using hundreds of cutouts. This is a true statement piece.
Choose a project that matches your current confidence level. Then, gradually work your way up to more complex items.
Troubleshooting Common Mistakes
Even experienced crafters encounter problems. Knowing how to fix these issues will save your project. Here are common mistakes and their solutions.
- Wrinkles and Bubbles: This is the most frequent issue. It usually happens when the paper is too thin or the glue is too wet. To fix it, poke the bubble with a pin. Then, press the air out gently. For wrinkles, try smoothing them out while the glue is still wet.
- Tearing Paper: Thin paper tears easily when wet. If this happens, let it dry. Then, carefully patch the tear with a matching piece of paper. Apply a thin layer of glue over the top.
- Visible Brush Strokes: If your sealer looks streaky, it is likely too thick or applied too slowly. Sand the surface lightly with fine-grit sandpaper. Then, apply a thinner coat of sealer. Use a foam brush for a smoother finish.
- Paper Lifting: If the edges of your paper curl up, the glue might not be strong enough. Apply a bit more glue under the lifted edge. Hold it down with a heavy book or clip until it dries.
- Cloudy Finish: A cloudy appearance can occur if moisture gets trapped. Ensure each layer is completely dry before adding the next. You can also use a hairdryer on a cool setting to speed up drying.
Do not get discouraged by mistakes. They are a natural part of the learning process. With practice, you will learn to avoid these pitfalls entirely.
FAQ
How do you do decoupage?
You start by cutting out your desired images from paper. Next, you prepare the surface by cleaning and sanding it. Then, you apply a layer of decoupage glue to the surface and place your paper on it. Smooth out any bubbles or wrinkles. Finally, apply several layers of sealer or glue over the top to protect the design.
What is decoupage technique?
The technique involves decorating an object by gluing colored paper cutouts onto it. It combines painting, stenciling, and collage. The goal is to create a finished surface that looks like inlay work or a painting. The paper is sealed with layers of varnish or lacquer to integrate it seamlessly with the object.
Can you use PVA glue for decoupage?
Yes, you can use PVA glue for decoupage. It is a cost-effective alternative to branded decoupage mediums. However, you should dilute it slightly with water to achieve a smooth consistency. Keep in mind that PVA might not be as durable or water-resistant as specialized decoupage sealers.
What kind of paper can be used for decoupage?
You can use almost any type of paper. Common choices include wrapping paper, tissue paper, napkins, magazine pages, and scrapbooking paper. Thinner papers like napkins are easier to smooth out, while thicker papers are more durable. You can even use fabric or photographs for different effects.
Conclusion
The art of decoupage offers a wonderful way to express your creativity. It transforms the mundane into the magnificent. We have explored the essential tools, the rich history, and the step-by-step techniques needed for success. Whether you are a beginner or an expert, there is always something new to learn. This craft is more than just cutting and pasting. It is a form of meditation and a way to personalize your world. So, gather your supplies and start your next project today. You will be amazed at what you can create with just paper and glue.