Introduction
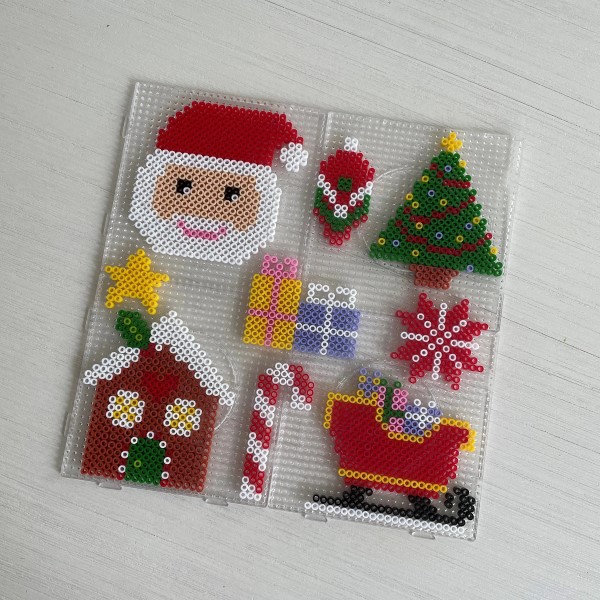
The holiday season is a time filled with joy, warmth, and creativity. A delightful way to express your artistic spirit during this festive time is through Christmas Perler bead patterns. These colorful beads offer endless possibilities for crafting charming decorations, ornaments, and gifts for family and friends. Not only are Perler beads easy to work with, but they also make for a wonderful activity that can engage individuals of all ages.

In this comprehensive guide, we will explore a variety of DIY Christmas Perler bead patterns that can add festive cheer to your holiday celebrations. With detailed step-by-step instructions and creative ideas, you’ll learn how to transform simple Perler beads into beautiful works of art that radiate the Christmas spirit. Whether you are a beginner or an experienced crafter, this guide will provide you with the inspiration and knowledge needed to create memorable holiday pieces.
Why Choose Perler Beads for Christmas Crafts?
1. Versatility of Perler Beads
Perler beads are incredibly versatile, allowing you to craft a wide variety of designs for Christmas.
- Creative Freedom: Perler beads come in many colors and sizes, enabling you to create intricate patterns, festive ornaments, and eye-catching designs. From snowflakes to Christmas trees, your imagination is the only limit.
- Suitable for All Ages: Whether you are crafting with children, friends, or on your own, Perler beads are accessible to all age groups. Kids enjoy the hands-on nature of the activity, while adults can engage in more complex designs.
2. Simple and Enjoyable Process
One of the primary reasons to choose Perler beads for your Christmas crafts is the ease of use.
- Clear Instructions: Crafting with Perler beads involves a straightforward process. Simply arrange the beads on a pegboard to create your desired pattern, and then fuse them together using heat. This method is user-friendly and perfect for those new to crafting.
- Minimal Cleanup: Unlike many other crafting materials, Perler beads do not require messy glue or paint. This makes the crafting process simpler and easier to manage, allowing you to focus on the fun of creating.

Fun Christmas Perler Bead Patterns to Explore
1. Classic Christmas Tree
Making a Festive Tree Design:
- Materials Needed: Green beads for the tree, brown beads for the trunk, and colorful beads for ornaments.
- Step-by-Step Instructions: Start by outlining the shape of a Christmas tree with green beads on the pegboard. Work from the bottom up, gradually decreasing the width of each layer. Once the base shape is complete, add a trunk with brown beads. Then, decorate the tree with colorful beads to create ornaments and a star at the top.
2. Joyful Snowman
Crafting a Cheerful Snowman:
- Materials Needed: White beads for the snowman body, orange beads for the carrot nose, and black beads for the hat and buttons.
- Step-by-Step Instructions: Create the snowman’s body by placing white beads on the pegboard in two stacked circles. Use a black bead to form the hat and position orange beads for the carrot nose. Enhance the snowman with black beads for eyes and mouth. You can also add a scarf using colorful beads to give it a warm, festive touch.
3. Adorable Ornaments
Creating Decorative Ornaments:
- Materials Needed: Various colored beads such as red, gold, and green.
- Step-by-Step Instructions: Arrange beads in circular shapes to form ornaments. Utilize different colors and patterns within the circles to create unique designs. You can also layer beads to add depth and dimension. Once finished, use ribbons to hang these vibrant ornaments on your tree or gift them to friends and family.
Step-by-Step Guide to Crafting
1. Gather Your Crafting Supplies
Before you begin your holiday crafts, make sure to gather all necessary materials.
- Perler Beads: Select a variety of colors that reflect the festive spirit of Christmas. Popular colors include red, green, white, and gold.
- Pegboards: Utilize pegboards of different shapes and sizes to help shape your designs.
- Ironing Paper: Ensure you have ironing paper on hand for fusing the beads after arrangement. This step is crucial for solidifying your design.
2. Plan Your Design
Planning your design before diving in is key to a successful finished product.
- Visualizing Your Idea: Sketch your desired design on paper. This helps in visualizing how the final craft will look and allows you to make alterations before creating the actual piece.
- Arranging the Beads: Using your pegboard, begin placing beads according to your design. Pay attention to colors and patterns to create visual harmony.
3. Fusing Beads Together
Once your design is complete, it’s time to fuse the beads.
Ironing Technique
- Preparation for Ironing: Before starting, make sure that your bead design is securely placed on the pegboard. Check that all beads are arranged correctly according to your desired pattern, as this is your final chance to make any modifications before the fusing process begins.
- Using Ironing Paper: Take a piece of ironing paper, which is often provided with Perler bead kits, and place it carefully over your bead design. This paper acts as a protective layer that prevents the beads from sticking to the iron directly, ensuring a smooth melting process and preventing any mess.
- Setting the Iron: Adjust your iron to medium heat. Avoid using a higher setting, as it can cause the beads to melt too quickly or even burn. It’s important to have a steady hand during this process, so make sure the iron is ready and heated up properly.
- Gentle Pressure Application: With the ironing paper in place, gently press the iron down onto the paper, using a circular motion. This method helps ensure that heat is evenly distributed across the beads. Apply gentle but consistent pressure; you want to melt the beads just enough for them to fuse without overdoing it.
- Watch the Beads Melt: As you press down, you’ll notice the beads begin to fuse together. Keep the iron in place for around 10 to 20 seconds, but be attentive to the process. You should see the beads start to soften and flatten slightly, forming a cohesive piece. Lift the iron occasionally to check the melting status without disrupting the process.
- Final Touches: Once you’re satisfied with the melting, carefully remove the iron from the design and allow it to cool for a few moments while still covered with ironing paper. This prevents any accidental disturbance to the design before it completely bonds.
Cooling Period
- Importance of Cooling: After ironing, allow your design to cool thoroughly before handling it. This step is crucial because if the beads are disturbed too soon, they may not hold together properly, leading to an incomplete or broken design.
- Suggested Cooling Time: The cooling process typically requires about 10 to 15 minutes, depending on the size and complexity of your design. During this time, the beads will continue to bond as they cool down, solidifying your creation.
- Handling with Care: After sufficient cooling, gently lift the edges of the ironing paper and peel it away from your bead design. Be cautious during this step, as the beads may still be fragile and more susceptible to breaking if handled too roughly.
- Final Assessment: After removing the ironing paper, assess your design for any areas that did not fuse together properly. If there are gaps or beads that did not melt sufficiently, you can reapply the iron on those spots, placing the ironing paper back over the design and gently heating again for a few seconds.
- Storing Your Creation: Once fully cooled and intact, you can store your finished piece safely. Consider displaying it proudly as decoration or gift it to a friend or family member. Always handle your fused beads with care to ensure they remain intact during storage or transit.
Displaying Your Christmas Perler Bead Patterns
1. Festive Ornaments
Once you’ve completed your Christmas designs, consider how to display them effectively.
- Hanging Your Ornaments: Attach strings or hooks to your finished bead designs and hang them on your Christmas tree. This adds a personal touch and brings a vibrant, crafty appearance to your holiday decor.
2. Customized Gift Tags
Use your Perler bead creations as unique gift tags.
- Adding Personalized Touch: Create small bead designs that can be attached to presents as gift tags. A snowman or Christmas tree themed tag can enhance your gifts and highlight the effort you put into crafting.
3. Framed Art
Consider framing your favorite creations for a beautiful display.
- Creating Wall Art: Frame completed designs and hang them in your home as festive decorations. This allows you to showcase your crafting talents with pride.
FAQs
What is the best Christmas thing to draw?
When working with Perler beads, popular festive subjects include Christmas trees, snowmen, candy canes, and holiday ornaments. Choose themes that inspire joy during the season.
What does it mean to give someone a drawing as a gift?
Gifting a drawing, including bead art, represents thoughtfulness and effort. It reflects a personal connection and a sincere desire to give something meaningful.
What is the 5 gift rule for kids?
The 5 gift rule suggests giving kids four types of gifts: something they want, something they need, something to wear, and something to read, with one bonus surprise gift for added delight.
How to craft a Christmas gift?
To craft a Christmas gift, select a theme that matches the recipient’s tastes, gather your materials, and get creative. Employ your chosen techniques, such as Perler beads, to personalize the gift.

Conclusion
In conclusion, DIY Christmas Perler bead patterns provide an excellent avenue for creativity during the holiday season. By exploring various designs and techniques, you can create unique and heartfelt gifts that capture the joy and spirit of Christmas.
As you embark on your crafting journey, remember that these projects not only add cheer to your seasonal celebrations but also strengthen connections with loved ones through shared creativity. Gather your materials, embrace the spirit of the holidays, and let your creativity flow through your Christmas Perler bead patterns. This holiday season, create joyful moments that will be cherished for years to come! Whether for personal enjoyment or as gifts for others, your artistry will surely shine bright!