Introduction to the Bunsen Burner
The Bunsen burner is an essential laboratory tool. It provides a steady and adjustable flame. This device aids in heating, sterilization, and other scientific processes. Proper understanding of its parts of bunsen burner labeled and usage ensures effective and safe experiments.
History and Development of the Bunsen Burner
The Bunsen burner was invented in 1855 by Robert Bunsen. He collaborated with Peter Desaga, a laboratory technician, to design it. Their goal was to create a device that offered a smokeless and efficient flame. This invention revolutionized laboratory practices by providing controlled heating. Over time, the burner became a staple in educational and research settings.
Common Uses in Laboratories
The Bunsen burner is widely used for various lab tasks. It is ideal for heating chemicals and solutions evenly. It helps in sterilizing laboratory instruments such as loops and tweezers. The Bunsen burner also facilitates combustion experiments and flame tests for element identification. Its versatility makes it a vital tool in scientific studies.
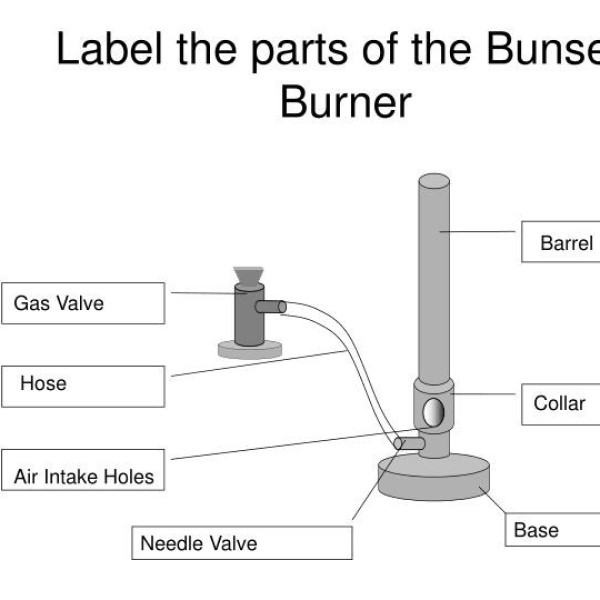
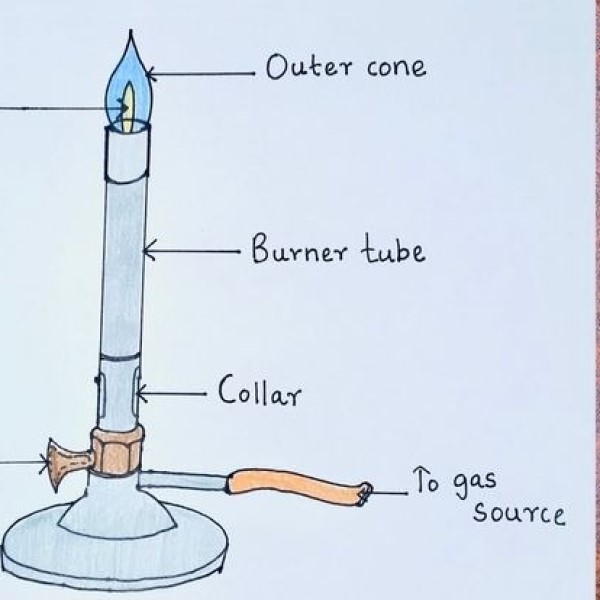
Key Components of a Bunsen Burner
Understanding the key components of a Bunsen burner is crucial for safe and effective use. Below is a breakdown of its main parts and their functions.
Base and Gas Inlet
The base provides stability to the burner. It keeps the burner steady during experiments. The gas inlet is where the fuel source connects to the burner. This fuel is usually natural gas or butane. The connection ensures a steady supply of gas for the flame.
Barrel and Its Function
The barrel is the metal tube where the flame forms. It guides the gas and air mixture upward. This part is long to ensure proper mixing of air and gas. A well-mixed combination produces a consistent flame.
Air Vent or Collar
The air vent or collar controls the airflow. Adjusting it regulates oxygen levels in the flame. More air creates a hotter, blue flame. Less air results in a cooler, yellow flame. It is essential for different types of experiments.
Gas Control Knob
The gas control knob manages the gas flow. Turning it adjusts the flame size and intensity. This ensures safety and precision during heating. Proper adjustment helps achieve the desired flame for specific tasks.
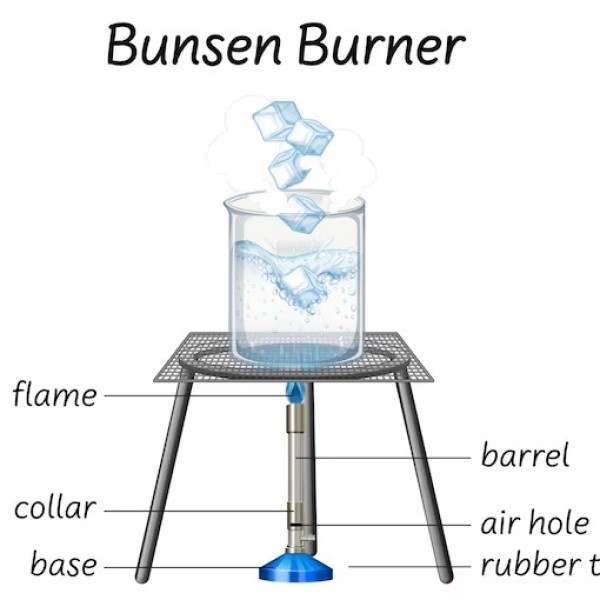
Detailed Diagram with Labels
Understanding a Bunsen burner labeled diagram is essential for proper operation and safety. The diagram visually explains the burner’s key parts and their functions.
Visual Breakdown of Parts
A typical bunsen burner labeled diagram includes the following parts:
- Base: Provides stability and prevents the burner from tipping over.
- Gas Inlet: Connects to the fuel source, supplying gas for combustion.
- Barrel: Guides the gas and air mixture to create a flame.
- Air Vent or Collar: Controls airflow to adjust the oxygen level.
- Gas Control Knob: Regulates gas flow to manage flame intensity.
Each part is clearly bunsen burner labeled to help users identify and understand its purpose. The diagram is an excellent tool to learn the position and role of components.
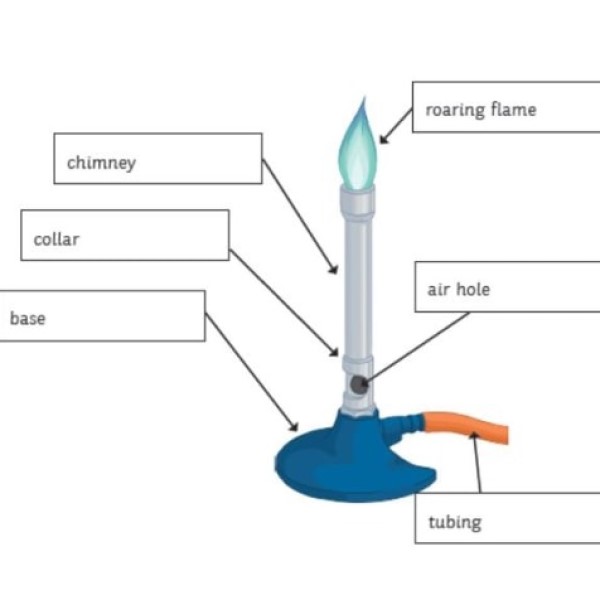
Role of Each Component
Each component of the Bunsen burner plays a specific role:
- Base: Ensures stability and safety during experiments.
- Gas Inlet: Provides a consistent gas supply for a steady flame.
- Barrel: Mixes air and gas efficiently for smooth combustion.
- Air Vent or Collar: Adjusts flame type by increasing or reducing airflow.
- Gas Control Knob: Allows precise control over flame size and temperature.
A well-labeled diagram improves comprehension and guides safe usage. Understanding the role of parts prepares users for confident and efficient operation.
How a Bunsen Burner Works
Understanding how a Bunsen burner works is key for safe and efficient use in laboratories. By knowing the proper steps and flame adjustments, users can achieve ideal results during experiments.
Steps for Safe Operation
Check All Connections:
Before beginning any experiment with a Bunsen burner, it is crucial to verify that all connections are secure.
Ensure the gas inlet, which connects the burner to the fuel source, is tightly attached to prevent any gas leaks.
A loose connection can lead to a dangerous buildup of gas in the area, increasing the risk of fire hazards.
Always perform this check as part of your pre-use routine to ensure everything is in safe working order.
Inspect the Burner:
Conduct a thorough inspection of the Bunsen burner itself to identify any potential issues.
Examine the air vent to ensure it is clear of debris or blockages that might restrict airflow, as this can affect the flame’s characteristics.
Check the gas control knob for any signs of damage or malfunction. It should turn smoothly without resistance.
Inspect the barrel for cracks or signs of wear that could cause performance issues.
Address any issues immediately, as using a damaged burner can lead to unsafe conditions.
Adjust the Air Vent:
Proper adjustment of the air vent is essential for achieving an optimal flame.
Set the air vent to allow for a balanced mixture of gas and air, as this will influence the flame’s color and temperature.
Generally, a wider opening leads to a hotter, blue flame, ideal for most laboratory experiments, while a more closed vent can produce a cooler, yellow flame.
Take the time to understand the specific requirements for your experiment to ensure the flame type matches the intended use.
Ignite the Flame:
When ready to light the burner, use a lighter or strike a match to start the flame.
Before igniting, slowly open the gas control knob to allow a small amount of gas to flow; this will make it easier to catch the flame.
Always light the burner before fully opening the gas control knob to minimize the risk of gas buildup.
Position the flame tool at an angle to the burner and away from your face to ensure safety during ignition.
Monitor Flame Type:
After igniting the flame, closely monitor its characteristics to ensure it corresponds to the requirements of your experiment.
A blue flame indicates complete combustion and is generally preferred for heating tasks, as it provides a hotter flame.
A yellow flame, however, may suggest incomplete combustion and is suitable for specific experiments where lower heat levels are required.
Adjust the air vent or gas control knob accordingly to maintain the desired flame type throughout your experiment, as fluctuations can impact results.
Shut Down Properly:
After completing your experiment, it is essential to shut down the Bunsen burner safely and efficiently.
Begin by turning off the gas flow completely at the gas source or control knob to eliminate any further gas release.
Allow the burner to cool down before handling it or moving it to avoid burns.
Once cool, clean the burner to remove any residue or debris, ensuring it remains in good condition for future use.
Establish a routine for proper shutdown procedures to maintain safety in the laboratory.
Following these steps ensures safety and efficiency during usage.
Adjusting the Flame for Different Experiments
- Yellow Flame (Safety Flame): Reduce airflow by closing the air vent. This flame is cooler and less intense. It is ideal for when the burner is not actively in use.
- Blue Flame (Heating Flame): Increase airflow by opening the air vent. This flame is hotter and ideal for chemical heating or sterilization.
- Fine-Tuning: Use the gas control knob to adjust flame size for precision in specific tasks.
Understanding flame adjustments ensures the burner meets requirements for varied experiments effectively.
Types of Flames and Their Applications
A Bunsen burner can produce two main flame types: yellow and blue. Each serves specific purposes in laboratory settings. Understanding their applications ensures experiments are conducted safely and effectively.
Yellow (Safety) Flame
The yellow flame, often called the “safety flame,” appears bright and luminous. It is created by closing the air vent almost completely, reducing oxygen supply to the flame.
- Properties: Cooler and less intense than a blue flame.
- Usage: Ideal for situations when the burner is not in active use.
- Purpose: Minimizes risk of accidents as the flame is visible and stable.
This flame should only be used briefly during setup or idle times.
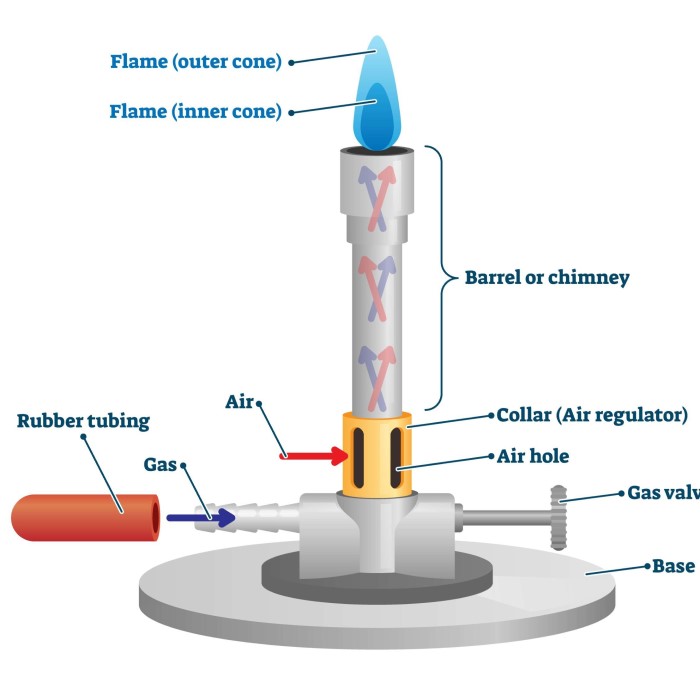
Blue (Heating) Flame
The blue flame forms when the air vent is opened, allowing more oxygen to mix with the gas. It burns hotter and produces less soot.
- Properties: Hotter and more intense, with a clean combustion process.
- Usage: Suitable for heating chemicals, sterilizing tools, and conducting flame tests.
- Purpose: Ensures efficient thermal energy for scientific experiments.
Using the blue flame requires careful control of the gas and air mixture to avoid overheating or accidents.
Understanding and selecting the correct flame type is crucial. It helps optimize experiments and promotes safety in laboratory environments.
Safety Tips While Using a Bunsen Burner
Using a Bunsen burner requires careful attention. Safety measures prevent accidents and ensure smooth experiments. Below are essential tips for safe usage.
Common Hazards and Precautions
- Fire Hazards: Always keep flammable materials far from the burner.
- Precaution: Clear the workspace before lighting the burner.
- Burn Risks: The burner gets very hot during use.
- Precaution: Handle the burner only after it cools down.
- Gas Leaks: Faulty connections may result in dangerous gas leaks.
- Precaution: Check the gas inlet before each use.
- Improper Flame Adjustment: A poorly adjusted flame can cause accidents.
- Precaution: Adjust the air vent and gas knob carefully for stable flames.
- Inadequate Ventilation: Improper airflow can lead to harmful gases building up.
- Precaution: Work in a well-ventilated laboratory to ensure safe air circulation.
Emergency Procedures
- Gas Leak Response: If you detect a gas smell:
- Turn off the gas supply immediately.
- Leave the room and alert a supervisor.
- Fire Emergency: If a fire breaks out:
- Use a fire extinguisher suitable for laboratory fires.
- Evacuate the lab if unable to control the fire.
- Burn Injury Treatment: If someone gets burned:
- Run cool water over the burned area.
- Cover the burn with a clean cloth and seek medical help.
- Accidental Ignition: If materials catch fire:
- Smother the fire using a fire blanket.
- Do not use water unless the material is non-reactive.
Safety protocols help in dealing with unexpected incidents confidently. They minimize risks and protect users effectively.
Maintenance and Troubleshooting
Proper maintenance ensures a Bunsen burner’s longevity and safety. Troubleshooting common issues helps maintain efficiency.
Cleaning and Storage
Regular cleaning prevents blockages and maintains smooth operation. Proper storage avoids damage and enhances longevity.
- Clean the Barrel:
- Use a brush to remove debris or soot from the barrel.
- Check for blockages regularly to ensure good airflow.
- Inspect the Air Vent:
- Clean air vents with a small brush to avoid obstruction.
- Ensure that the collar moves freely for proper airflow adjustment.
- Check Gas Inlet:
- Clear the gas inlet from dust or dirt using a soft cloth.
- Ensure the gas connection is tight to prevent leaks.
- Store Properly:
- Place the burner in a dry, cool area when not in use.
- Keep it away from flammable materials or chemicals.
- Periodic Inspection:
- Check all components for damage or wear before use.
- Replace faulty or old parts immediately.
Solving Common Issues with the Burner
Troubleshooting common problems ensures safe and effective operation.
- Weak Flame:
- Cause: Insufficient gas or blocked air vent.
- Solution: Increase gas flow or clean the vent for better airflow.
- Irregular Flame:
- Cause: Dirt in the barrel or gas inlet.
- Solution: Clean both areas thoroughly.
- Gas Leak:
- Cause: Loose or damaged gas connection.
- Solution: Tighten the connection or replace the gas tube immediately.
- Failure to Ignite:
- Cause: Faulty gas supply or blocked gas inlet.
- Solution: Check the gas source and clear the inlet.
- Noisy Flame:
- Cause: Excessive airflow or gas pressure.
- Solution: Adjust the air vent and control knob for balance.
Regular cleaning, proper storage, and timely troubleshooting minimize risks and enhance performance.
Conclusion: The Importance of a Labeled Bunsen Burner
In summary, ensuring your bunsen burner labeled correctly is imperative for safe lab practices. Proper labeling promotes a safer work environment, enhances user understanding, and encourages responsible equipment handling. By understanding the components and maintenance required for the burner, users can optimize their lab experiences. Through adherence to safety guidelines and equipment care, we can confidently use the Bunsen burner to conduct experiments that advance scientific knowledge.
With this knowledge, you are now better equipped to utilize a Bunsen burner effectively and safely in your lab endeavors. Remember, a well bunsen burner labeled is not just a tool; it is a key part of maintaining a safe and productive lab environment.