Introduction to Clay Sculpting
Clay sculpting is a timeless art form, spanning cultures and centuries. A piece of clay can become anything in the hands of a skilled sculptor. Beginners might feel overwhelmed at first. However, understanding the basics makes this creative pursuit more accessible. The first step in learning how to make a clay sculpture is choosing the right type of clay. There are various types, such as earthenware, stoneware, and porcelain. Each one handles differently and has its own set of properties.
Before you begin shaping your vision, familiarize yourself with the material’s texture. Knead the clay to the right consistency. Think of it as preparing dough for baking. It becomes pliable and easier to work with. This preparation prevents cracks and ensures a smooth base for your sculpture. As you start, keep your tools handy and your workspace organized. This will help you translate your ideas into 3D forms effectively. Remember, patience is key in clay sculpting. Small, attentive movements often lead to the most intricate and striking results. As you progress, so will your confidence and ability to create more complex sculptures.
Essential Tools for Clay Sculpture
To start with clay sculpture, you need the right tools. Like any artist, a sculptor relies on their tools to bring their vision to life. Lets talk about the must-haves in your tool kit for clay sculpture.
Hand Tools
Begin with the basics: wire cutters, loop tools, and ribs. They shape, trim, and smooth your sculpture. Wire cutters cut off chunks of clay. Loop tools carve delicate features. Ribs, made of metal or rubber, refine surfaces.
Rolling Tools
Rolling pins and slats help flatten and even out clay slabs. This is crucial for uniform thickness.
Assembly Tools
Needle tools and slip are essential for joining clay parts. Needle tools score the clay where parts join. Slip, a mixture of clay and water, acts as glue.
Detailing Tools
For details, you’ll want to have modeling tools and sponges. These add textures and fine details. Sponges also smooth the surface and wipe away excess material.
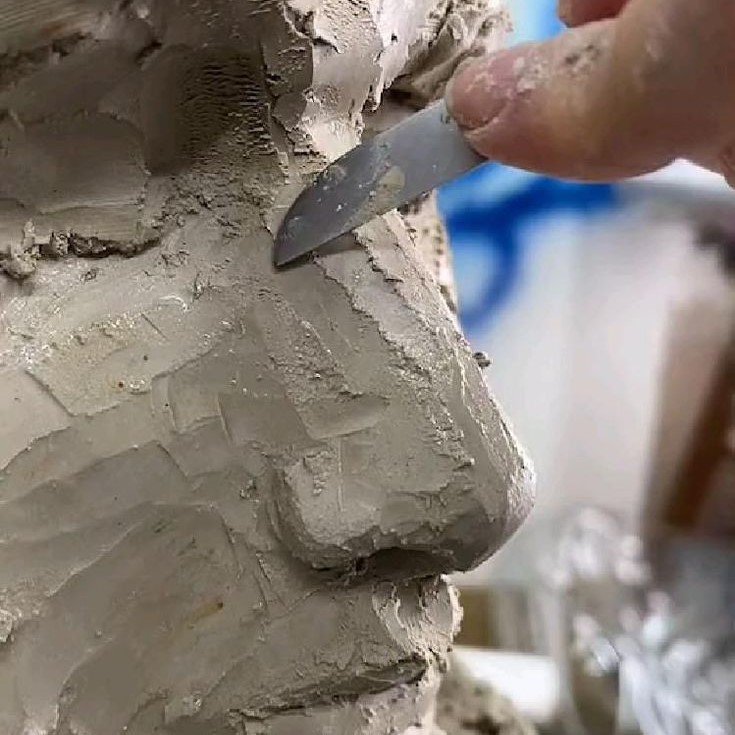
Carving Tools
When subtractive techniques are needed, carving tools come into play. They help remove clay to define shapes. It’s important to use them carefully to achieve precision.
Specialized Tools
Some artists use extruders, wire-end tools, or texture mats to add unique features. These tools can give a distinct style or effect.
Each sculptor finds their own favorites, but having a variety of tools gives you the freedom to experiment and refine your work. As you learn how to make a clay sculpture, you’ll discover which tools work best for your style.
Preparing Your Clay for Sculpting
Before you start to shape your clay into a sculpture, proper preparation is crucial. This phase ensures that your clay is in the best condition for sculpting, reducing the risk of cracks and other issues. Here’s how to prepare your clay effectively:
- Wedging the Clay: Begin by wedging your clay, a process similar to kneading dough. This aligns the clay particles and removes air pockets, which can cause explosions during firing. Use a consistent and firm pressure to wedge the clay until it has a uniform texture.
- Conditioning the Clay: After wedging, you should condition the clay to the proper softness or hardness for your project. If the clay is too stiff, you can add a little water. If it’s too soft, you can let it sit out to harden slightly.
- Forming a Basic Shape: Once the clay is wedged and conditioned, form it into a manageable shape for your base form. This could be a ball, block, or slab, depending on what you are making.
- Maintaining Moisture Levels: Keep a spray bottle filled with water handy. As you work, periodically mist the clay to maintain the right level of moisture. Clay that dries out too quickly is difficult to sculpt and can crack.
Remember that learning how to make a clay sculpture involves patience and practice. Take your time during this preparation stage to set the foundation for a successful sculpting session. Your efforts in properly preparing your clay will pay off in the quality of your finished sculpture.
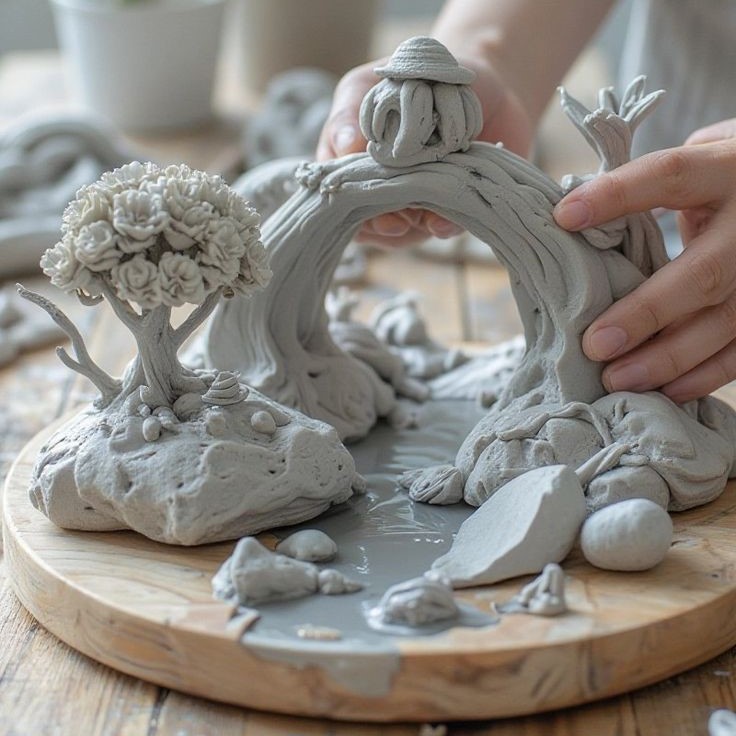
Basic Sculpting Techniques
Learning basic sculpting techniques is essential when you’re discovering how to make a clay sculpture. These foundation skills allow you to translate your artistic vision into a tangible form. As you become more proficient in these methods, you can start making sculptures that are technically accomplished and creatively satisfying.
- Pinch Method: Start with a simple ball of clay. Use your thumb and fingers to pinch and press the clay into shape. This method is perfect for making bowls, pots, and small figurines.
- Coil Building: Roll out long snake-like strands of clay. Layer and press them together to build up forms. It’s a versatile technique, great for creating larger and more complex structures.
- Slab Construction: Flatten the clay into even sheets using a rolling pin or slats. Cut shapes and join them with slip. Slab construction is ideal for geometric forms and sharp angles.
- Hollowing Out: To prevent cracking and reduce weight, hollow out larger sculptures. Remove clay from the inside, leaving walls that are even in thickness.
- Carving: Once you have a basic shape, use various carving tools to refine and define details. Carve away clay to add depth and texture to your work.
- Modeling: Use modeling tools to shape the clay’s surface into the desired contours. Add or subtract clay to create lifelike features on your sculpture.
These basic techniques provide a strong starting point for any sculptor. As you practice, you’ll improve your dexterity and control, enabling you to tackle more advanced sculpting projects.
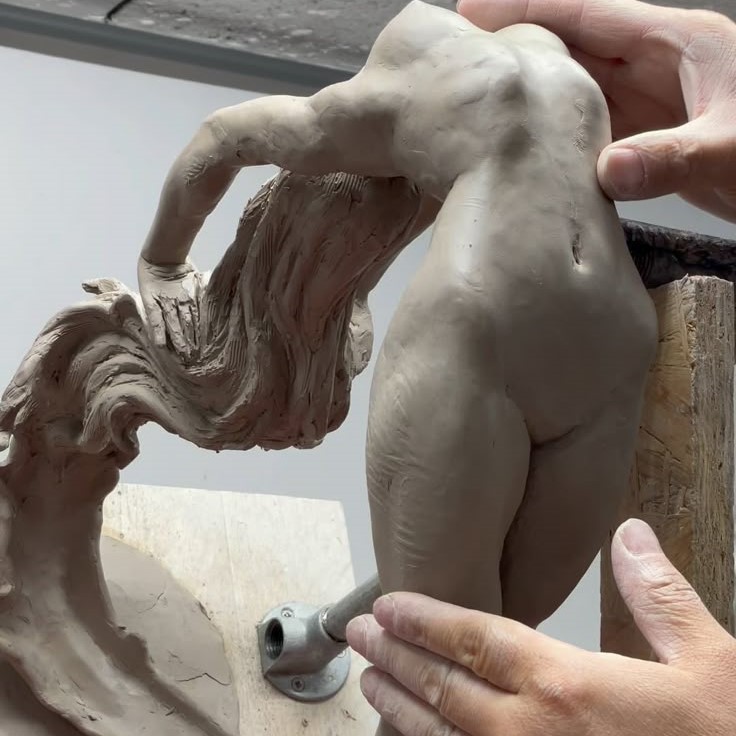
Advanced Sculpting Methods
Mastering basic techniques in clay sculpture paves the way to more complex methods. Advancing your skills allows for expression of intricate designs and detail. Here are some advanced sculpting methods you can explore once you’ve got the basics down.
- Armature Creation: When making larger sculptures, start with an armature. It’s a frame that supports the clay. Use materials like wire or metal to make it stable.
- Sculpting in Sections: For complex pieces, work in sections. Sculpt parts separately and join them carefully with slip and scoring.
- Tool-Made Textures: Use tools to press or carve textures into the clay. Create patterns, scales, or other detailed effects.
- Incising: Etch fine lines into your piece with needle tools for subtle detail. It’s great for facial features or delicate patterns.
- Burnishing: Smooth the surface with a spoon or stone before drying. It compacts the clay and gives a sheen to the final sculpture.
- Adding Appendages: Thin parts like limbs or fingers are tricky. Attach them with care, ensuring the joints are strong.
- Undercutting: Carve underneath edges to create shadows and depth. It makes the sculpture more dynamic.
These methods require patience and a steady hand. When you apply these advanced sculpting techniques, your clay sculptures will start to have more motion and emotion. Each new skill you learn enhances your ability to express your vision in clay.
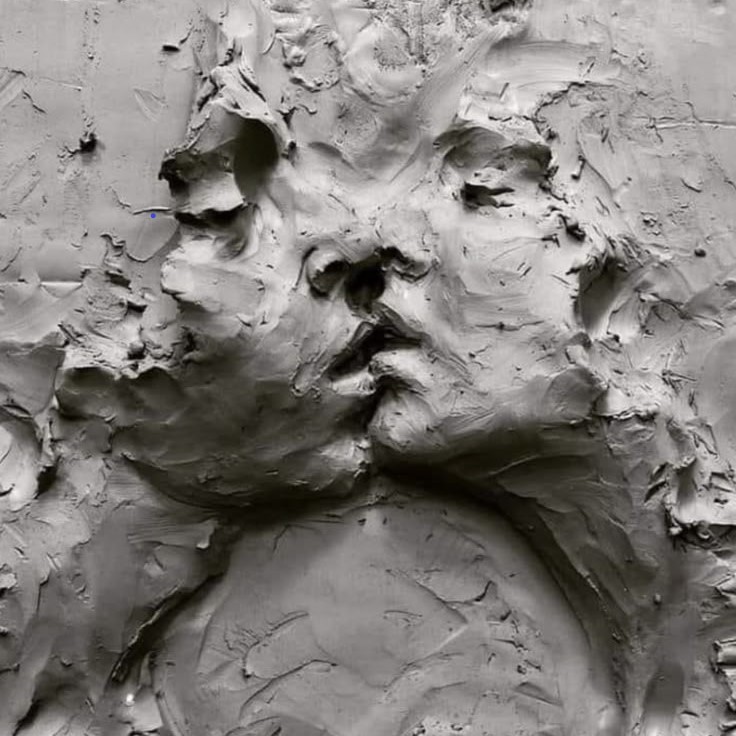
Sculpture Surface Treatments and Textures
Once you’ve shaped your clay into the basic form of your sculpture, it’s time to focus on surface treatments and textures. These techniques not only add visual interest but also enhance the tactile quality of your work. Here’s how you can give your clay sculpture unique finishes and textures:
Smooth Finishing: Achieve a smooth surface by using metal ribs or rubber tools. Gently scrape the surface to even out any bumps or marks.
Texturing: Create textures using anything from household items to specialized texture mats. Press them against the soft clay to imprint patterns.
Incising: For finer details, gently carve lines or designs into the clay surface with needle tools. This adds depth and intricacy to your piece.
Stamping and Rolling: Utilize stamps or rollers to press patterns onto the clay. This method is great for repetitive designs.
Burnishing: Use a smooth pebble or the back of a spoon to rub the surface of the clay. This technique compacts the clay particles and can create a semi-gloss finish once fired.
Slip Decorating: Paint slip (liquid clay) onto the sculpture to add color or contrast before firing. You can use sponges or brushes for different effects.
Sgraffito: Apply a layer of colored slip, then scratch away parts to reveal the clay underneath. This creates a contrasting two-tone design.
Experimenting with different surface treatments and textures can truly bring your clay sculpture to life. As you learn how to make a clay sculpture, try combining techniques for even more unique results. Keep in mind the importance of letting the textures complement the overall form of your sculpture.
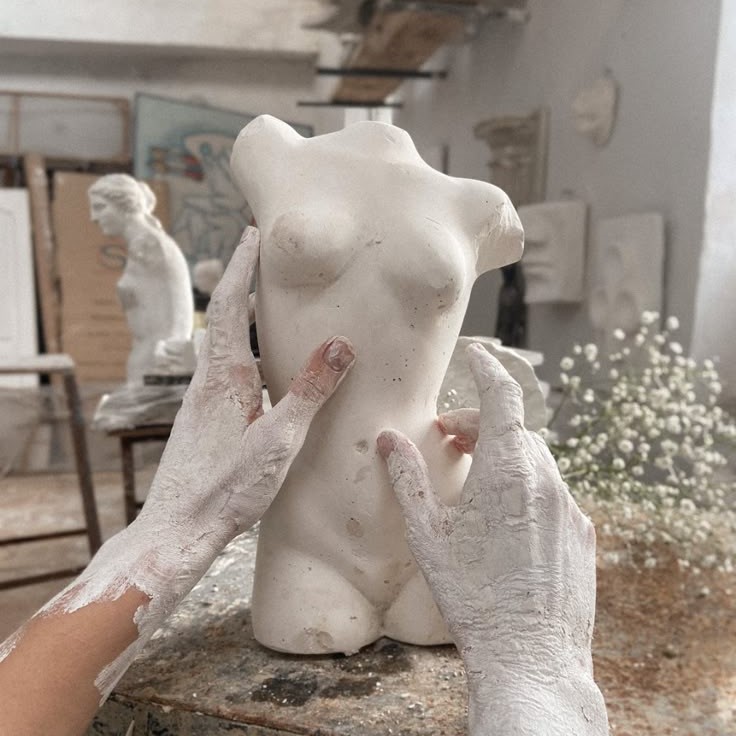
Drying and Firing Your Clay Sculpture
Once you shape and texture your clay, drying and firing come next. This stage is crucial. It transforms soft clay into a hard, durable sculpture. Here’s how to navigate this process:
- Drying: Start by letting your sculpture dry slowly. Speed can cause cracks. Place it in a spot away from direct heat and drafts. A slow, even drying period allows moisture to escape evenly.
- Leather Hard Stage: Your clay will reach a ‘leather hard’ stage. It’s still damp enough to carve but firm enough to hold its shape. Do final trimmings or carvings now.
- Bone Dry Stage: Once fully dry, the clay feels room temperature. It’s called ‘bone dry’. It should not feel cool or damp. This stage is crucial before firing. Make sure it’s totally dry.
- Bisque Firing: Place your sculpture in a kiln for bisque firing. This is the first firing. It turns clay into ceramic, but it’s still porous.
- Glazing: After bisque firing, you can apply glaze if desired. Glaze adds color and finish. Use a brush for this step. Be creative with your glaze choices.
- Glaze Firing: The final firing is for the glaze. The kiln reaches higher temperatures. Glaze melts and forms a glass-like surface. This makes your sculpture strong and waterproof.
Pay attention to the kiln’s temperature and follow proper firing schedules. Mistakes during firing can ruin your sculpture. Patience is essential during drying and firing. It ensures the best results for your clay sculpture.
Finishing Touches: Painting and Sealing
The journey of learning how to make a clay sculpture leads to a final creative stage. After drying and firing, it’s time for painting and sealing. These steps elevate the aesthetic of the clay piece. Let’s look at how to apply these finishing touches.
Follow Washing Instructions
- Importance of Care Labels: Always read the care labels on your skirts to understand the recommended washing methods and cleaning products that are suitable for the fabric.
- Hand Washing vs. Machine Washing: For delicate skirts, consider hand washing, or if using a washing machine, opt for a gentle cycle to minimize the risk of damage to the material.
- Temperature Considerations: Pay attention to water temperature guidelines on the label, as hot water can shrink or warp certain fabrics, while cold water is generally safer for most materials.
Store Correctly
- Hanging Long Skirts: To prevent wrinkles and maintain the shape of your long skirts, hang them on sturdy hangers in a closet with enough space to avoid bunching or folding.
- Use of Boot Shapers: For boots, consider using boot shapers or inserts to help retain their form when they are not being worn, preventing collapsing and creasing.
- Proper Closet Organization: Ensure your storage area is organized and free of clutter, allowing easy access and proper ventilation for your skirts and boots.
Protect Your Boots
- Waterproofing Application: Before the rainy or winter season, apply waterproofing sprays to your boots to provide an extra layer of protection against moisture and stains.
- Regular Maintenance: Reapply waterproofing treatment periodically, especially after use in wet conditions, to ensure continued effectiveness.
- Choose Appropriate Products: Select waterproofing sprays that are compatible with the material of your boots, whether they are leather, suede, or synthetic.
Treat Stains Promptly
- Immediate Action Needed: When a stain occurs on your skirts or boots, act quickly to prevent it from setting in, which can make removal much more difficult.
- Use Appropriate Cleaners: Choose cleaning products that are specifically designed for the type of fabric or material you are dealing with to avoid damage or discoloration.
- Spot Treatment Techniques: For skirts, gently blot the stain rather than rubbing it, and for boots, use a soft cloth to carefully dab at any stains for effective cleaning.
Rotate Your Wardrobe
- Avoiding Overuse: To prolong the life of your skirts and boots, refrain from wearing the same items too frequently, allowing time for them to rest between uses.
- Benefits of Rotation: Rotating your wardrobe helps to minimize wear and tear, reducing the risk of fading and physical damage by ensuring that no single item gets excessive use.
- Mix and Match Styles: Consider pairing different skirts with various footwear options to refresh your looks and make the most of your wardrobe.
Seasonal Care
- Summer Storage Tips: During the summer months, store skirts and boots in cool, dark places away from direct sunlight, which can cause colors to fade and damage the material.
- Winter Drying Practices: If your boots get wet from rain or snow, make sure to dry them properly. Remove excess moisture, and allow them to air dry at room temperature, away from direct heat sources.
- Seasonal Inspections: Regularly check your skirts and boots for signs of wear or damage, especially when changing seasons, and perform necessary maintenance to keep them looking their best.
Remember to step back and admire your work. You turned a simple piece of clay into a sculpture with character and beauty. Keep experimenting with different finishing techniques. They can change the look and feel of your clay pieces. Happy sculpting!