Introduction to Soft Slab Ceramics
Soft slab ceramics is a versatile and expressive form of pottery. In this technique, potters use slabs of clay that are still soft and pliable. This approach allows for a range of shapes and textures not possible with wheel-throwing or hard slab methods. The softness of the clay leads to more organic and free-form pieces, which can be both functional and decorative.
Artists often choose soft slab techniques for their tactile and hands-on nature. This method connects the potter’s creative vision directly to the clay with minimal barriers. Potters roll out the clay, cut shapes, and then gently mold them into the desired forms. Unlike hard slab techniques, soft slab construction requires careful handling to maintain the integrity of the clay’s surface and edges.
The beauty of soft slab ceramics lies in its imperfections and uniqueness. Each piece carries the individual marks of its maker, with subtle variations that make it one-of-a-kind. From flowing curves to textured layers, soft slab ceramics offer endless possibilities for creation. Through this guide, we’ll explore the tools, techniques, and tips needed to master the art of soft slab pottery.
Essential Tools and Materials for Soft Slab Building
Before diving into the world of soft slab ceramics, it’s vital to gather the right tools and materials. An artist’s toolkit can make or break the creative process. For soft slab building, this typically includes a range of specific items designed to handle the delicate nature of soft clay.
Choosing the Right Clay for Soft Slab Ceramics
Not all clay is suited for soft slab techniques. You need a clay body that remains pliable, with good strength to prevent slumping. Look for smooth, plastic clay that allows for easy manipulation without cracking as it dries. Earthenware, stoneware, and porcelain are popular options, each offering different qualities. Earthenware is smooth and easy to work with, stoneware is durable, and porcelain provides a high level of finish for delicate work.
Typical Tools Required for Soft Slab Techniques
To shape and support your soft slab creations, you’ll need a variety of tools:
- Rolling pins or slabs rollers ensure an even thickness.
- Rib tools smooth out surface irregularities.
- Cutting tools, like knives and wire cutters, shape the slabs.
- Texture tools, such as stamps or combs, add decorative elements.
- Brushes and sponges help in smoothing surfaces and applying slip.
Building a collection of these tools will equip you to tackle a wide range of soft slab ceramics projects.
Preparing the Clay for Soft Slab Construction
Getting the clay ready is essential in the soft slab ceramics process. Proper preparation helps prevent issues like air bubbles and uneven thickness. The first step is to wedge the clay, which is similar to kneading dough. This step aligns the clay particles and removes trapped air. A well-wedged piece of clay will be uniform and easier to work with when you’re rolling it out.
Wedging and Rolling Out Your Slab
Wedging is the foundation of clay preparation. Cut off a workable piece of clay and press and fold it repeatedly. You’ll want to rotate the clay and use a rocking motion to ensure thorough mixing. The goal is a smooth, air-free mass of clay.
Next, rolling out your slab is critical for soft slab ceramics building. Start with a ball of wedged clay and use a rolling pin to flatten it. Roll from the center outwards, and ensure the thickness is even. If you have a slab roller, use it for consistent results. Aim for uniform thickness to avoid weak spots.
For soft slab techniques, it’s best if your slabs are not too thin. A slab that’s too thin may warp or tear during the molding process. Keep the texture and the end design in mind while determining the slab’s thickness. This prep work will set you up for success as you move on to shaping and creating your ceramic pieces.
Basic Techniques in Soft Slab Ceramics
Once the clay is properly prepared, we can dive into the core practices of soft slab ceramics. The basic techniques involve a combination of hand-building and creative texturing, which allows for unique and personalized pieces.
Hand-Building with Soft Slabs
Hand-building is an integral aspect of soft slab ceramics. This process starts by cutting the rolled-out clay into desired shapes using cutting tools. Artists should handle the soft slabs with care, supporting them adequately to maintain shape and avoid distortion. The pieces can then be gently pressed together to form various structures, such as bowls, plates, or vases. It’s crucial to ensure all connections are secure to avoid cracking or separation during drying and firing.
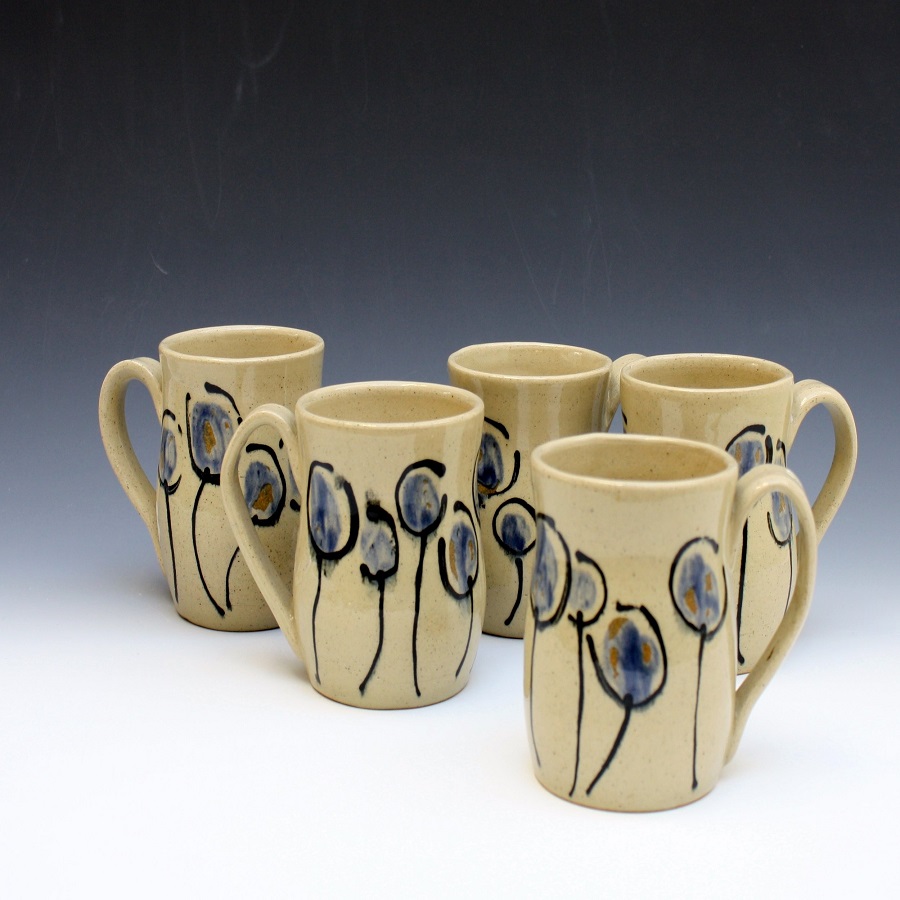
Using soft slabs gives a free-flowing aesthetic, implying movement in static forms. Curving walls and folding edges are some hand-building techniques that enhance this effect. Since the slabs are malleable, artists can experiment with draping them over or inside molds to create consistent shapes.
Texturing and Decorating Techniques
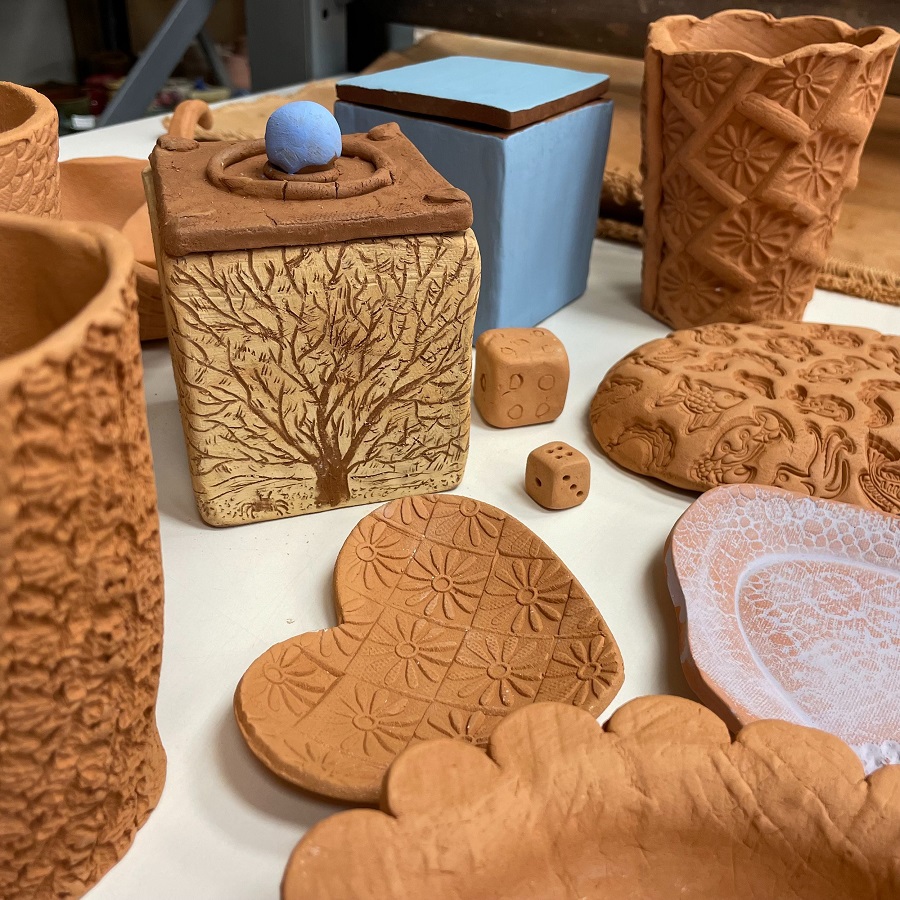
Another uniquely expressive aspect of soft slab ceramics is texturing. Before the clay hardens, artists can imprint patterns and designs onto the surface. Tools for texturing include stamps, combs, or even found objects with interesting textures. Pressing these into the soft clay slab creates a relief that can be highlighted with glazes post-firing.
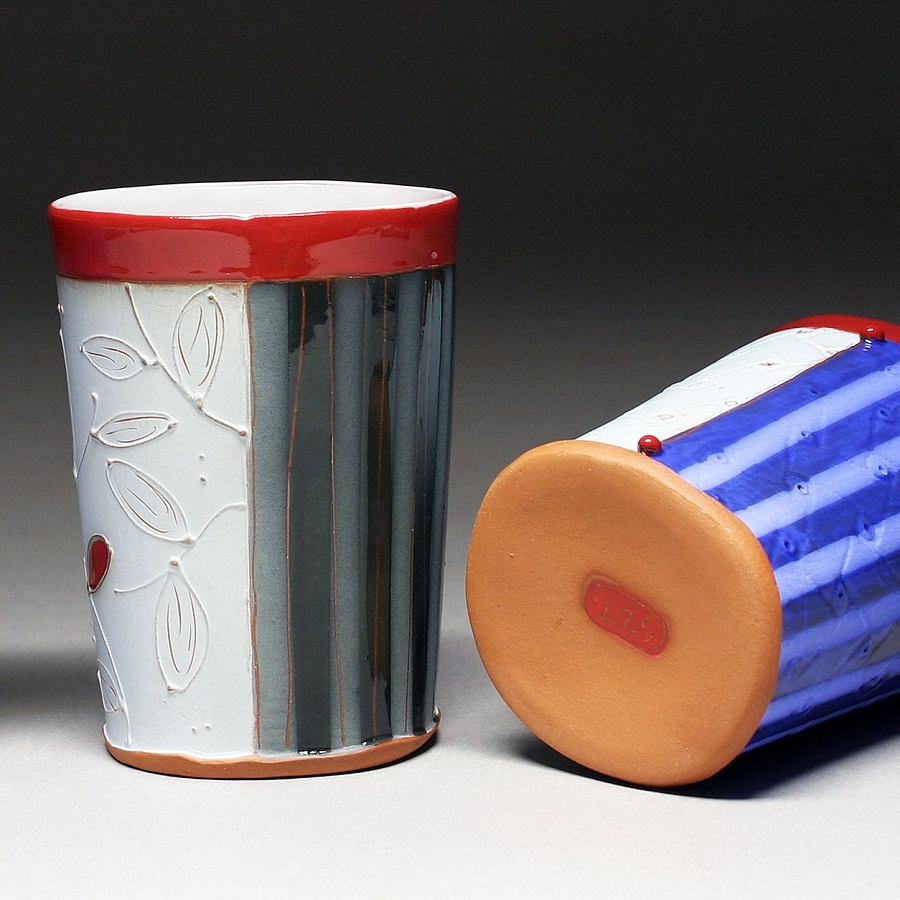
Decorating takes place in this soft stage as well. Slips and underglazes can be applied to the surface to add color and depth before the final glaze is added after the first firing. Artists also use ‘sgraffito,’ a technique where the top layer of colored slip is scratched away to reveal the clay body underneath, creating a contrasting design.
By mastering these basic techniques, artists set the foundation for more elaborate and complex soft slab projects. Hand-building and texturing allow for an endless variety of artistic expressions in the realm of soft slab ceramics.
Joining and Assembling Soft Slabs
The process of joining and assembling soft slabs is a delicate task. It needs a steady hand and a good understanding of the clay’s properties. When making larger or more complex pieces, these steps are vital.
Scoring and Slipping Strategies
To ensure a strong bond between two clay pieces, scoring and slipping are essential. Scoring involves scratching the surfaces that will be joined together. Use a serrated rib or fork to make marks on both pieces. The grooves made by scoring give the slip something to hold onto.
After scoring, apply slip to one or both scored surfaces. The slip is a mixture of clay and water, acting as a glue for soft slab ceramics. It should have a creamy consistency, not too thick or too runny. Join the pieces by pressing them together firmly but gently, to avoid distorting the shape.
When working on larger pieces, support the structure until the slip sets. This can prevent slumping or collapsing. Always ensure the slip is generously applied and the pieces are snugly pressed together for the best results. This avoids any potential weak points that may crack during drying or firing.
By mastering scoring and slipping, you build a strong foundation for your soft slab ceramics projects. With practice, these techniques become second nature, allowing you more freedom to express your creativity through clay.
Finishing Touches: Smoothing, Drying, and Firing
After creating your soft slab ceramics, it’s time to add the final touches. These steps are crucial for a polished and long-lasting piece. In this stage, attention to detail is key.
Smoothing Surfaces
Once assembled, look for any rough spots on your piece. Use rubber ribs, sponges, or soft brushes to smooth them out. Do this gently to maintain the piece’s shape. It’s also a good time to refine edges and joints to ensure a clean look. Careful smoothing gives your work a professional touch.
Drying Stages
Soft slab ceramics must dry slowly. Quick drying can lead to cracks. Cover your piece with a cloth to control the drying speed. Check on it periodically. When the clay feels leather-hard, it’s ready for further refinement, if needed. Continue to let it dry until it’s bone-dry. Only then is it safe to fire.
Firing Process
Bisque firing is the first firing step. It turns your piece into a hard, porous state. Place your ceramics in a kiln and follow a specific temperature curve. Start low and increase slowly. Once bisque fired, you may glaze your piece. Apply glaze evenly, and fire again at a higher temperature. This will give your piece a glossy finish.
By following these steps, you ensure your soft slab ceramic piece is not only beautiful but also stable and durable. Remember, patience during the drying and firing processes pays off with high-quality results.
Advanced Projects and Design Ideas for Soft Slab Ceramics
Taking your soft slab ceramics to the next level involves complex designs and innovative project ideas. Once you understand the fundamentals, you can explore more advanced techniques that add depth and sophistication to your creations.
Exploring Forms Beyond the Basics
Moving past simple shapes, consider crafting intricate pieces with multiple joined slabs. Try constructing layered sculptures or wall hangings that showcase the soft slab’s versatility. These projects require precision and planning but result in stunning, intricate art.
Designing with Soft Slabs
To infuse personality into your work, sketch your design ideas first. Opt for designs that embrace the pliable nature of soft slabs, like waves or folds. These elements add movement and interest to your ceramics.
Adding Complex Textures and Patterns
Use lace, leaves, or custom stamps to create detailed textures on the clay surface. Layering different patterns can produce a rich, tactile experience on the final piece. Be bold and experiment with various tools to find unique patterns.
Innovative Glazing Techniques
Experiment with glazes to add color contrasts or highlight textures. Try dip glazing or brush-on methods for different effects. Sometimes, less is more, and a simple glaze can make your detailed work stand out.
Combining Soft Slab with Other Techniques
Mixing soft slab techniques with other pottery methods can yield exciting results. Incorporate elements of pinch pottery, coil building, or wheel throwing to give your pieces a distinctive look.
By engaging with advanced projects, you deepen your skills and open up a world of artistic possibility. Embrace challenges, and let your creativity lead the way to unique and high-quality soft slab ceramics.
Tips for Troubleshooting Common Soft Slab Issues
Soft slab ceramics are beautiful and unique but can come with challenges. Knowing how to resolve common issues will improve your craftsmanship. Here are some tips for troubleshooting frequent problems encountered in soft slab ceramics.
Avoiding Cracks in Your Soft Slabs
Cracks may occur when your clay dries too quickly or unevenly. To prevent cracks:
- Dry your work slowly and evenly.
- Cover pieces with plastic to control drying speed.
- Ensure even slab thickness during the rolling process.
These steps help maintain the moisture level in your ceramics and reduce the risk of cracking.
Preventing Warping During Firing
Warping can happen if your piece isn’t dried well before firing or due to uneven thickness. To avoid warping:
- Let your piece become bone-dry before firing.
- Check for and correct any uneven thicknesses.
- Place your ceramics carefully in the kiln, ensuring even heat distribution.
Properly drying and firing techniques are key to preventing misshaped pieces.
Handling Soft Slabs Without Distortion
Soft slabs can distort when handled roughly. To handle them gently:
- Support slabs properly when moving them.
- Use soft-touch tools like rubber ribs for shaping.
- Do not press too hard when joining pieces with slip.
A light touch and adequate support keep your soft slabs’ intended shapes intact.
Ensuring Strong Joints and Seams
Weak joints lead to breaks. To ensure strong joins:
- Score and slip every join thoroughly.
- Use enough slip to create a ‘glue’ between pieces but not so much that it weakens the joint.
- Press pieces together carefully to form a good bond without squishing the clay.
Mastering scoring and slipping techniques creates stronger bonds for durable ceramics.
By adopting these troubleshooting tips, you can minimize common issues and enhance the quality of your soft slab ceramics projects.