Introduction to Ceramics
Ceramics are a versatile art form that brings creators and nature together. It’s the magical process of shaping clay into beautiful, functional pieces. These can range from cups and plates to decorative sculptures. As a beginner, understanding the basics is critical. This guide will get you started on how to make ceramics with ease. First, let’s define ceramics. They are items made from clay that have been hardened by heat. The key to making ceramics is patience and practice. With the right approach, you can craft stunning pieces that reflect your style. We will explore the essential steps in how to make ceramics, all the way from choosing clay to the final glaze. If you’ve ever admired pottery and wondered about the creation process, this guide is the perfect starting point.
Essential Tools and Materials for Ceramics
For those wondering how to make ceramics, it’s important to begin with the right tools and materials. These essentials form the foundation of any ceramic project and will determine the success of your creative endeavors. Let’s delve into the necessities for any beginner ceramicist.
Clay
The primary material for ceramic making is clay. There are various types, such as earthenware, stoneware, and porcelain. Each type has its own characteristics and uses. It’s essential to choose clay that suits the items you intend to make.
Pottery Tools
Basic pottery tools include a rolling pin for flattening clay, a rib tool for smoothing, and wire clay cutters for slicing clay. Other essentials are sponges and scrapers for shaping and finishing, along with a range of loop and ribbon tools for trimming and carving.
Workspace Essentials
A sturdy table, a non-stick surface like a canvas or a slab mat, and a damp box for keeping your clay workable are vital. Good lighting and comfortable seating will make your work easier and more enjoyable.
Kiln
A kiln is necessary for firing your ceramics. While it’s an investment, the type of kiln you choose will affect your final results. Explore options that fit your space and budget.
Glazing Supplies
Glazes add color and finish to your pieces. You’ll need brushes and glazing tongs, along with a selection of glazes. Understanding how different glazes work is important for achieving the desired effect.
These are just the basics, but they are crucial for anyone starting out in ceramics. Remember, the key to making great ceramics lies in choosing the right materials and tools that fit the kind of pieces you wish to create.
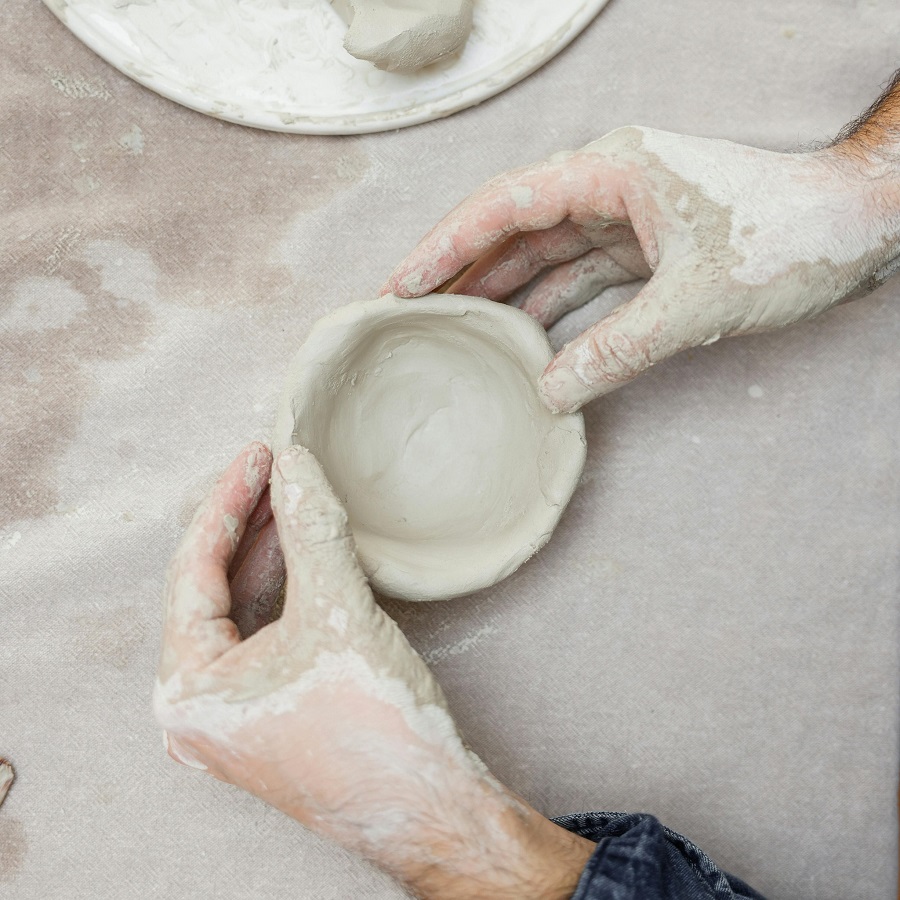
Basics of Hand-Building Techniques
When diving into how to make ceramics, hand-building stands out as a beginner-friendly method. It requires minimal tools and offers a direct way to shape clay by hand. Here are the fundamental techniques you should know:
Pinch Pots
Start with a ball of clay. Press your thumb into the center, then pinch and turn. Do this until you create a small pot. Pinch pots are perfect for practicing your hand skills.
Coil Building
Roll clay into long, thin coils. Stack and smooth the coils to build up the walls of a pot or vase. This method is great for making larger items and adding texture.
Slab Construction
Use a rolling pin to flatten clay into even sheets, or slabs. Cut the slabs and join them to form boxes, plates, or other shapes. This technique allows for geometric designs and is ideal for making tableware.
Mastering these hand-building techniques will give you a solid foundation. They teach you the behavior of clay and offer endless creative possibilities. With some practice, you’ll develop the skill and confidence to create various ceramic pieces.
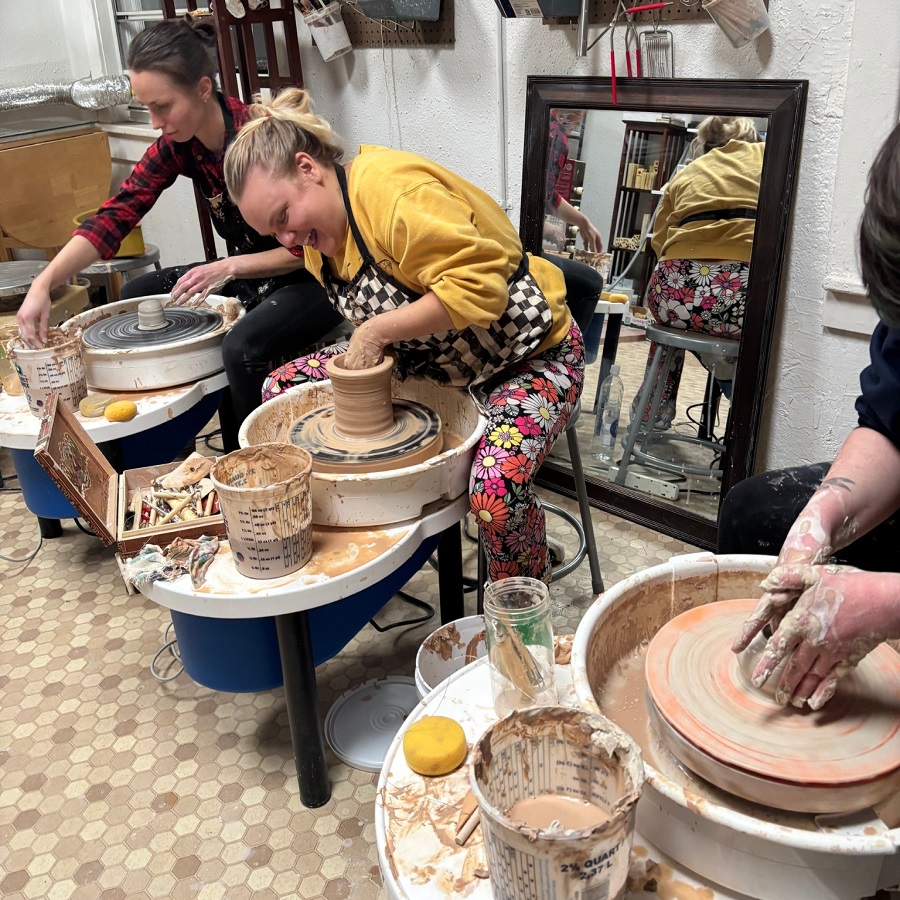
Introduction to Pottery Wheel Techniques
When learning how to make ceramics, mastering the pottery wheel is a thrilling step. It allows for the creation of symmetrical pieces with a professional finish. Here we’ll cover the basics to get you started.
Setting Up the Wheel
First, ensure your wheel is stable and set at a comfortable height. Sit down and position your legs around the wheel. Test the pedal to get a feel for the speed control. A steady speed is essential.
Preparing Your Clay
Before you begin, center a well-wedged piece of clay on the wheel. Coning up and down helps to align the clay particles and remove air bubbles.
Shaping Your Piece
With the wheel spinning, wet your hands and the clay. Use gentle but firm pressure to shape the clay. Keep your movements steady and symmetrical for the best results. Creating a well in the center sets the stage for raising the walls of your piece.
Thinning the Walls
As you become more comfortable, you’ll learn to thin and lift the walls. The key is even pressure and steady hands. This can take practice but is vital for creating functional pieces.
Finishing Touches
Once shaped, use tools to smooth and finish the rim and base. Trimming excess clay at the bottom gives your piece a polished look.
The pottery wheel can be challenging at first. But it offers precision that hand-building techniques can’t match. With practice, you’ll find the rhythm and touch that work for you. And soon, you’ll be making ceramics with a beautiful, even finish that’s sure to impress.
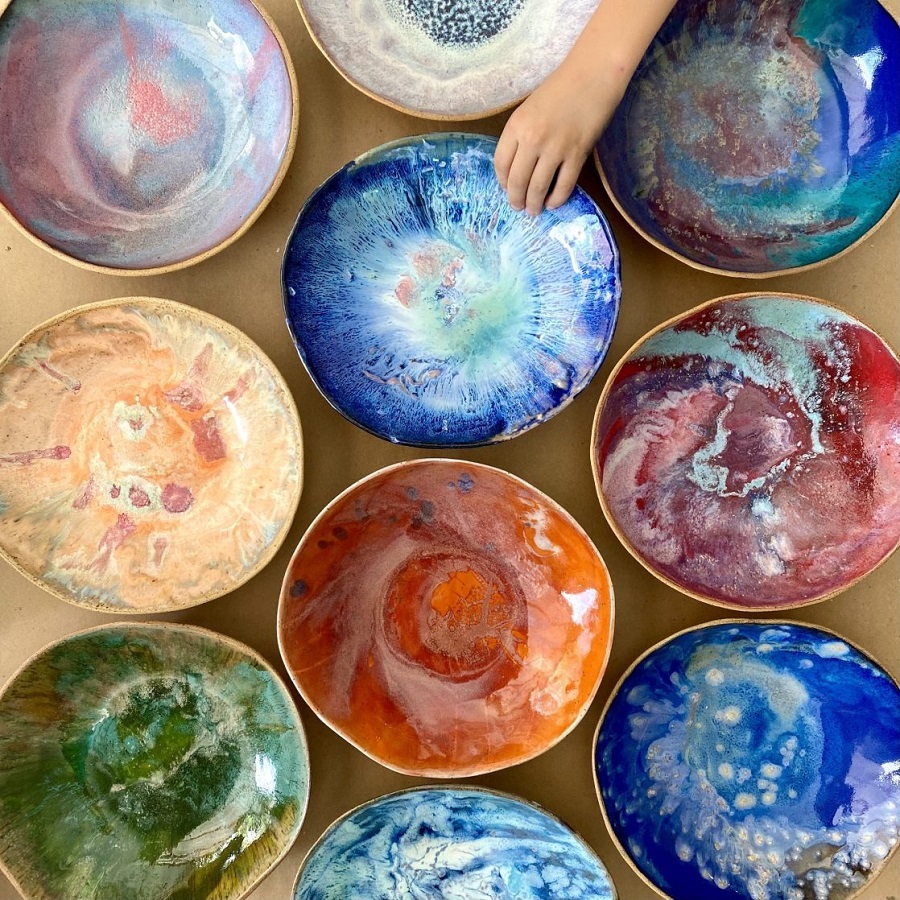
Understanding Glazes and Finishing Touches
When learning how to make ceramics, understanding glazes is key. Glazes can transform your project’s look and feel. They can add color, texture, and strength to your finished pieces. Here are some basics to help you get started with glazes and finishing touches:
Types of Glazes
There are many glazes to choose from. Each creates a different effect on your ceramics:
- Gloss Glazes give a shiny, reflective finish.
- Matte Glazes result in a non-glossy, satin touch.
- Opaque Glazes cover the clay body completely.
- Transparent Glazes show the detail and color of the clay beneath.
Experimenting with different glazes is a part of the learning process. It helps you find what works best for your style.
Applying Glazes
Applying glazes should be done with care:
- Make sure your ceramic is clean and dry before applying.
- Use brushes for accuracy, and pour or dip for even coatings.
- Apply glazes in thin layers to avoid drips or bubbles.
Remember, the true color of a glaze appears after firing, so testing is important.
Firing Techniques
The firing process affects your glaze’s final look:
- Bisque Firing is the first firing that hardens the clay.
- Glaze Firing fuses the glaze to the ceramic after it is applied.
- Temperatures and firing times will depend on the clay and glaze types used.
Proper firing ensures a durable and attractive ceramic piece.
Final Touches
After firing, examine your piece. Add any last details or refinements. Sanding rough spots or adding extra glaze can perfect your project.
With practice, you’ll understand how to make ceramics with glazes that enhance your pieces. This brings out the full beauty of your work and adds a professional touch.
Firing Ceramics: Kiln Types and Processes
When you’re exploring how to make ceramics, firing is fundamental. It changes soft clay into a solid, durable form. To do this, you need a kiln. This section talks about the types of kilns and firing processes.
Types of Kilns
There are several kiln types you might use:
- Electric Kilns: These are common and easy to use. They heat up with electric coils. Control is simple, making them great for beginners.
- Gas Kilns: These rely on natural gas or propane. They are good for creating certain glaze effects. But, they need more skill to manage.
- Wood Kilns: These use wood as fuel. They give unique looks due to ash and flame patterns. Yet, they demand lots of time and labor.
Your choice in kiln affects the finished look of your pieces. Consider space, cost, and the effects you want.
Firing Processes
Next, let’s break down the firing steps:
- Loading the Kiln: Place your pieces with care to avoid damage. Ensure good airflow around each one.
- Bisque Firing: This first fire removes water and hardens the clay. It’s done at a lower temperature.
- Glaze Firing: After applying glaze, this second fire melts the glaze to the piece. It takes a higher temperature.
- Cooling Down: After firing, let the kiln cool slowly. This prevents cracks.
Each fire is crucial. It determines your ceramic’s strength and look. Always follow safety and use the right settings for your clay and glazes.
Decorating Your Ceramics
After mastering the basics of how to make ceramics and learning about different firing techniques, it’s time to add personality to your pieces through decoration. Decorating your ceramics is where your creativity truly shines, and there are various methods to consider, each with its own unique impact.
- Underglaze Decoration: You can apply underglazes before the bisque firing. They come in many colors, allowing for intricate designs. Apply with brushes or sponges to create patterns, images, or detailed artwork. Underglazes stay true to color after firing, making them reliable for specific design work.
- Sgraffito Technique: This method involves scratching through a layer of underglaze to reveal the clay body beneath. It’s ideal for creating contrasting textures and patterns. Use carving tools for sgraffito to get the effect you want.
- Slip Trailing: Slip is liquid clay. Use it to add raised decorative lines on your piece. You can apply slip with a squeeze bottle or a slip trailer. This adds texture and depth to your design, providing a 3D effect after firing.
- Stamps and Stencils: Stamps can press patterns into the clay, while stencils can guide underglaze application. Both are great for repetitive and symmetrical designs without needing advanced drawing skills.
- Wax Resist: Apply wax to areas where you want to keep the natural look of the clay or prevent glaze from adhering. After the wax burns off in the kiln, those areas will show the unglazed clay.
These techniques open up limitless possibilities for personalizing your ceramics. Try different methods to see which ones align with your vision. With practice, you’ll find the perfect way to express your artistic voice through your ceramic creations.
Tips for Setting Up Your Home Studio
Creating a home studio for making ceramics is essential if you’re serious about your craft. This space is where you can unleash your creativity and refine your skills. Here are key points to set up an efficient and inspiring home studio:
- Choose the Right Location: Find a room or space in your home that has good natural light and ventilation. These are important for both seeing the fine details of your work and for health reasons, as clay dust can be harmful if not properly ventilated.
- Organize Your Tools: Keep your tools organized and within reach. Use shelves, pegboards, or containers to store your equipment. This way, you save time and stay focused on your project.
- Invest in Proper Seating: Get a comfortable chair or stool. Your back will thank you after long hours at the wheel or worktable.
- Protect Your Surfaces: Line your work surfaces with canvas or a similar material. It makes cleaning up easier and keeps your clay from sticking.
- Set Up Your Kiln Safely: Ensure your kiln is in a well-ventilated area and away from flammable materials. Follow manufacturer instructions for use and safety.
- Manage Your Time: Plan your time in the studio. Break up tasks into manageable chunks to stay productive and not get overwhelmed.
- Keep a Damp Box: A damp box is great for keeping work-in-progress pieces from drying out.
- Stay Inspired: Decorate your studio with images, objects, or anything that sparks your creativity.
Remember, your home studio should be a place where you can work comfortably and efficiently. Tailor your space to fit your unique process and style when you’re learning how to make ceramics. This investment will pay off as you develop your skills and start creating more advanced pieces.