Introduction to Ceramic Glazing
Ceramic glazing is an art form where magic happens. Artists transform bare clay into eye-catching pieces with beautiful finishes. This process involves coating the surface of bisque-fired ceramics with a thin layer of glaze. When fired, the glaze fuses to the pottery, creating a glassy surface. This doesn’t only add beauty to the ceramics—it also makes them waterproof and durable.
In crafting unique ceramic pieces, glazing ceramics plays a crucial role. It allows artists to express creativity through color, texture, and finish. A well-glazed ceramic can look sleek and modern or rustic and earthy. The choice of glaze and the way it’s applied can drastically change the appearance of a piece.
Glazers must understand the science behind the materials and the firing process. Knowledge of how different glazes interact with clay bodies and the heat in the kiln is essential. This ensures the finished piece reflects the artist’s vision. Whether you are a novice or a seasoned potter, glazing your ceramics can be a satisfying experience. With patience and practice, you can achieve stunning results that showcase your artistic skills.
Essential Tools and Materials for Glazing
Having the right tools and materials is key to successful glazing ceramics. Here are the essentials you’ll need before diving into the glazing process:
Tools for Applying Glaze
- Brushes: A variety of sizes help with different glaze applications. Choose soft-bristled brushes for smooth coats.
- Sponges: Sponges help wipe off excess glaze and create texture.
- Pouring Equipment: For covering large areas quickly, pitchers or ladles can be very useful.
- Tongs: Specialized tongs grip hot ceramics when dipping in glaze or placing in the kiln.
Glaze Materials
- Bisque Ware: Your ceramics must be bisque-fired before you apply glaze.
- Glazes: Available in various forms, including liquid, powder, and pencil. Select based on desired effect.
- Underglazes: These can be applied before the glaze for added color and design.
- Wax Resist: This is used to keep glaze off certain areas of the ceramic piece.
Safety Equipment
- Gloves and Aprons: Protect your hands and clothes from glaze materials.
- Safety Glasses: Shield your eyes from dust, especially when mixing powdered glazes.
- Dust Masks: These are essential to avoid inhaling ceramic dust during handling and mixing.
Gather these tools and materials, and you are well-equipped to start the glazing journey. Each plays a role in the final quality of your glazed ceramics. With these at your disposal, you can explore various techniques to create stunning ceramics.
Preparing Your Ceramics for Glazing
Before you start glazing ceramics, preparation is key. Proper preparation ensures your glaze adheres well and fires correctly. Here are steps to prep your ceramics for glazing:
- Clean Your Bisque Ware: Dust or particles on your bisque ware can lead to flaws in the glazed surface. Wipe your ceramics with a damp sponge to remove any debris.
- Dry Thoroughly: Ensure that your bisque ware is completely dry. Applying glaze on damp ceramics can cause issues during firing, like blistering or peeling.
- Mend Cracks or Blemishes: Inspect your bisque ware for any imperfections. Use clay slip to fill in any cracks or chips before glazing.
- Apply Wax Resist: If there are areas you want free of glaze, apply wax resist. Areas covered with wax will repel glaze, remaining clear.
- Plan Your Design: Decide on the patterns, textures, and colors you want. This will help guide how you apply the glaze.
By following these preparatory steps, your ceramics will be well-suited for a smooth glazing process. Now you’re ready to explore the various types of glazes and their effects.
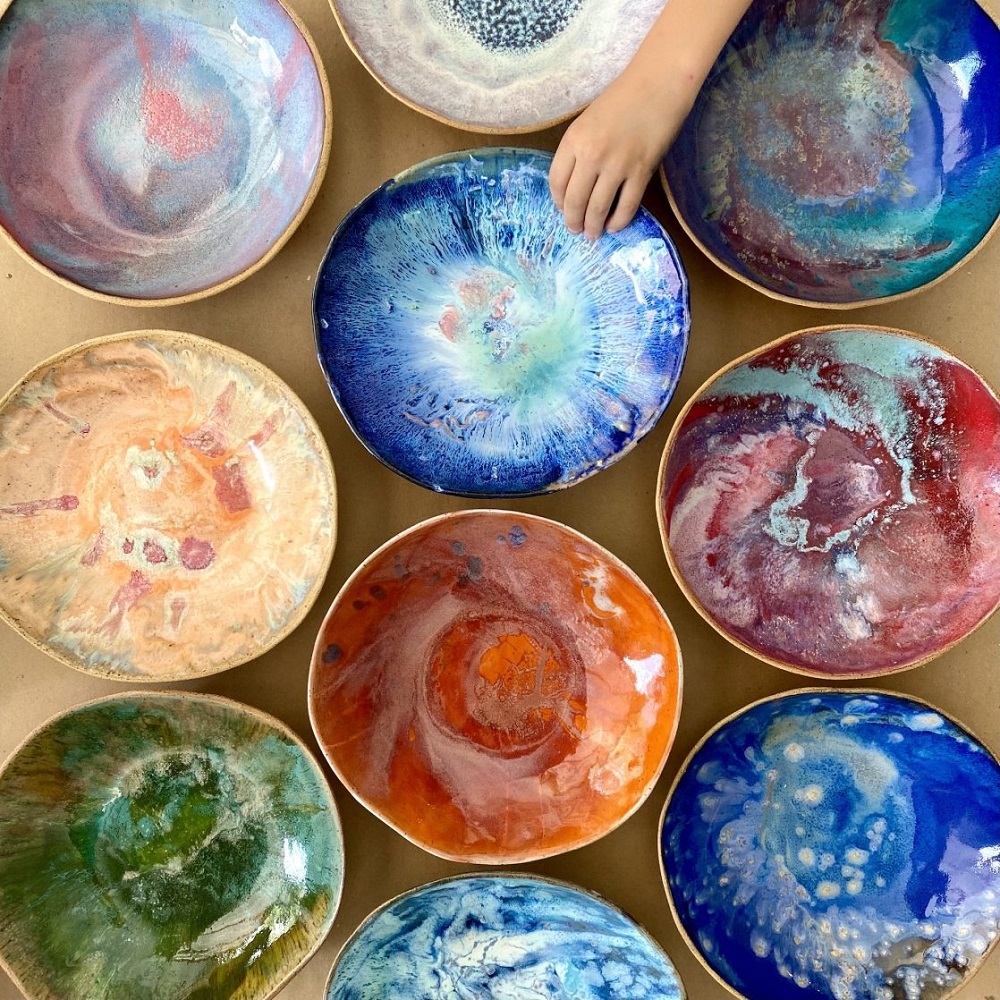
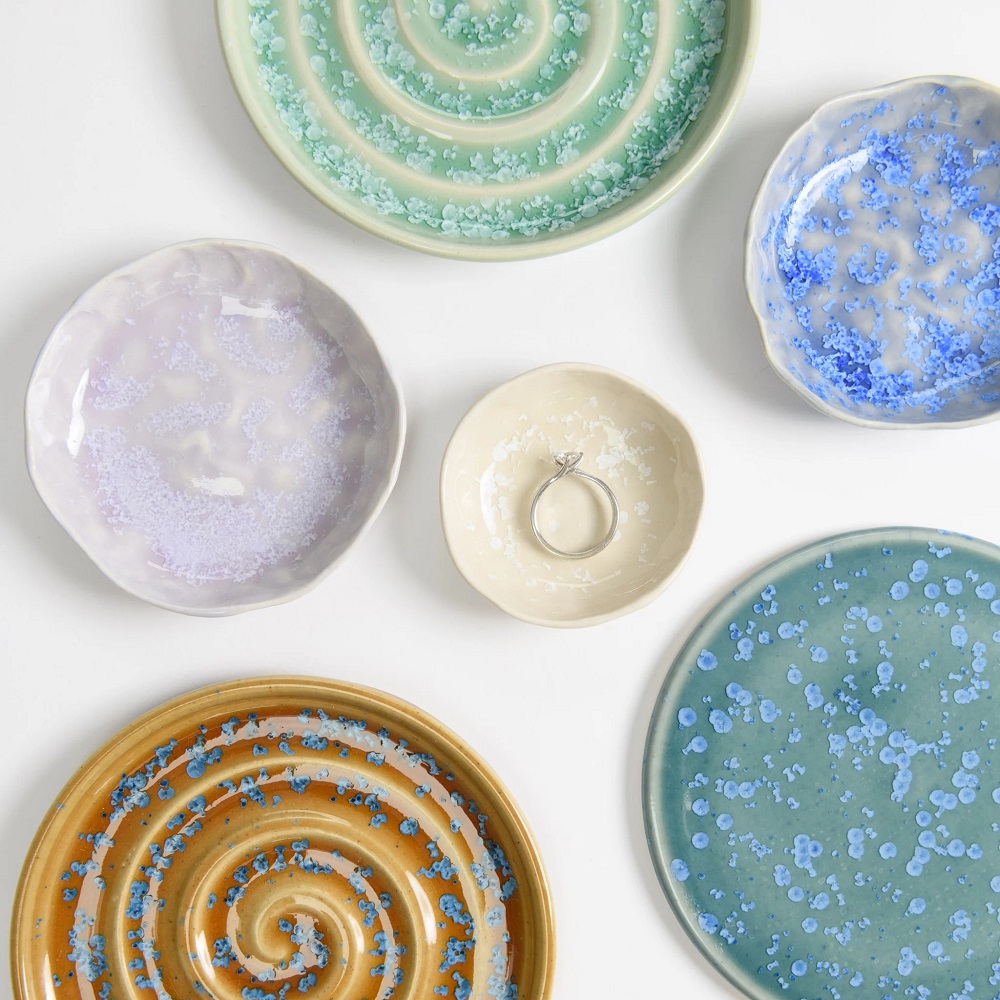
Types of Glazes and Their Effects
In glazing ceramics, the type of glaze you choose can greatly impact the final appearance of your piece. Each type of glaze has unique qualities that can add depth, texture, and color to your ceramics. Understanding these effects is essential for achieving the results you desire.
Matte Glazes
Matte glazes provide a soft, non-reflective finish. They create a smooth, velvety surface that absorbs light. This type of glaze is perfect for a rustic or natural look. It can also highlight textural details on your piece.
Glossy Glazes
Glossy glazes yield a shiny, glass-like surface. They reflect light, making colors appear more vibrant and adding a sense of depth. If you want your ceramic to stand out, a glossy glaze is a go-to choice.
Satin Glazes
Satin glazes are somewhere in between matte and glossy. They offer a medium level of sheen. This creates a soft glow that can enhance subtle details without overwhelming shine.
Crystalline Glazes
Crystalline glazes are known for their unique crystal patterns. These glazes create a mesmerizing effect, with crystals that can vary in size. They require precise firing conditions to develop properly.
Textured Glazes
Textured glazes can produce surfaces ranging from rough to raised patterns. They add a tactile dimension to ceramics, making them engaging both visually and to the touch.
Specialty Glazes
Specialty glazes include those that mimic natural phenomena like raku or ash glazes. They can offer effects such as speckles, streaks, or variegated colors.
By choosing the right type of glaze and understanding its effects, you can enhance the artistic expression of your ceramic pieces. Pairing knowledge with experimentation will lead to stunning ceramic artwork.
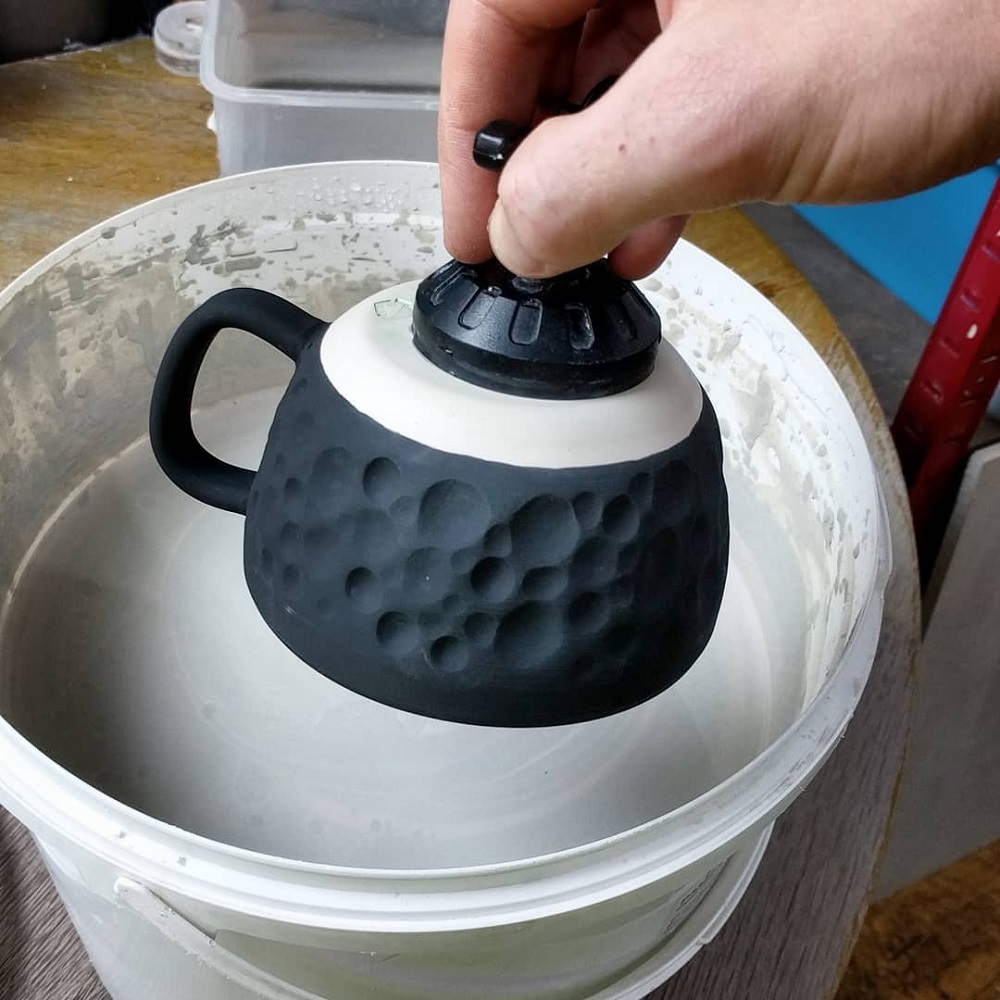
Techniques for Applying Glaze
Once your ceramics are ready, glazing them properly is crucial for achieving the perfect finish. Mastering these techniques can take your work from good to stunning. Here’s what you need to know about applying glaze to your ceramics effectively:
Dipping: Dipping involves submerging your bisque ware in a container of glaze. Keep your piece in the glaze until it’s entirely coated. Then, remove it carefully to avoid drips.
Pouring: This technique is great for covering large areas. Simply pour glaze over your piece and tilt it to spread the glaze evenly.
Brushing: For more precise application, use brushes. Apply glaze with smooth, even strokes. Different brush sizes can create varied textures.
Spraying: Spraying uses an airbrush or a spray gun. It results in an even coat, ideal for large batches or complex shapes.
Layering: You can layer different glazes to create unique effects. Just wait for one layer to dry before applying the next.
Sgraffito: Apply a thick layer of underglaze, then scratch away parts of it to create designs. This technique reveals the clay body underneath.
Experiment with these techniques to see which works best for your artistic style and the piece you’re creating. With practice, glazing ceramics will become second nature, and you’ll develop your own signature style.
Firing Ceramics: Understanding the Process
Firing is a critical step in glazing ceramics that brings out the beauty of your artwork. It’s the process where the applied glaze and the ceramic body fuse together. This happens in a kiln, a special oven that reaches high temperatures. To start, place your glazed pieces inside the kiln. Ensure they do not touch each other to avoid fusing together. The kiln slowly heats to the desired temperature. This is often between 1800°F and 2400°F. The specific temperature depends on the clay and glaze type you use. Heating should be even and controlled. Rapid temperature changes can damage your ceramics.
Once the peak temperature is reached, the kiln cools down. The slow cooling is just as important as the heating phase. The cooling process helps the glaze to settle and the ceramics to strengthen. When the temperature drops to safe levels, you can open the kiln and remove your pieces. They will have transformed with a shiny or matte finish, depending on the glaze you chose. With a successful firing, your artwork will be both beautiful and durable.
Understanding the firing process helps avoid common issues like cracking or glaze defects. Always follow the manufacturer’s instructions for your specific kiln. Monitor the kiln during firing for safety and to ensure you get the results you’re after. With practice and attention to detail, you can master the art of firing glazed ceramics.
Tips for Achieving Stunning Glaze Results
Achieving stunning glaze results in ceramics is akin to crafting a masterpiece. Each glaze application can lead to a unique outcome that exhibits your creativity and technique. To ensure your ceramic glazing stands out, here are several tips to bear in mind:
- Test Your Glazes: Before applying on your main piece, test glazes on small samples. This helps you see the fired results.
- Monitor Thickness: The glaze thickness can affect the color and texture. Aim for even coverage.
- Control the Drying Speed: Slow drying avoids cracks. Use a damp room or cover pieces with plastic.
- Keep a Firing Log: Note every detail of the firing process. This can improve consistency and troubleshooting.
- Use the Right Kiln Settings: Follow the recommended temperature and soak times for your glazes.
- Experiment with Application: Try various methods such as brushing, dipping, or spraying to find what’s best.
- Protect Against Dust: Always work in a clean space. Dust can affect glaze quality and firing.
- Adjust for Color: Understand that some colors may change at high temperatures. Anticipate these shifts.
Employing these tips and tricks while glazing ceramics can elevate the quality of your finished pieces. Remember, patience and continuous learning are crucial in the art of ceramic glazing. With each batch of ceramics you fire, aim to refine your technique and push the boundaries of your skills for more stunning results.
Troubleshooting Common Glazing Problems
Glazing ceramics can sometimes present challenges. Even experienced artists face glazing problems now and then. Knowing how to fix these issues ensures your ceramics look their best. Here are common problems and how to solve them.
Crawling
Crawling happens when the glaze retracts, leaving bare patches. Often, this is due to a dusty bisque surface or too-thick glaze. To prevent this, clean your bisque ware thoroughly and apply glaze evenly. If crawling occurs, you can refire the piece after smoothing the glaze.
Pinholing
Small holes or pinholes in the glaze surface are called pinholes. They usually form if the glaze dries too quickly or the firing is too fast. To avoid pinholes, ensure a slow, even drying process. Also, control the kiln’s heating rate to allow gases to escape.
Cracking
Glaze cracking, or ‘crazing,’ appears as a network of fine lines. It’s due to a mismatch in expansion between glaze and clay body. Adjust the glaze formula to match the clay’s thermal expansion. You can also refire the piece at a lower temperature to resolve crazing.
Shivering
Opposite to crazing, shivering is when glaze flakes off the edges. This shows the glaze is too compressed on the clay body. Use a glaze with a closer expansion fit to your clay, or add silica to the existing glaze.
Running
Sometimes glaze melts and flows down the piece, creating ‘runs’ during firing. To fix running, try applying a thinner layer of glaze or using a glaze with a higher melting point. Also, adjust the firing temperature as needed.
By correcting common glazing problems, you can ensure a smooth and satisfying glazing experience. Keep these solutions in mind, and don’t hesitate to experiment. With a little patience and skill, you’ll achieve the stunning results you’re aiming for.
Finishing Touches: After Firing Practices
The journey of glazing ceramics doesn’t end with just firing. After you fire your pieces, there are some final practices to ensure they look their best.
Inspect for Any Flaws: Check each piece for any unexpected changes. Look for cracks, runs, or any imperfections that firing may have caused. If you find any, decide if they can add character or if you should try a refire.
Sanding: If there are sharp spots or rough edges, carefully sand them down. Use fine-grit sandpaper to avoid scratching the surface.
Cleaning: Clean off any kiln wash or debris that may have stuck to the bottom. Gently wash the ceramics with a damp cloth. Patience is key.
Applying Sealants: If your piece is unglazed on the bottom, consider a sealant. This can prevent scratches and moisture absorption.
Photographing Your Work: Good photos show your work in its best light. Use natural, indirect light and a neutral background. This helps to capture the true colors and fine details.
Documenting the Process: Keep a detailed record of your firing outcomes. Note what worked well, and what you might change next time.
By applying these finishing touches with care, you add to the beauty and longevity of your glazed ceramics. They are now ready to display or use. Remember, every step in the process of glazing ceramics is a chance to refine your artistry and to create something truly special.