Oil pastels are a fantastic medium for artists of all ages and skill levels. Known for their vibrant colors and smooth application, oil pastels can produce stunning artwork when used correctly. One of the key aspects of mastering oil pastels is learning how to blend them effectively. Blending not only enhances color richness but also creates depth and texture in your creations. In this article, we will explore the best methods for blending oil pastels, empowering you to unlock your creativity and take your artwork to the next level.
Understanding Oil Pastels
What Makes Oil Pastels Unique
Before diving into blending techniques, it’s essential to understand what sets oil pastels apart from other art mediums. Oil pastels consist of pigment mixed with a non-drying oil and wax binder. This unique composition gives oil pastels their rich, creamy texture and excellent vibrancy. Unlike chalk pastels, which can easily smudge and lose pigment, oil pastels maintain their color and can be manipulated for a variety of effects.
Advantages of Using Oil Pastels
One major advantage of oil pastels is their versatility. They adhere well to various surfaces, including paper, canvas, and cardboard. Their creamy consistency allows for easy layering and blending, making them ideal for both detailed work and broad strokes. Whether you are creating abstract art or realistic landscapes, oil pastels can be an effective medium. Understanding these unique characteristics will help you appreciate how to blend them for the best artistic results.
Basic Blending Techniques
Using Fingers for Blending
One of the simplest and most effective methods for blending oil pastels is using your fingers. This technique allows for precise control and smooth transitions between colors. To start, lay down your base colors on your chosen surface. Then, use your fingertip or a clean section of your finger to gently rub the colors together. Start from the edges and work your way inward to create a soft gradient effect.
Paper Towel Method
If you prefer not to use your fingers, you can employ a paper towel to blend oil pastels. Take a soft paper towel and fold it into a small square. Lightly rub the surface of your painting where you want to blend colors together. This technique will provide a more even blending effect without transferring any oils from your skin to the artwork. You can also use cotton swabs or makeup sponges, depending on the size of the area you’re working with.
Utilizing Tools for Blending
Blending Stumps or Tortillons
Blending stumps, also known as tortillons, are specialized tools that can help with blending oil pastels without getting your hands dirty. These cylindrical tools are made from tightly rolled paper and allow for precise blending in tight areas. To use a blending stump, simply rub the tip on the area where you want to blend. The textured surface picks up pigment and smudges it evenly, creating smooth transitions.
Palette Knives for Textured Effects
For more dramatic effects, consider using a palette knife. This tool can create unique textures and patterns when blending oil pastels. Apply the pastels directly onto the surface in your desired pattern, then use the flat edge of the palette knife to scrape, spread, or blend the colors together. This technique is perfect for creating abstract art or adding dimension to landscapes and backgrounds.
Layering Colors for Depth
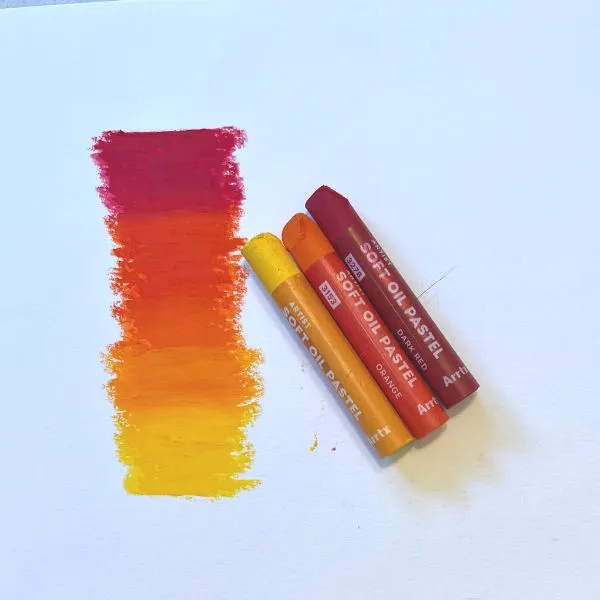
Build Up Colors Gradually
One effective method for blending oil pastels is to layer colors gradually. Start by applying a base layer of lighter colors and slowly build up to darker shades. The initial layers will create a foundation, while subsequent layers provide depth and richness. Each additional layer can be blended using your preferred technique, allowing the colors to mix beautifully, resulting in a more dynamic final piece.
Experiment with Complementary Colors
Another key to successful blending lies in understanding color theory, particularly complementary colors. When you apply complementary colors side by side (for instance, red and green or blue and orange), blending them creates a visually striking effect. Start with one color, then add its complement. Blend them together gradually to create unique shades and tones that make your artwork stand out. This method not only enhances your blending technique but also elevates your overall color palette.
Exploring Different Surfaces
Choosing the Right Paper
The surface you choose to work on can significantly affect how your oil pastels blend. Heavier papers, like watercolor paper, can hold up better to intense blending and layering. Smooth paper will allow for finer blending techniques, while textured paper can add interesting effects. Experiment with various types of paper to discover which one you enjoy working with most and how it influences your blending outcomes.
Trying Canvas or Wood Panels
While paper is a common substrate for oil pastels, don’t hesitate to try other surfaces like canvas or wood panels. These surfaces may require a different approach to blending but can yield impressive results. For example, using oil pastels on a primed canvas can help colors blend beautifully while allowing you to build texture. Similarly, wood panels offer a sturdy base, making them durable for mixed media projects.
Cleaning Techniques and Maintenance
Keeping Your Tools Clean
Maintaining clean tools is crucial for achieving the best blending results with oil pastels. If using fingers, ensure they are clean before starting a new area to prevent unwanted color transfer. For blending stumps or tools, it’s essential to periodically clean them by rubbing them on scrap paper. This action will help remove excess pastel build-up, ensuring smooth blending without muddying your colors.
Properly Storing Oil Pastels
Caring for your oil pastels will prolong their lifespan and maintain their performance. Store them in a cool, dry place and avoid direct sunlight, which can dry out the pastels or cause them to become brittle. Consider using a dedicated container or a portable art case to keep your pastels organized and protected. Proper storage means you’ll always have quality materials ready when inspiration strikes.
Practicing for Mastery
Setting Aside Time for Experimentation
To truly unlock your creativity, set aside dedicated time to experiment with blending oil pastels. Practice different techniques and explore unique color combinations. Consider creating mini studies or practicing specific blending styles, such as creating gradients or abstract compositions. The more you practice, the more confident you’ll become in using oil pastels, allowing your artistic voice to shine through in your creations.
Learning from Others
Finally, don’t hesitate to learn from other artists. Attend workshops, watch tutorial videos, or join online art communities where you can ask questions and showcase your work. Learning tips and techniques from those who have experience with oil pastels can offer fresh insights and inspire new ideas. Engaging with the artistic community will not only hone your skills but also keep you motivated in your creative journey.
Embrace Your Artistic Journey
Blending oil pastels is a skill that can greatly enhance your artwork and unlock new depths of creativity. By understanding the unique qualities of oil pastels and employing various blending techniques, you can create vibrant, expressive pieces that reflect your artistic vision. From basic techniques using your fingers to more advanced methods involving tools and layering, each approach offers unique benefits and opportunities for exploration.
Remember to experiment with different surfaces, keep your tools clean, and practice regularly to elevate your skills. As you continue to develop your blending techniques, you’ll not only improve your technical ability but also grow in confidence as an artist. Embrace your artistic journey, and let the rich, vibrant world of oil pastel blending lead you to new creative heights!